チュートリアル:デスクトップとモバイルデバイスでのプッシュ通知
デスクトップおよびモバイルアプリケーションでローカルおよびリモート通知をトリガーします。リモートサーバーからmacOS/iOSおよびAndroidデバイスの両方にプッシュ通知を送信する方法を学びます。
レベル: 上級
プラットフォーム: macOS, iOS, Android
クラス: PushNotifications::Listener, PushNotifications::Notification, PushNotifications::Channel, PushNotifications::Settings
このプロジェクトには、macOS/iOSではApple Developerアカウント、AndroidではGoogle Firebaseアカウントが必要です。これについてサポートが必要な場合は、Apple DeveloperおよびGoogle Firebaseのウェブサイトの指示に従ってこれらのアカウントを開設してください。
このプロジェクトでは、シミュレータがリモートテストをサポートしていないため、プッシュ通知をテストするために物理デバイスも必要です。これに対応したデバイスを準備してください。
プッシュ通知でサポートされる機能は、プラットフォームとOSバージョンによって異なります。macOSでは、リモート通知には最低10.7、ローカル通知には10.8が必要です。Androidでは、リモート通知には最低API 14(Ice Cream Sandwich)、通知チャンネルには最低27が必要です。チュートリアルの最小SDKバージョンは23ですが、14以上に変更しても構いません。
はじめに
このチュートリアルのデモプロジェクトをこちらからダウンロードしてください:PIP | ZIP。プロジェクトを解凍し、最初のヘッダファイルをProjucerで開いてください。
このプロジェクトのPIPバージョンを使用する場合は、Resourcesフォルダを生成されたProjucerプロジェクトにコピーしてください。
この手順についてサポートが必要な場合は、チュートリアル:Projucer Part 1: Projucerを始めようを参照してください。
デモプロジェクト
このプロジェクトは、ローカルおよびリモート通知の送受信を行うための包括的なユーザーインターフェースを提供します。通知パラメータと識別子を整理するために別々のテーブルが表示されます。モバイルアプリケーションをiOSシミュレータで実行すると、ウィンドウは以下のようになります:
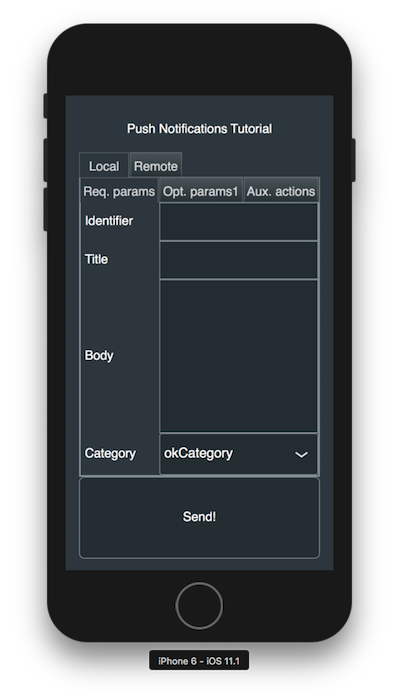
ここで紹介するコードは、JUCE ExamplesのPushNotificationsDemoと大まかに類似しています。
初期設定
このプロジェクトが正しく機能するためには、特定のデプロイメントプラットフォーム用の適切な開発者コンソールでいくつかの初期設定手順を実行する必要があります。まず、Projucerでプッシュ通知の適切な権限を許可しましょう。macOSとiOSでは、Push Notifications capabilityフィールドを有効にしてください。Androidでは、Remote Notificationsフィールドを有効にしてください。
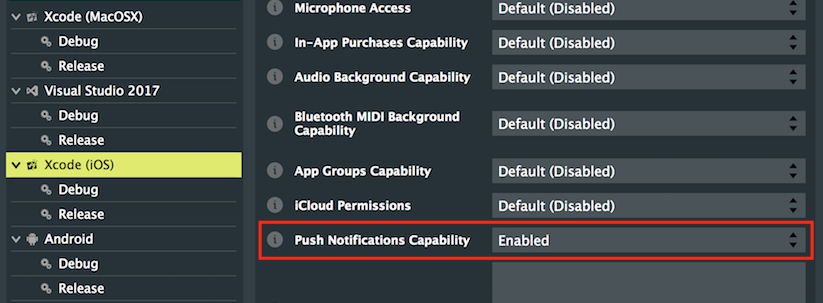
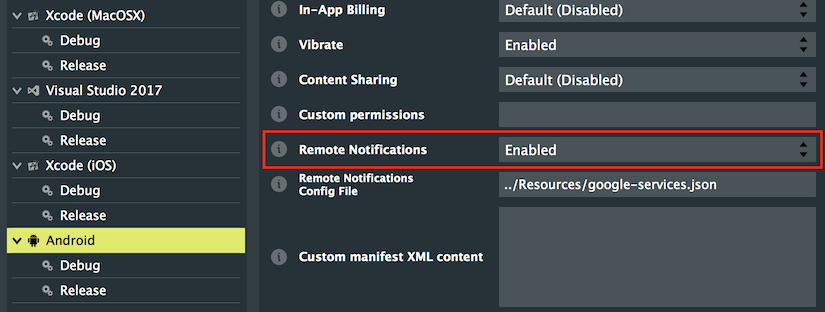
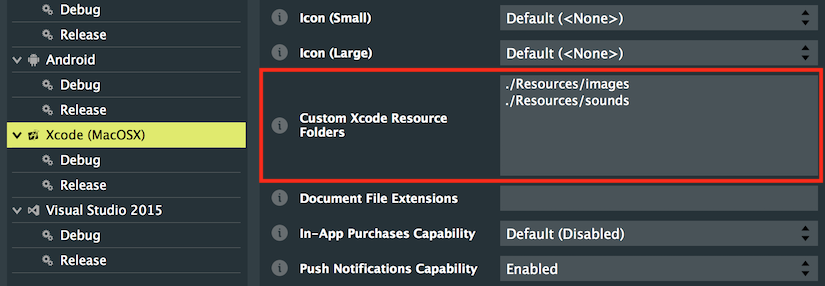
また、リソースが実行可能ファイルにバンドルされるように、macOSとiOSの両方にカスタムXcodeリソースフォルダを指定する必要があります:

最後に、Androidでは、「Debug」と「Release」の両方のエクスポーター設定で、実行可能ファイルに追加したい各リソースを個別にrawリソースとして指定する必要があります:


必要なリソースの完全なリストは以下のとおりです:
../Resources/sounds/demonstrative.mp3
../Resources/sounds/isntit.mp3
../Resources/sounds/jinglebellssms.mp3
../Resources/sounds/served.mp3
../Resources/sounds/solemn.mp3
../Resources/images/ic_stat_name.png
../Resources/images/ic_stat_name2.png
../Resources/images/ic_stat_name3.png
../Resources/images/ic_stat_name4.png
../Resources/images/ic_stat_name5.png
Projucerは、プロジェクトを保存してお気に入りのIDEで開くときに、必要な権限をデプロイメントターゲットに自動的に追加します。
Apple Developer
Androidで開発している場合は、次のセクションGoogle Firebaseの手順にスキップしてください。
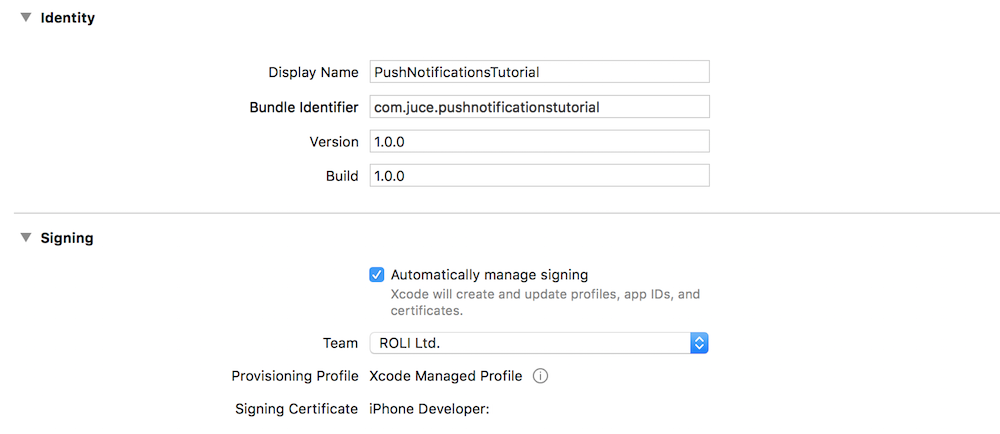
macOSとiOSでは、Xcode内でApple Developerアカウントにサインインし、アプリケーションに署名するために開発チームを選択する必要があります。プロジェクトに一意のバンドルIDを選択してください。Xcodeは、以下のスクリーンショットに示すように、署名証明書とプロビジョニングプロファイルを自動的に提供するはずです:
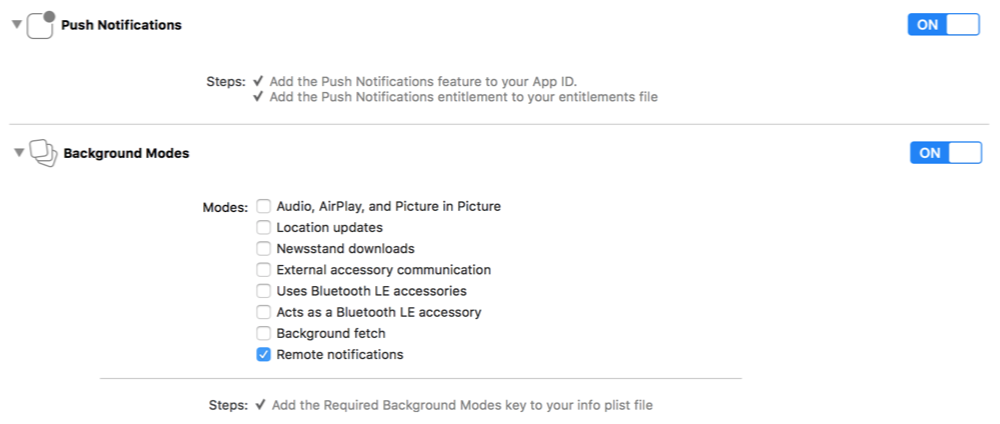
また、Capabilities設定ウィンドウで正しいアプリ機能がチェックされ、承認されていることを確認してください。以下と同じ情報が表示されるはずです(macOSにはBackground Modesセクションがないことに注意):
Pusher
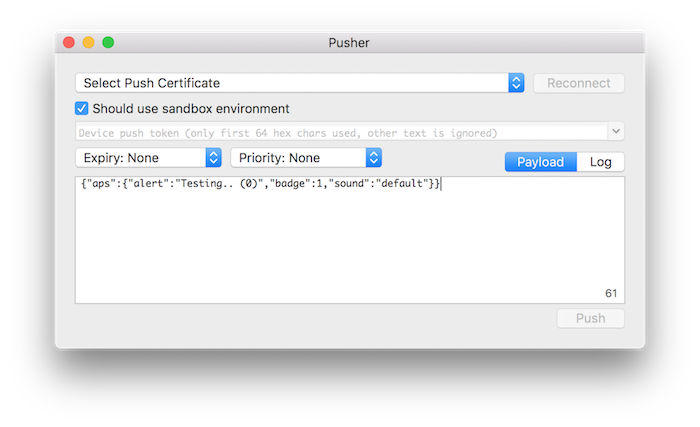
iOSでリモート通知をテストするには、Apple Push Notification Service(APNs)を使用して通知を送信するサーバーまたはアプリケーションが必要です。これらをテストするためにGoogle Firebaseを使用することもできます(Androidの場合と同様に)が、ありがたいことにPusherというアプリを使用したより簡単なソリューションがあります。このチュートリアルの目的にはこのアプリケーションをお勧めしますが、APNsを使用する他の任意のサービスを使用できます。
SSL証明書の生成
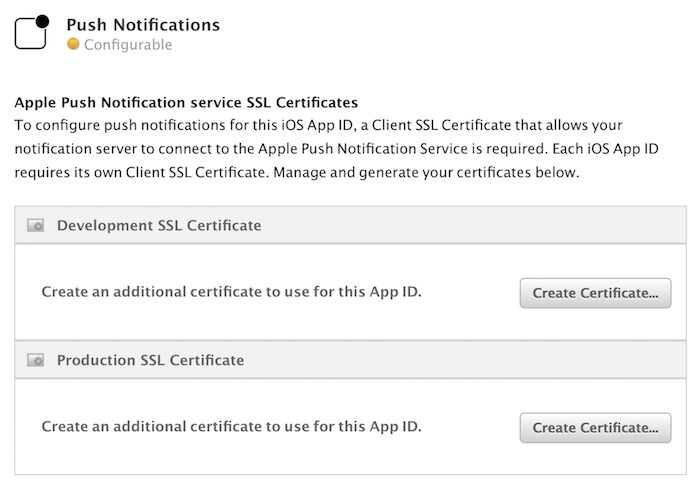
Pusherアプリを使用してプッシュ通知を送信するには、SSL証明書を生成する必要があります。これを行うには、Apple Developerアカウントにログインし、Certificates, IDs & ProfilesページでアプリIDに移動します。リストの下部にあるEditボタンをクリックして、Push Notificationsサービスを設定できるはずです。以下のスクリーンショットに示すように、ウェブサイトの指示に従って証明書を作成してください:
証明書が生成されてダウンロードされたら、ダブルクリックしてキーチェーンに追加します。キーチェーンから自動的にリストされるため、Pusherアプリの証明書ドロップダウンで選択できます。
Google Firebase
macOS/iOSで開発している場合は、前のセクションApple Developerの手順に戻ってください。
このチュートリアルの目的では、Androidでリモート通知をテストするためにGoogle Firebaseを使用します。まず、Firebaseコンソールで新しいプロジェクトを作成し、プロジェクトにAndroidアプリを追加します。プロジェクトに一意のパッケージ名を選択してください。プロジェクト設定のCloud Messagingタブに移動すると、以下の画面でサーバー送信者IDにアクセスできます:
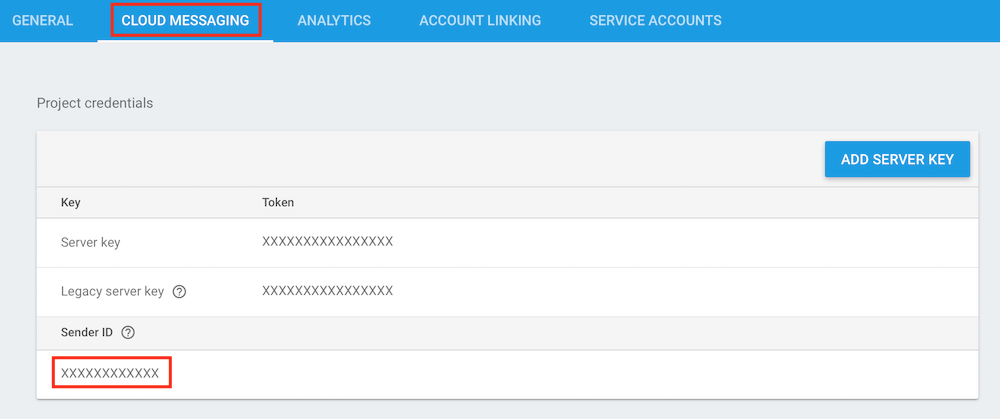
この送信者IDをMainContentComponentコンストラクタの以下のコードスニペットに挿入してください:
#if JUCE_ANDROID
remoteView.sendRemoteMessageButton.onClick = [this] {
    juce::StringPairArray data;
    data.set ("key1", "value1");
    data.set ("key2", "value2");

    static int id = 100;
    juce::PushNotifications::getInstance()->sendUpstreamMessage ("XXXXXXXXXXXX", // ここに送信者IDを挿入
        "com.juce.pushnotificationstutorial",
        juce::String (id++),
        "standardType",
        3600,
        data);
};
Google FirebaseのバンドルIDがプロジェクト設定のもの(すべて小文字)と一致していることを確認してください。
google-services.jsonファイルの生成
Androidでのリモート通知用にFirebase設定ファイルもダウンロードする必要があります。プロジェクト設定のGeneralタブに移動し、以下のスクリーンショットに示すようにgoogle-services.jsonをダウンロードします:
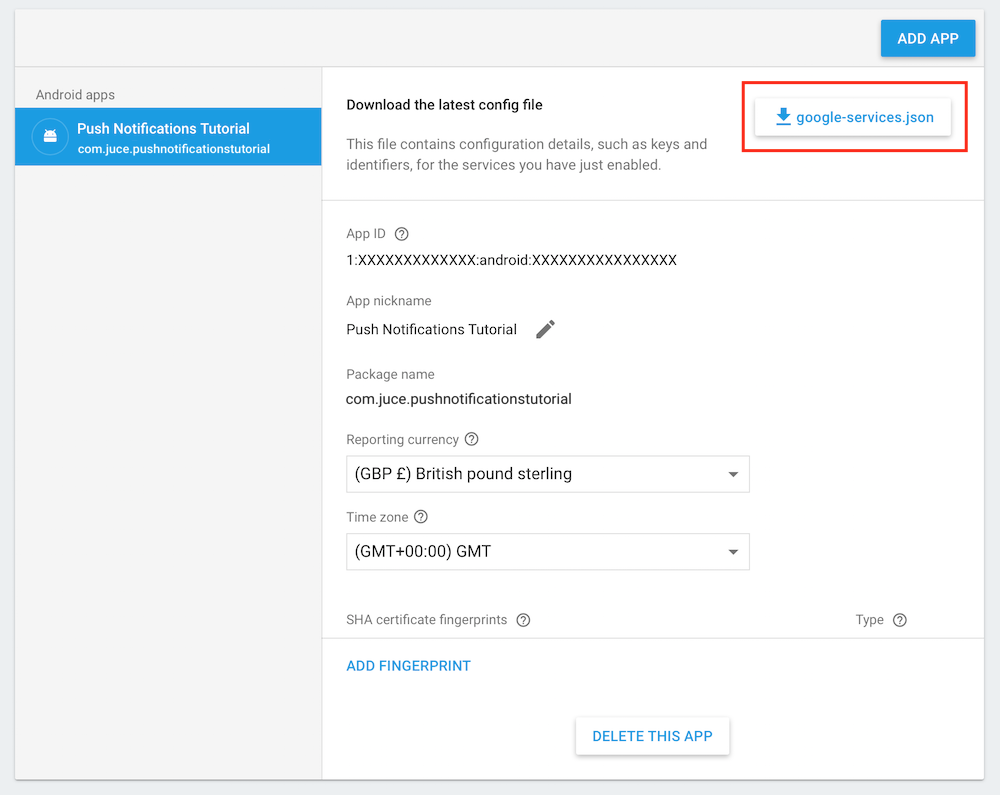
ファイルをJUCEプロジェクトディレクトリにコピーし、Androidエクスポーター設定のRemote Notifications Config Fileフィールドにgoogle-services.jsonファイルへの相対パスを挿入します:
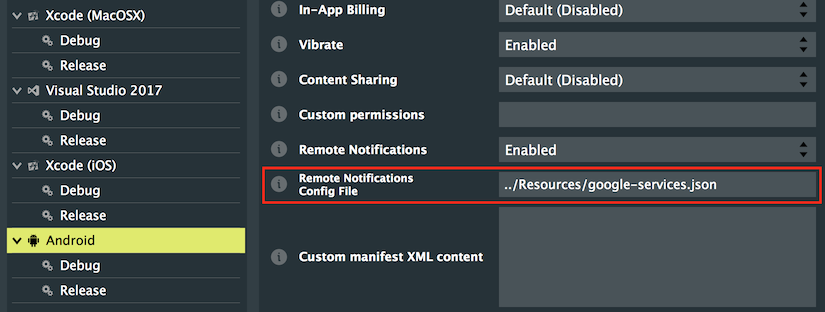
「Debug」と「Release」セクションの下で、google-services.jsonへのパスを各ターゲットに対して個別に指定することもできます。これらはメインのAndroidエクスポーターセクションの設定を上書きします。
プッシュ通知の設定はこれで完了し、ついにこれらの機能をアプリに実装できます。
通知タイプ
通知は、アプリが実行中かどうかに関わらず、関連するコンテンツをユーザーに通知するのに便利です。単にメッセージを表示したり、ダイアログボックスを表示したり、サウンドを再生したりできます。一般的に、すべての関連プラットフォームで2つの主要な通知タイプがあります:
- ローカル:システムによってローカルでトリガーされ、インターネット接続を必要とせず、アプリが非アクティブなときでも発火するようにアプリによってスケジュールできます。
- リモート:リモートサーバーからプッシュされ、インターネット接続を必要としますが、顧客デバイスから受信したデータに基づいていつでも送信できます。
まず、アプリ内から発火できるシンプルなローカル通知を見てみましょう。
リスナーとしての登録
JUCEのPushNotificationsクラスはシングルトンとして実装されており、そのグローバルインスタンスはPushNotifications::getInstance()関数を使用していつでもアクセスできます。PushNotificationsクラスは、アクションの結果がPushNotifications::Listenerインターフェースを使用して伝播される非同期インターフェースを提供します。コールバックを受信するには、PushNotificationsインスタンスにリスナーを登録するだけです。したがって、MainContentComponentクラスで、PushNotifications::Listenerを継承します [1]:
class MainContentComponent : public juce::Component,
                             private juce::ChangeListener,
                             private juce::ComponentListener,
                             private juce::PushNotifications::Listener // [1]
{
MainContentComponentクラスのコンストラクタで、このクラスをPushNotificationsインスタンスのリスナーとして追加します [2]:
juce::PushNotifications::getInstance()->addListener (this); // [2]
また、クラスデストラクタで以下のように登録解除します [3]:
~MainContentComponent() override
{
    juce::PushNotifications::getInstance()->removeListener (this); // [3]
}
権限のリクエスト
どんなタイプの通知を送信する前にも、まずユーザーに許可をリクエストする必要があります。これはアプリが最初に起動されたときに1回だけリクエストされ、設定はアプリが削除されるか、ユーザーがシステム設定で権限を取り消すまで保存されます。したがって、アプリケーションの起動時に毎回権限をリクエストし、権限が付与されていない場合にのみユーザーに付与を求めることが良い習慣です。macOS/iOSでは、PushNotifications::Settingsオブジェクトを引数としてrequestPermissionsWithSettings()関数を呼び出します [4]。Androidでは、PushNotifications::ChannelGroupオブジェクトとPushNotifications::Channelオブジェクトを引数としてsetupChannels()関数を呼び出します [5]。
#if JUCE_IOS || JUCE_MAC
paramControls.fireInComboBox.onChange = [this] { delayNotification(); };
juce::PushNotifications::getInstance()->requestPermissionsWithSettings (getNotificationSettings()); // [4]
#elif JUCE_ANDROID
juce::PushNotifications::ChannelGroup cg { "demoGroup", "demo group" };
juce::PushNotifications::getInstance()->setupChannels ({ { cg } }, getAndroidChannels()); // [5]
#endif
}
setupChannels()はAndroid Oreo(API 26)以降でのみ必要であり、以前のAndroidバージョンでは無視されます。
macOS/iOSでの権限のリクエスト
まず、macOS/iOS側を見てみましょう。
リクエストする必要がある3つの異なるタイプの権限、すなわちアラート、バッジ、サウンドがあります。この初期化を容易にするために、このコードを挿入するgetNotificationSettings()関数を作成しました。PushNotifications::Settingsオブジェクトで、これらの機能を許可するために対応する変数を設定します [6]。macOSにデプロイしている場合は、これだけでリクエストする必要があり、関数から戻ることができます。ただし、iOSでは、以下のように定義されたActionおよびCategoryオブジェクトを定義する必要があります:
- Action:通知にボタンまたはテキスト入力として表示できるアクションを表します。
- Category:通知に一緒に表示されるアクションのセットを表します。
同じ関数で、以下のようにアクションとカテゴリを定義します:
static juce::PushNotifications::Settings getNotificationSettings()
{
    juce::PushNotifications::Settings settings; // [6]
    settings.allowAlert = true;
    settings.allowBadge = true;
    settings.allowSound = true;

#if JUCE_IOS
    using Action = juce::PushNotifications::Settings::Action;
    using Category = juce::PushNotifications::Settings::Category;

    Action okAction;
    okAction.identifier = "okAction";
    okAction.title = "OK!";
    okAction.style = Action::button;
    okAction.triggerInBackground = true;

    Action cancelAction;
    cancelAction.identifier = "cancelAction";
    cancelAction.title = "Cancel";
    cancelAction.style = Action::button;
    cancelAction.triggerInBackground = true;
    cancelAction.destructive = true;

    Action textAction;
    textAction.identifier = "textAction";
    textAction.title = "Enter text";
    textAction.style = Action::text;
    textAction.triggerInBackground = true;
    textAction.destructive = false;
    textAction.textInputButtonText = "Ok";
    textAction.textInputPlaceholder = "Enter text...";

    Category okCategory;
    okCategory.identifier = "okCategory";
    okCategory.actions = { okAction };

    Category okCancelCategory;
    okCancelCategory.identifier = "okCancelCategory";
    okCancelCategory.actions = { okAction, cancelAction };

    Category textCategory;
    textCategory.identifier = "textCategory";
    textCategory.actions = { textAction };
    textCategory.sendDismissAction = true;

    settings.categories = { okCategory, okCancelCategory, textCategory }; // [7]
#endif

    return settings;
}
ここでは、3つの異なるアクションと3つの異なるカテゴリを作成しました:
- OK Action:バックグラウンドでトリガーされる適切な「OK」タイトルを持つボタンとしてアクションスタイルを指定します。
- Cancel Action:バックグラウンドでトリガーされ、破壊的に表示される適切な「Cancel」タイトルを持つボタンとしてアクションスタイルを指定します。
- Text Action:バックグラウンドでトリガーされる適切なプレースホルダーとボタンテキストを持つテキスト入力としてアクションスタイルを指定します。
- OK Category:「OK Action」のみを表します。
- OK/Cancel Category:「OK Action」と「Cancel Action」を表します。
- Text Category:「Text Action」のみを表し、却下アクションが送信されることを指定します。
これらのカテゴリはすべてPushNotifications::Settingsオブジェクトで返されます [7]。
Androidでの権限のリクエスト
次に、Android側を見てみましょう。
定義できるさまざまな重要度のチャンネルがあり、対応する設定があり、これらのチャンネルは通知を視覚的に分離するためにチャンネルグループの一部になることができます。この初期化を容易にするために、このコードを挿入するgetAndroidChannels()関数を作成しました。異なるパラメータを指定するために3つの異なるPushNotifications::Channelオブジェクトを作成します [8]:
static juce::Array<juce::PushNotifications::Channel> getAndroidChannels()
{
    using Channel = juce::PushNotifications::Channel;

    Channel ch1, ch2, ch3;

    ch1.identifier = "1";
    ch1.name = "HighImportance";
    ch1.importance = juce::PushNotifications::Channel::max;
    ch1.lockScreenAppearance = juce::PushNotifications::Notification::showCompletely;
    ch1.description = "High Priority Channel for important stuff";
    ch1.groupId = "demoGroup";
    ch1.ledColour = juce::Colours::red;
    ch1.bypassDoNotDisturb = true;
    ch1.canShowBadge = true;
    ch1.enableLights = true;
    ch1.enableVibration = true;
    ch1.soundToPlay = juce::URL ("demonstrative");
    ch1.vibrationPattern = { 200, 200, 200, 200, 200, 200, 200, 200, 200, 200, 200, 200 };

    ch2.identifier = "2";
    ch2.name = "MediumImportance";
    ch2.importance = juce::PushNotifications::Channel::normal;
    ch2.lockScreenAppearance = juce::PushNotifications::Notification::showPartially;
    ch2.description = "Medium Priority Channel for standard stuff";
    ch2.groupId = "demoGroup";
    ch2.ledColour = juce::Colours::yellow;
    ch2.canShowBadge = true;
    ch2.enableLights = true;
    ch2.enableVibration = true;
    ch2.soundToPlay = juce::URL ("default_os_sound");
    ch2.vibrationPattern = { 1000, 1000 };

    ch3.identifier = "3";
    ch3.name = "LowImportance";
    ch3.importance = juce::PushNotifications::Channel::min;
    ch3.lockScreenAppearance = juce::PushNotifications::Notification::dontShow;
    ch3.description = "Low Priority Channel for silly stuff";
    ch3.groupId = "demoGroup";

    return { ch1, ch2, ch3 };
}
- チャンネル1:通知で最も高い重要度を表します。色を赤に、「おやすみモード」をバイパスに、カスタムバイブレーションパターンをアクティブに、カスタムサウンドファイルを再生するなどのパラメータを指定できます。
- チャンネル2:通知で中程度の重要度を表します。今回は色を黄色に、異なるバイブレーションパターンをアクティブに、異なるカスタムサウンドファイルを再生するように指定します。
- チャンネル3:通知で最も低い重要度を表します。これらにはデフォルトのパラメータのままにすることにしました。
これらのチャンネルはすべて、同じPushNotifications::ChannelGroupに属するPushNotifications::Channelオブジェクトの配列として返されます [9]。
getAndroidChannels()の実装では、チャンネルごとに少なくとも識別子、名前、グループIDを提供することでチャンネルを正しく設定する必要があります。
演習:これらのプラットフォームでの通知権限に慣れるために、自由に実験してこれらの設定を変更してください。
すべてのプラットフォームでの通知の設定が完了しました。
ローカル通知
ユーザーがローカル通知タブの送信ボタンをクリックすると、以下のsendLocalNotification()関数が呼び出されます。この関数はまず、ユーザーインターフェース入力から対応するパラメータを埋めるPushNotifications::Notificationオブジェクトを作成します [1]。パラメータが正しくないために通知オブジェクトが無効な場合、このチュートリアルの目的のためにオプションでメッセージを表示します [2]。そうでなければ、オブジェクトが有効な場合、PushNotificationsインスタンスでsendLocalNotification()関数を呼び出すことができます [3]。
void sendLocalNotification()
{
    juce::PushNotifications::Notification n; // [1]

    fillRequiredParams (n); // [4]
    fillOptionalParamsOne (n);
#if JUCE_ANDROID
    fillOptionalParamsTwo (n);
    fillOptionalParamsThree (n);
#endif

    if (!n.isValid()) // [2]
    {
#if JUCE_IOS
        juce::String requiredFields = "identifier (from iOS 10), title, body and category";
#elif JUCE_ANDROID
        juce::String requiredFields = "channel ID (from Android O), title, body and icon";
#else
        juce::String requiredFields = "all required fields";
#endif

        juce::NativeMessageBox::showMessageBoxAsync (juce::AlertWindow::InfoIcon,
            "Incorrect notifications setup",
            "Please make sure that "
                + requiredFields + " are set.");

        return;
    }

    juce::PushNotifications::getInstance()->sendLocalNotification (n); // [3]
}
今のところ、必須パラメータタブのユーザー入力から以前に定義したPushNotifications::Notificationオブジェクトを引数として渡すfillRequiredParams()関数で埋める必須パラメータに焦点を当てます [4]。
プッシュ通知のオプションパラメータに興味がある場合は、このチュートリアルの最後のセクション通知のカスタマイズを参照してください。そこで詳しく説明します。
void fillRequiredParams (juce::PushNotifications::Notification& n)
{
    n.identifier = paramControls.identifierEditor.getText(); // [5.1]
    n.title = paramControls.titleEditor.getText(); // [5.2]
    n.body = paramControls.bodyEditor.getText(); // [5.3]
#if JUCE_IOS
    n.category = paramControls.categoryComboBox.getText(); // [6.1]
#elif JUCE_ANDROID || JUCE_MAC
    #if JUCE_MAC
    juce::String prefix = "images/";
    juce::String extension = ".png";
    #else
    juce::String prefix;
    juce::String extension;
    #endif
    if (paramControls.iconComboBox.getSelectedItemIndex() == 0) // [7]
        n.icon = prefix + "ic_stat_name" + extension;
    else if (paramControls.iconComboBox.getSelectedItemIndex() == 1)
        n.icon = prefix + "ic_stat_name2" + extension;
    else if (paramControls.iconComboBox.getSelectedItemIndex() == 2)
        n.icon = prefix + "ic_stat_name3" + extension;
    else if (paramControls.iconComboBox.getSelectedItemIndex() == 3)
        n.icon = prefix + "ic_stat_name4" + extension;
    else if (paramControls.iconComboBox.getSelectedItemIndex() == 4)
        n.icon = prefix + "ic_stat_name5" + extension;
#endif

#if JUCE_ANDROID
    // 注:これは厳密には必須パラメータではありませんが、最も速い方法なのでここで行っています!
    n.publicVersion = new juce::PushNotifications::Notification(); // [8]
    n.publicVersion->identifier = "blahblahblah";
    n.publicVersion->title = "Public title!";
    n.publicVersion->body = "Public body!";
    n.publicVersion->icon = n.icon;

    n.channelId = String (paramControls.channelIdComboBox.getSelectedItemIndex() + 1); // [6.2]
#endif
}
すべてのプラットフォームで、通知は必須パラメータタブのユーザー入力から設定する3つの主要なパラメータで定義されます:
- 識別子 [5.1]:内部的に通知を識別するための一意のID。これは通常ユーザーには表示されません。
- タイトル [5.2]:バブルの上部に表示される通知のタイトル。
- 本文 [5.3]:トリミングされた場合に全体を表示するために展開できる通知のコンテンツ。
macOS/iOSでは、表示するアクションを選択するために通知カテゴリを追加で提供します [6.1]。Androidでは、通知の重要度を指定するためにチャンネル番号を指定します [6.2]。
macOSとAndroidでは、通知内に表示するアイコンを提供する必要があり、パスがプラットフォーム固有であることを確認します [7]。最後にAndroidでは、必要に応じてデバイスのロック画面に表示される通知の異なるバージョンをオプションで提供できます [8]。
ローカル通知は実装が比較的簡単なので、次にリモート通知に飛び込みましょう。
リモート通知
このセクションは物理デバイスでのみ動作します。シミュレータでは正しく機能しないため、試みないでください。
macOS/iOSでリモート通知を受信するには、まずテスト通知を送信するためにPusherアプリケーションに挿入するデバイストークンを取得する必要があります。このトークンはいつでも変更される可能性があるため、アプリケーションが起動するたびに新しいトークンを取得することをお勧めします。これは、PushNotificationsインスタンスでgetDeviceToken()関数を呼び出すことでボタンラムダ関数で実行されます [1]:
remoteView.getDeviceTokenButton.onClick = [] {
    juce::String token = juce::PushNotifications::getInstance()->getDeviceToken();

    DBG ("token = " + token);

    if (token.isEmpty())
        showRemoteInstructions();
    else
        juce::NativeMessageBox::showMessageBoxAsync (juce::AlertWindow::InfoIcon, "Device token", token);
};
予想通り、トークンがリフレッシュされるたびに、この変更を通知するためにdeviceTokenRefreshed()というコールバック関数がトリガーされます:
void deviceTokenRefreshed (const juce::String& token) override
{
    juce::NativeMessageBox::showMessageBoxAsync (juce::AlertWindow::InfoIcon,
        "Device token refreshed",
        token);
}
macOS/iOSでのリモート通知
Pusherに移動して、macOS/iOSでアプリにプッシュ通知を送信する方法を見てみましょう。デバッガから新しいデバイストークンをコピーし、Pusherアプリを起動します。適切なDevice push tokenフィールドにトークンを貼り付け、ドロップダウンメニューで正しい証明書が選択されていることを確認します。
下のテキストフィールドで、JSON形式を使用してペイロード辞書としてプッシュ通知を作成できます。シンプルな通知は以下のようになります:
{
  "aps": {
    "alert": "Test Push Notification",
    "badge": 1,
    "sound": "default"
  },
  "juce": "tutorial",
  "foo": "bar"
}
「aps」という最初の要素には、通知に必要な情報が含まれます。上記の例では、トリガーされたときのアラート、バッジカウント、再生するサウンドを記述しています。また、例に示されているように、「aps」要素の後に続くキー/値のペアとしてアプリケーション固有のデータを送信することもできます。
この2番目のペイロード例では、タイトルフィールドに加えて本文とアクションボタンなどの詳細情報を含むようにアラートをカスタマイズします。また、通知がトリガーされたときにカスタムサウンドファイルを再生することも決定します:
{
  "aps": {
    "alert": {
      "title": "Test Push Notification",
      "body": "Hello World!",
      "action-loc-key": "OK"
    },
    "badge": 2,
    "sound": "demonstrative.caf"
  }
}
3番目の例では、PushNotifications::Settingsで定義された通知カテゴリを使用してアクションを簡単に定義します。また、content-availableプロパティを設定することで、OSにバックグラウンドで通知をサイレントに配信するように指示します:
{
  "aps": {
    "category": "okCategory",
    "alert": "Test Push Notification",
    "badge": 3,
    "content-available": 1
  },
  "foobar": ["foo", "bar"]
}
演習:異なるペイロードパラメータを試して、それらがアプリ内でどのように受信されるか確認してください。通知本文に画像を表示できますか?
Androidでのリモート通知
次にAndroid側に切り替えて、Google Firebaseコンソールを使用します。コンソールで、Grow > Notificationsタブに移動し、Compose messageをクリックします。以下のウィンドウで、メッセージの情報を入力し、通知を送信するターゲットを選択できます。
Androidでは、重要なユーザーデータを通信するためにアプリからサーバーにアップストリームメッセージを送信することもできます。これは、StringPairArrayオブジェクトとしてキー/値のペアの辞書を定義し [1]、PushNotificationsインスタンスでsendUpstreamMessage()関数を呼び出すことで実行されます [2]:
remoteView.sendRemoteMessageButton.onClick = [this] {
    juce::StringPairArray data; // [1]
    data.set ("key1", "value1");
    data.set ("key2", "value2");

    static int id = 100;
    juce::PushNotifications::getInstance()->sendUpstreamMessage ("XXXXXXXXXXXX", // ここに送信者IDを挿入
        "com.juce.pushnotificationstutorial",
        String (id++),
        "standardType",
        3600,
        data); // [2]
};
残念ながら、これを行うたびに、以前に設定したサーバー送信者IDを引数として明示的に渡す必要があります。
アップストリームメッセージがサーバーに送信されると、リクエストが成功した場合、以下のupstreamMessageSent()関数でコールバックを期待できます:
void upstreamMessageSent (const juce::String& messageId) override
{
    juce::NativeMessageBox::showMessageBoxAsync (juce::AlertWindow::InfoIcon,
        "Upstream message sent",
        "Message id: " + messageId);
}
ただし、リクエストが失敗した場合、代わりにupstreamMessageSendingError()関数でコールバックを受け取ります:
void upstreamMessageSendingError (const juce::String& messageId, const juce::String& error) override
{
    juce::NativeMessageBox::showMessageBoxAsync (juce::AlertWindow::InfoIcon,
        "Upstream message sending error",
        "Message id: " + messageId
            + "\nerror: " + error);
}
Google Firebaseがあまりにも多くのメッセージを受信すると、保留中のメッセージのキューから削除を開始する場合があります。これが発生すると、remoteNotificationsDeleted()関数を介して通知されます:
void remoteNotificationsDeleted() override
{
    juce::NativeMessageBox::showMessageBoxAsync (juce::AlertWindow::InfoIcon,
        "Remote notifications deleted",
        "Some of the pending messages were removed!");
}
Androidでは、PushNotificationsインスタンスでそれぞれsubscribeToTopic()およびunsubscribeFromTopic()関数を呼び出すことで、特定のトピックの購読および購読解除も行えます。この例では、「sports」トピックの購読および購読解除を選択します:
remoteView.subscribeToSportsButton.onClick = [this] { juce::PushNotifications::getInstance()->subscribeToTopic ("sports"); };
remoteView.unsubscribeFromSportsButton.onClick = [this] { juce::PushNotifications::getInstance()->unsubscribeFromTopic ("sports"); };
受信した通知の処理
ユーザーが通知に対してアクションを起こしたときに呼び出される可能性のあるさまざまなコールバックがあります。正確な動作はプラットフォームとOSバージョンによって異なる場合があるため、詳細な説明についてはPushNotificationsクラスのドキュメントを参照してください。
handleNotification()コールバック関数は、ユーザーが通知を押すたびに呼び出されます。通常、この関数を使用してIDに基づいて通知からの情報を処理しますが、このチュートリアルの目的では、以下のように3つの主要なパラメータを含むメッセージボックスを表示するだけです:
void handleNotification (bool isLocalNotification, const juce::PushNotifications::Notification& n) override
{
    juce::ignoreUnused (isLocalNotification);

    juce::NativeMessageBox::showMessageBoxAsync (juce::AlertWindow::InfoIcon,
        "Received notification",
        "ID: " + n.identifier
            + ", title: " + n.title
            + ", body: " + n.body);
}
handleNotificationAction()コールバック関数は、ユーザーが通知からアクションを実行するたびに呼び出されます(ボタンを押したりテキスト入力を入力したりするなど)。このコールバックには、アクションのタイプに関する追加情報と、例えばテキスト入力の形式でのオプションの応答が含まれます。このシナリオでは、通知識別子をremoveDeliveredNotification()関数に引数として提供し、PushNotificationsインスタンスで呼び出すことで、履歴から通知を手動で削除する必要もあります [9]:
void handleNotificationAction (bool isLocalNotification,
    const juce::PushNotifications::Notification& n,
    const juce::String& actionIdentifier,
    const juce::String& optionalResponse) override
{
    juce::ignoreUnused (isLocalNotification);

    juce::NativeMessageBox::showMessageBoxAsync (juce::AlertWindow::InfoIcon,
        "Received notification action",
        "ID: " + n.identifier
            + ", title: " + n.title
            + ", body: " + n.body
            + ", action: " + actionIdentifier
            + ", optionalResponse: " + optionalResponse);

    juce::PushNotifications::getInstance()->removeDeliveredNotification (n.identifier);
}
名前が示すように、以下のコールバックは、ユーザーが応答する前にローカル通知を却下したときにトリガーされ、以前と同じメッセージボックスを表示します:
void localNotificationDismissedByUser (const juce::PushNotifications::Notification& n) override
{
    juce::NativeMessageBox::showMessageBoxAsync (juce::AlertWindow::InfoIcon,
        "Notification dismissed by a user",
        "ID: " + n.identifier
            + ", title: " + n.title
            + ", body: " + n.body);
}
ユーザーが通知を無視したり、アクションを起こさない場合、通知はデバイスの通知エリアの配信済みリストに残ります。配信済み通知のリストを取得するには、PushNotificationsインスタンスでgetDeliveredNotifications()関数を呼び出すことができます。その後、deliveredNotificationsListReceived()という名前のコールバック関数が呼び出され、以下のようにメッセージボックスにリストを表示することで処理できます:
void deliveredNotificationsListReceived (const juce::Array<juce::PushNotifications::Notification>& notifs) override
{
    juce::String text = "Received notifications: ";

    for (auto& n : notifs)
        text << "(" << n.identifier << ", " << n.title << ", " << n.body << "), ";

    juce::NativeMessageBox::showMessageBoxAsync (juce::AlertWindow::InfoIcon, "Received notification list", text);
}
macOS/iOSでは、アプリケーションは将来の特定の瞬間にトリガーされるローカル通知をスケジュールできます。getPendingLocalNotifications()関数がPushNotificationsインスタンスで呼び出されると、この便利なpendingLocalNotificationsListReceived()というコールバック関数が保留中の通知の配列を受け取ります:
void pendingLocalNotificationsListReceived (const juce::Array<juce::PushNotifications::Notification>& notifs) override
{
    juce::String text = "Pending notifications: ";

    for (auto& n : notifs)
        text << "(" << n.identifier << ", " << n.title << ", " << n.body << "), ";

    juce::NativeMessageBox::showMessageBoxAsync (juce::AlertWindow::InfoIcon, "Pending notification list", text);
}
演習:異なるパラメータを試して、これらをメッセージボックスに表示してください。コールバックメッセージボックスに通知アイコンを表示できますか?
このチュートリアルの核心が示され、PushNotifications::Listenerクラスのすべてのコールバック関数がオーバーライドされましたが、オプションの通知パラメータについてもっと学びたい場合は、読み進めてください!
通知のカスタマイズ
通知には、このチュートリアルでこれまでに発見したものに加えて、設定できる多数のオプションパラメータがあります。このオプションセクションでは、これらのパラメータを詳細にカバーします。
sendLocalNotification()関数で最初に呼び出されるこの関数は、すべてのプラットフォームでサポートされるいくつかのオプションパラメータを埋めます:
void fillOptionalParamsOne (juce::PushNotifications::Notification& n)
{
    n.subtitle = paramControls.subtitleEditor.getText(); // [1.1]
    n.badgeNumber = paramControls.badgeNumberComboBox.getSelectedItemIndex(); // [1.2]

    if (paramControls.soundToPlayComboBox.getSelectedItemIndex() > 0)
        n.soundToPlay = juce::URL (paramControls.soundToPlayComboBox.getItemText (paramControls.soundToPlayComboBox.getSelectedItemIndex())); // [1.3]

    n.properties = juce::JSON::parse (paramControls.propertiesEditor.getText()); // [1.4]
- サブタイトル [1.1]:通知に表示できる追加テキスト。
- バッジ番号 [1.2]:他の配信された通知のバッジ番号と合計される前にバッジアイコンに表示されるカウントを表す数値。
- サウンド [1.3]:通知がトリガーされたときに再生するカスタムサウンド。このフィールドを空のままにすると通知はサイレントになり、「default_os_sound」を使用するとデフォルトのOSサウンドがトリガーされます。
- プロパティ [1.4]:辞書として渡される可能性のある追加プロパティ。
macOSとiOSでは、通知のトリガーを指定された秒数だけ遅延させ、問題の通知を繰り返すかどうかも決定できます。Androidでは、通知のコンテンツに表示する大きな画像を提供し、以下の追加パラメータを指定できます:
- バッジアイコンタイプ [2.1]:バッジアイコンのサイズ、または非表示にするかどうか。
- ティッカーテキスト [2.2]:アクセシビリティに使用される追加テキスト。
- 自動キャンセル [2.3]:クリックしたときに通知をキャンセルするかどうか。
- 一度だけアラート [2.4]:まだ表示されていない場合にのみ通知をサウンドとバイブレーションさせるかどうか。
iOSのように通知にアクションボタンを表示したい場合、AndroidとmacOSでは手動で定義する必要があります。この設定は基本的にPushNotifications::Settingsオブジェクトを使用するiOSのものと似ているため、詳細には触れません。
次のパラメータセットはAndroid専用です。
void fillOptionalParamsTwo (juce::PushNotifications::Notification& n)
{
    using Notification = juce::PushNotifications::Notification;

    Notification::Progress progress;
    progress.max = paramControls.progressMaxComboBox.getSelectedItemIndex() * 10;
    progress.current = paramControls.progressCurrentComboBox.getSelectedItemIndex() * 10;
    progress.indeterminate = paramControls.progressIndeterminateButton.getToggleState();

    n.progress = progress; // [3.1]
    n.person = paramControls.personEditor.getText(); // [3.2]
    n.type = Notification::Type (paramControls.categoryComboBox.getSelectedItemIndex()); // [3.3]
    n.priority = Notification::Priority (paramControls.priorityComboBox.getSelectedItemIndex() - 2); // [3.4]
    n.lockScreenAppearance = Notification::LockScreenAppearance (paramControls.lockScreenVisibilityComboBox.getSelectedItemIndex() - 1); // [3.5]
    n.groupId = paramControls.groupIdEditor.getText(); // [3.6]
    n.groupSortKey = paramControls.sortKeyEditor.getText();
    n.groupSummary = paramControls.groupSummaryButton.getToggleState();
    n.groupAlertBehaviour = Notification::GroupAlertBehaviour (paramControls.groupAlertBehaviourComboBox.getSelectedItemIndex());
}
- プログレス [3.1]:進捗を表示する特定のタイプの通知を表示します。
- 人物 [3.2]:通知を特定の人物に関連付けます。これは例えばメッセージングアプリで役立ちます。
- タイプ [3.3]:OSが外観をより適切に処理するための通知のカテゴリを指定します。
- 優先度 [3.4]:OSが外観をより適切に処理するための通知の優先度を指定します。
- ロック画面の外観 [3.5]:ロック画面に通知を表示するか非表示にするか。
- グループ [3.6]:ソート順序、グループサマリー、グループアラート動作など、通知のグループに関連するパラメータを指定します。
void fillOptionalParamsThree (juce::PushNotifications::Notification& n)
{
    n.accentColour = paramControls.accentColourButton.findColour (juce::TextButton::buttonColourId, false); // [4.1]
    n.ledColour = paramControls.ledColourButton.findColour (juce::TextButton::buttonColourId, false); // [4.2]

    using Notification = juce::PushNotifications::Notification;
    Notification::LedBlinkPattern ledBlinkPattern;
    ledBlinkPattern.msToBeOn = paramControls.ledMsToBeOnComboBox.getSelectedItemIndex() * 200;
    ledBlinkPattern.msToBeOff = paramControls.ledMsToBeOffComboBox.getSelectedItemIndex() * 200;
    n.ledBlinkPattern = ledBlinkPattern; // [4.3]

    juce::Array<int> vibrationPattern;

    if (paramControls.vibratorMsToBeOnComboBox.getSelectedItemIndex() > 0 && paramControls.vibratorMsToBeOffComboBox.getSelectedItemIndex() > 0)
    {
        vibrationPattern.add (paramControls.vibratorMsToBeOffComboBox.getSelectedItemIndex() * 500);
        vibrationPattern.add (paramControls.vibratorMsToBeOnComboBox.getSelectedItemIndex() * 500);
        vibrationPattern.add (2 * paramControls.vibratorMsToBeOffComboBox.getSelectedItemIndex() * 500);
        vibrationPattern.add (2 * paramControls.vibratorMsToBeOnComboBox.getSelectedItemIndex() * 500);
    }

    n.vibrationPattern = vibrationPattern; // [4.4]

    n.localOnly = paramControls.localOnlyButton.getToggleState(); // [4.5]
    n.ongoing = paramControls.ongoingButton.getToggleState(); // [4.6]
    n.timestampVisibility = Notification::TimestampVisibility (paramControls.timestampVisibilityComboBox.getSelectedItemIndex()); // [4.7]

    if (paramControls.timeoutAfterComboBox.getSelectedItemIndex() > 0)
    {
        auto index = paramControls.timeoutAfterComboBox.getSelectedItemIndex();
        n.timeoutAfterMs = index * 1000 + 4000; // [4.8]
    }
}
- アクセントカラー [4.1]:通知のアクセントカラーを変更します。
- LEDカラー [4.2]:デバイス背面の物理LEDの色を変更します。
- LEDブリンクパターン [4.3]:物理LEDの点滅パターンのカスタマイズを可能にします。
- バイブレーションパターン [4.4]:物理デバイスのバイブレーションパターンのカスタマイズを可能にします。
- ローカル [4.5]:通知を他の接続されたユーザーデバイスにブロードキャストするかどうか。
- 進行中 [4.6]:ユーザーが通知を却下できるか、システムのみが手動で却下できるか。
- タイムスタンプ [4.7]:通知にタイムスタンプまたはクロノメーターを表示するかどうか。
- タイムアウト [4.8]:まだキャンセルされていない場合に、通知が自動的にキャンセルされる時間を指定します。
このコードの変更版のソースコードは、デモプロジェクトのPushNotificationsTutorial_02.hファイルにあります。
まとめ
このチュートリアルでは、モバイルとデスクトップでプッシュ通知を処理する方法を学びました。特に:
- さまざまなデプロイメントプラットフォームの予備設定をカバーしました。
- 通知を許可するためにシステムからユーザー権限をリクエストしました。
- アプリ内からローカル通知としてシンプルなメッセージを表示しました。
- リモートサーバーから送信されたプッシュ通知を処理しました。
- 画像を表示しサウンドを再生して通知をカスタマイズしました。