チュートリアル:デスクトップとモバイルデバイスでのアプリ内課金
デスクトップおよびモバイルアプリケーションで消費型および非消費型のアプリ内課金を販売します。macOS/iOSおよびAndroidデバイスの両方でIAP製品の支払いを設定し処理する方法を学びます。
レベル: 上級
プラットフォーム: macOS, iOS, Android
クラス: InAppPurchases::Listener, SoundPlayer, AsyncUpdater, ListBoxModel
このプロジェクトには、macOS/iOSではApple DeveloperアカウントとiTunes Connectアカウント、AndroidではGoogle Play Developerアカウントが必要です。これについてサポートが必要な場合は、Apple Developer、iTunes Connect、およびGoogle Play Developerのウェブサイトの指示に従ってこれらのアカウントを開設してください。
このプロジェクトでは、シミュレータがIAPテストをサポートしていないため、アプリ内課金をテストするために物理デバイスも必要です。これに対応したデバイスを準備してください。
はじめに
このチュートリアルのデモプロジェクトをこちらからダウンロードしてください:PIP | ZIP。プロジェクトを解凍し、最初のヘッダファイルをProjucerで開いてください。
このプロジェクトのPIPバージョンを使用する場合は、Resourcesフォルダを生成されたProjucerプロジェクトにコピーしてください。
この手順についてサポートが必要な場合は、チュートリアル:Projucer Part 1: Projucerを始めようを参照してください。
デモプロジェクト
このプロジェクトは、音声読み上げを使用してフレーズを再生する際に、さまざまな音声的な風味を提供するためにアプリ内課金を通じて取得できるさまざまな音声を提供します。デフォルトでは、ユーザーは一般的なロボットの声にアクセスできますが、必然的にJUCE開発者の声を試したくなるでしょう。モバイルアプリケーションをiOSシミュレータで実行すると、ウィンドウは以下のようになります:
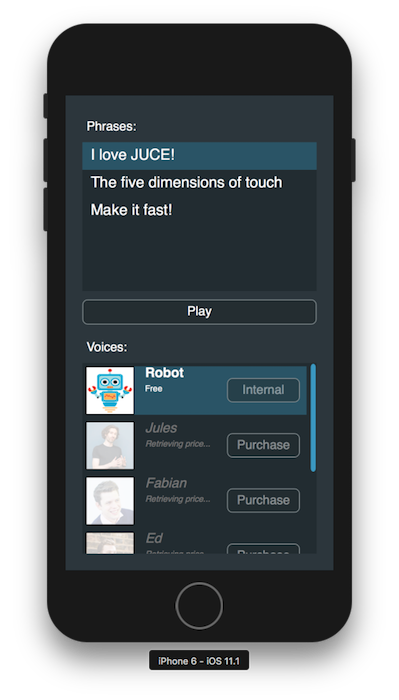
アプリケーションがシミュレータで実行されているため、製品がグレーアウトされ、価格が無期限に取得されるのは予想される動作です。
これはチュートリアルプロジェクトですが、サンドボックスモードでないか、テストユーザーとしてログインしていない場合、アイテムを購入しようとするとクレジットカードに請求されます!
ここで紹介するコードは、JUCE ExamplesのInAppPurchaseと大まかに類似しています。
初期設定
このプロジェクトが正しく機能するためには、特定のデプロイメントプラットフォーム用の適切な開発者コンソールでいくつかの初期設定手順を実行する必要があります。まず、Projucerでアプリ内課金の適切な権限を許可しましょう。macOS/iOSでは、In-App purchases capabilityチェックボックスがオンになっていることを確認してください。Androidでは、In-App Billingチェックボックスがオンになっていることを確認してください。


Projucerは、プロジェクトを保存してお気に入りのIDEで開くときに、必要な権限をデプロイメントターゲットに自動的に追加します。
Apple Developer
Androidで開発している場合は、次のセクションGoogle Play Developerの手順にスキップしてください。
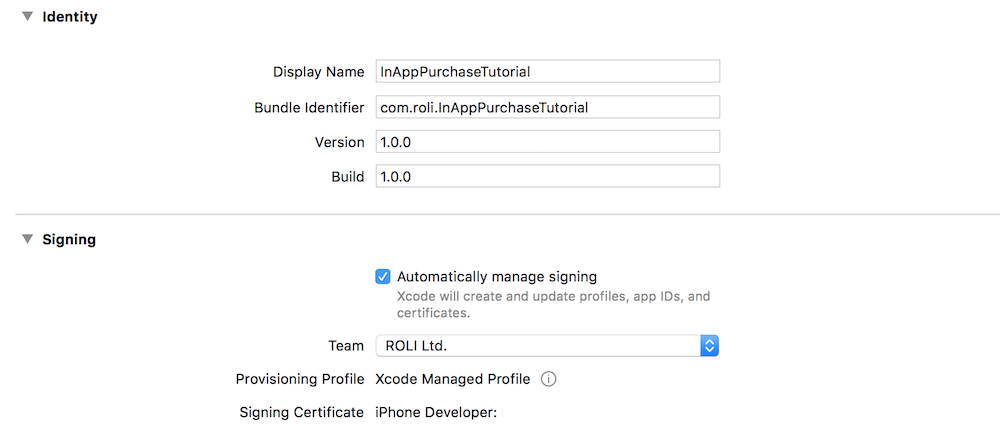
macOSとiOSでは、Xcode内でApple Developerアカウントにサインインし、アプリケーションに署名するために開発チームを選択する必要があります。プロジェクトに一意のバンドルIDを選択してください。Xcodeは、以下のスクリーンショットに示すように、署名証明書とプロビジョニングプロファイルを自動的に提供するはずです:
また、Capabilities設定ウィンドウで正しいアプリ機能がチェックされ、承認されていることを確認してください。以下と同じ情報が表示されるはずです:

iTunes Connect
iOSでアプリ内課金が正しく表示されるようにするには、iTunes ConnectでIAP製品を作成する必要があります。まず、My Appsの下のダッシュボードで新しいアプリを作成します。アプリのFeaturesタブに移動すると、以下の画面でIn-App Purchases機能にアクセスできます:
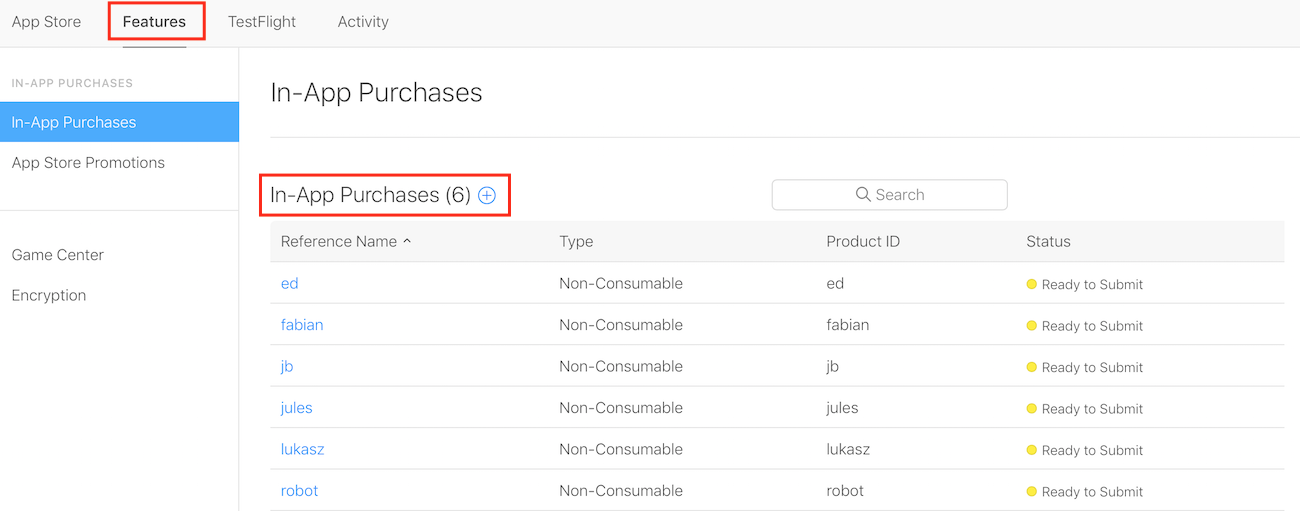
**+**サインをクリックして、アプリのオプションに対応する適切な名前と価格で6つの製品を作成します。
Google Play Developer
macOS/iOSで開発している場合は、前のセクションApple Developerの手順に戻ってください。
Androidでアプリ内課金が正しく表示されるようにするには、Google Play Consoleでアプリ内課金製品を作成する必要があります。まず、All applicationsパネルからアプリページに移動し、Store presenceの下のIn-app Productsページを開きます。以下の画面に示すように、Managed productsタブの下のアイテムにアクセスできます:
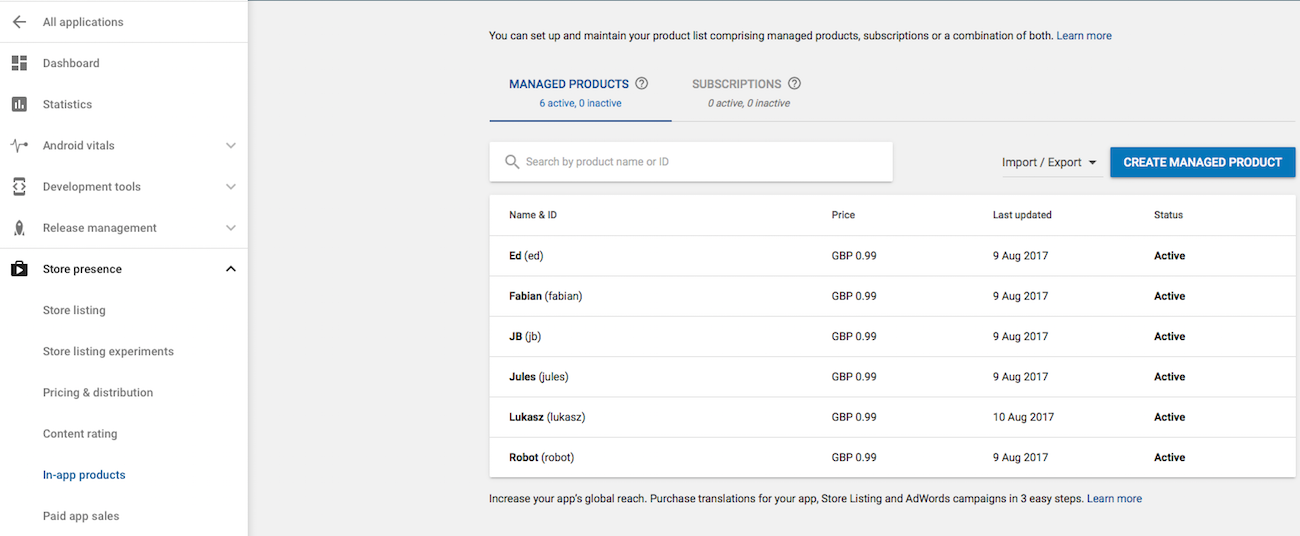
Create managed productをクリックして、アプリのオプションに対応する適切な名前と価格で6つの製品を作成します。
Google Playの製品IDに関する制限により、製品IDには数字(0-9)、小文字(a-z)、アンダースコア(_)、またはピリオド(.)のみを使用することをお勧めします。これにより、AppStoreとPlayStoreの両方で同じ製品IDを使用できます。そうでない場合、アプリは同じ製品に対して異なる製品IDを処理する必要があります。
Android APKの生成
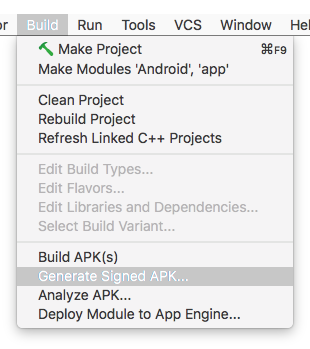
Androidでアプリ内課金が正しく機能するためには、アプリのAndroidバージョンに署名し、Google Play Store APIへのリクエストを認証する必要があります。まずAndroid Studioを起動し、**Build > Generate Signed APK...**のメニューバーに移動します:
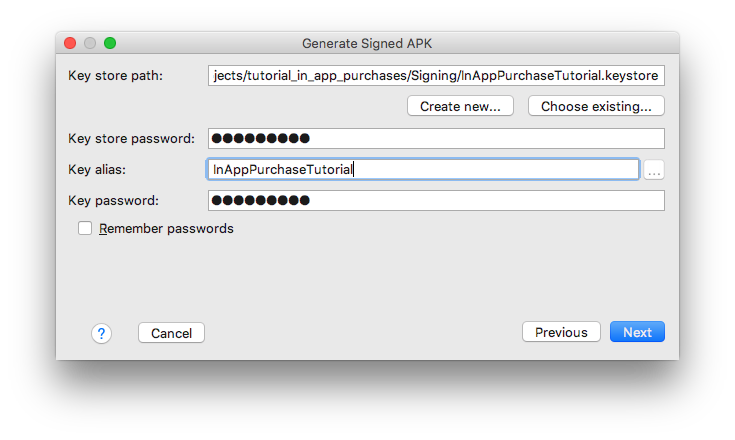
次に、以下のようにキーストアファイルの場所、エイリアス、パスワードを入力するよう促されます:
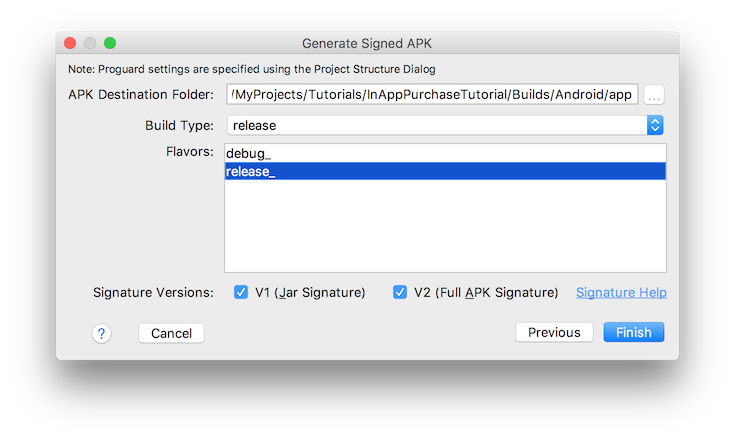
次に、リリースビルドタイプ、「release_」フレーバーを選択し、V1とV2の両方の署名がチェックされていることを確認します。
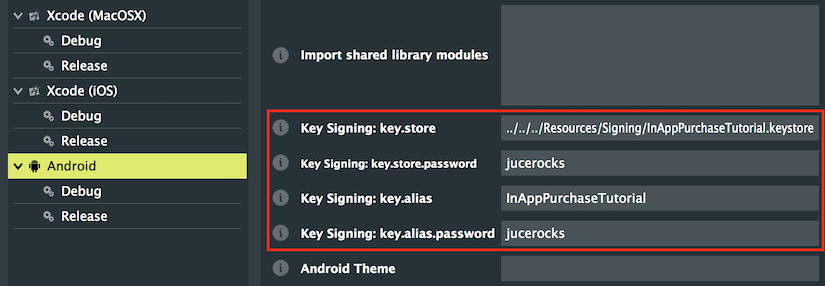
これにより、Projucerで参照できるキーストアファイルが生成されます。Androidリリース設定の下で、Key Signingフィールドにキーストアファイルへの相対パス、エイリアス、パスワードを入力します:
アプリ内課金の設定はこれで完了し、ついにこれらの機能をアプリに実装できます。
購入タイプ
アプリ内課金は、アプリ内で直接追加のコンテンツや機能を顧客に提供するのに便利です。プレミアム機能、独占アイテム、さらにはサブスクリプションも可能です。一般的に、すべての関連プラットフォームで4つの主要な購入タイプがあります:
- 消費型:使用でき、複数回購入できるカウント可能なアイテム。
- 非消費型:アプリの機能を永続的にロック解除する1回限りの購入。
- 自動更新サブスクリプション:キャンセルするまで定期的に更新されるコンテンツ。
- 非更新サブスクリプション:手動で更新する必要がある期間限定のコンテンツ。
このチュートリアルでは、非消費型のアプリ内課金を実装します。
プロジェクト構造
プロジェクトは、アプリケーションのさまざまな部分を処理するために以下のクラスを使用して構造化されています:
- MainContentComponent:画面上にGUIコンポーネントをレイアウトし、再生/停止ボタンのクリックでサウンドファイルの再生を処理します。
- PhraseModel:購入した音声を使用して再生可能なフレーズを記述するListBoxModel。
- VoiceModel:フレーズを再生するために購入できる利用可能な音声を記述するListBoxModel。
- VoiceRow:特定の音声エントリの画像と情報を表示するVoiceModelクラスのカスタム行Component。
- VoicePurchases:購入を処理し、InAppPurchasesインスタンスをカプセル化するVoiceProduct購入を管理するクラス。
- VoiceProduct:価格、名前、以前に購入したかどうかなどの情報を含む単一の購入可能な製品を記述する構造体。
ご覧のように、アプリケーション機能を別々のクラスに分離するために、おおまかにMVCデザインパターンに従っています。
VoiceProduct構造体には、非消費型製品に役立つ情報、すなわち以下の変数が含まれています:
- const char* identifier:iTunes ConnectとGoogle Playで参照される一意の識別子。
- const char* humanReadable:アプリに表示する識別子の人間が読める形式のバージョン。
- bool isPurchased:ログインしているユーザーが以前にアイテムを購入したかどうか。
- bool priceIsKnown:価格が読み込まれて表示用に取得されたかどうか。
- bool purchaseInProgress:ユーザーが現在進行中の購入を開始したかどうか。
- String purchasePrice:現地通貨で製品価格を表示するローカライズされた文字列。
演習:消費型購入にはどのような情報が必要でしょうか?サブスクリプションはどうでしょうか?何を追加または削除すべきか考えてみてください。
製品の表示
ユーザーインターフェースで販売したいIAP製品を表示することから始めましょう。VoicePurchasesクラスのVoicePurchasesコンストラクタで、上記の構造を使用してVoiceProductオブジェクトを以下のように初期化しています:
VoicePurchases()
{
    voiceProducts = juce::Array<VoiceProduct> (
        { VoiceProduct { "robot", "Robot", true, true, false, "Free" },
            VoiceProduct { "jules", "Jules", false, false, false, "Retrieving price..." },
            VoiceProduct { "fabian", "Fabian", false, false, false, "Retrieving price..." },
            VoiceProduct { "ed", "Ed", false, false, false, "Retrieving price..." },
            VoiceProduct { "lukasz", "Lukasz", false, false, false, "Retrieving price..." },
            VoiceProduct { "jb", "JB", false, false, false, "Retrieving price..." } });
}
これらの製品IDは、正しく動作するためにiTunes ConnectとGoogle Play Consoleの値と正確に一致する必要があります。
すべての製品の人間が読めるバージョンを簡単に取得するために、すべての大文字の名前のStringArrayを返すヘルパー関数を実装しました:
juce::StringArray getVoiceNames() const
{
    juce::StringArray names;

    for (auto& voiceProduct : voiceProducts)
        names.add (voiceProduct.humanReadable);

    return names;
}
識別子を渡されたときにVoiceProductのインデックスを取得するために、同じクラスにfindVoiceIndexFromIdentifier()という別のヘルパー関数を作成しましょう。このプライベート関数は、後でInAppPurchasesオブジェクトからのコールバックを処理する際に役立ちます:
int findVoiceIndexFromIdentifier (juce::String identifier) const
{
    identifier = identifier.toLowerCase();

    for (auto i = 0; i < voiceProducts.size(); ++i)
        if (juce::String (voiceProducts.getReference (i).identifier) == identifier)
            return i;

    return -1;
}
InAppPurchasesクラスはブロードキャスターとして機能するため、InAppPurchases::Listenerを継承してこのクラスのリスナーになり、IAPサーバーからコールバックを受け取りましょう [1]:
class VoicePurchases : private juce::InAppPurchases::Listener // [1]
{
public:
VoicePurchasesクラスでInAppPurchasesコールバック関数のオーバーライドを開始できます。まず、productsInfoReturned()関数を実装します。この関数は、InAppPurchases::getProductsInformation()を呼び出した後に製品情報を返すために呼び出されます。
void productsInfoReturned (const juce::Array<juce::InAppPurchases::Product>& products) override
{
    if (!juce::InAppPurchases::getInstance()->isInAppPurchasesSupported()) // [2]
    {
        for (auto idx = 1; idx < voiceProducts.size(); ++idx) // [3]
        {
            auto& voiceProduct = voiceProducts.getReference (idx);

            voiceProduct.isPurchased = false;
            voiceProduct.priceIsKnown = false;
            voiceProduct.purchasePrice = "In-App purchases unavailable";
        }

        juce::AlertWindow::showMessageBoxAsync (juce::AlertWindow::WarningIcon, // [4]
            "In-app purchase is unavailable!",
            "In-App purchases are not available. This either means you are trying "
            "to use IAP on a platform that does not support IAP or you haven't setup "
            "your app correctly to work with IAP.",
            "OK");
    }
    else
    {
        for (auto product : products)
        {
            auto idx = findVoiceIndexFromIdentifier (product.identifier); // [5]

            if (juce::isPositiveAndBelow (idx, voiceProducts.size())) // [6]
            {
                auto& voiceProduct = voiceProducts.getReference (idx);

                voiceProduct.priceIsKnown = true;
                voiceProduct.purchasePrice = product.price;
            }
        }

        juce::AlertWindow::showMessageBoxAsync (juce::AlertWindow::WarningIcon, // [7]
            "Your credit card will be charged!",
            "You are running the sample code for JUCE In-App purchases. "
            "Although this is only sample code, it will still CHARGE YOUR CREDIT CARD!",
            "Understood!");
    }

    guiUpdater.triggerAsyncUpdate();
}
- [2]:まず、アプリ内課金がプラットフォームでサポートされているか、設定が正しく行われているかを確認します。
- [3]:最初の無料製品を除くすべてのVoiceProductオブジェクトに対して、製品が利用不可であることを反映するように変数を設定します。
- [4]:オプションで、ユーザーに問題を説明するメッセージボックスを非同期で表示します。
- [5]:アプリ内課金が利用可能な場合、すべてのVoiceProductオブジェクトに対して、以前に実装したヘルパー関数を使用して識別子からインデックスを取得します。
- [6]:インデックスが有効な場合、製品の利用可能性を反映するように製品変数を設定します。
- [7]:オプションで、ユーザーに課金されることを説明するメッセージボックスを非同期で表示します。
購入の取得
このセクションは物理デバイスでのみ動作します。シミュレータでは正しく機能しないため、試みないでください。
アプリ内課金を扱う際、アプリケーションが最初に確認すべきことは、ユーザーがサインインしたときの過去の購入です。顧客として最もイライラすることの1つは、別のデバイスや同じアプリの以前のバージョンで行った以前の購入を失うことです。したがって、アプリの起動時にできるだけ早くユーザーに製品ページの更新されたビューを提供するようにしましょう。
まず、アプリの一時的な状態を格納するためにVoicePurchasesクラスに追加のプライベート変数を作成します [1]:
bool havePurchasesBeenRestored = false, havePricesBeenFetched = false, purchaseInProgress = false; // [1]
juce::Array<VoiceProduct> voiceProducts;

JUCE_DECLARE_NON_COPYABLE_WITH_LEAK_DETECTOR (VoicePurchases)
};
インデックスからVoiceProductを取得するためのgetPurchase()という新しいヘルパー関数も必要です。この関数では、この関数が最初に呼び出されたときの初期化コードも挿入します:
VoiceProduct getPurchase (int voiceIndex)
{
    if (!havePurchasesBeenRestored)
    {
        havePurchasesBeenRestored = true; // [2]
        juce::InAppPurchases::getInstance()->addListener (this); // [3]

        juce::InAppPurchases::getInstance()->restoreProductsBoughtList (true); // [4]
    }

    return voiceProducts[voiceIndex]; // [5]
}
- [2]:この関数が初めて呼び出された場合、このコードセグメントが再度呼び出されないようにします。
- [3]:このクラスをInAppPurchasesインスタンスのリスナーとして追加し、コールバックを受信します。
- [4]:次に、
restoreProductsBoughtList()関数を呼び出して復元プロセスをトリガーし、その後のコールバックを待ちます。 - [5]:最後に、指定されたインデックスのVoiceProductを返します。これは、この関数の通常の動作として毎回呼び出されます。
VoicePurchasesクラスは、上記の関数が最初に呼び出されたときにリスナーとして登録されるため、このクラスが破棄されるときに登録解除する必要があります。クラスデストラクタでInAppPurchasesリスナーとしてクラスを削除します:
~VoicePurchases() override
{
    juce::InAppPurchases::getInstance()->removeListener (this);
}
以前に定義したgetPurchase()関数では、購入を復元するコールバックをトリガーするためにrestoreProductsBoughtList()関数を呼び出しました。では、purchasesListRestored()というコールバック関数を実装しましょう:
void purchasesListRestored (const juce::Array<PurchaseInfo>& infos, bool success, const juce::String&) override
{
    if (success)
    {
        for (auto& info : infos)
        {
            for (const auto& productId : info.purchase.productIds)
            {
                auto idx = findVoiceIndexFromIdentifier (productId); // [6]

                if (juce::isPositiveAndBelow (idx, voiceProducts.size()))
                {
                    auto& voiceProduct = voiceProducts.getReference (idx); // [7]

                    voiceProduct.isPurchased = true;
                }
            }
        }

        guiUpdater.triggerAsyncUpdate();
    }

    if (!havePricesBeenFetched)
    {
        havePricesBeenFetched = true; // [8]
        juce::StringArray identifiers;

        for (auto& voiceProduct : voiceProducts)
            identifiers.add (voiceProduct.identifier);

        juce::InAppPurchases::getInstance()->getProductsInformation (identifiers); // [9]
    }
}
- [6]:サーバーからの応答が成功した場合、購入リストを更新できます。ヘルパー関数を使用して、識別子から音声のインデックスを見つけます。
- [7]:インデックスが有効な場合、VoiceProductオブジェクトの適切な変数を設定して購入状態を反映します。
- [8]:このコールバック関数が最初に呼び出されたとき、購入価格を初期化する必要があります。このコードセグメントが2回目に呼び出されないようにします。
- [9]:
getProductsInformation()関数を呼び出して、InAppPurchasesインスタンスで製品価格を取得するリクエストを開始します。
これらのアプリ内課金製品のGUIを更新するために、購入状態を格納する一時変数があると便利です。VoiceModelクラスのVoiceRowサブクラスにこれらをプライベートメンバー変数として宣言しましょう:
bool isSelected = false, hasBeenPurchased = false, purchaseInProgress = false;
int rowSelected = -1;
juce::Image avatar;
現時点では、すべてのアプリ内課金製品は視覚的に同じように見え、その利用可能性を視覚的にはっきりと示していません。購入可能な製品に異なるルック・アンド・フィールを適用しましょう。paint()関数で、利用可能な場合は製品画像に白い背景を適用し [10]、利用不可の場合は白い半透明のオーバーレイを適用するようにコードを変更します [11]:
void paint (juce::Graphics& g) override
{
    auto r = getLocalBounds().reduced (4);
    {
        auto voiceIconBounds = r.removeFromLeft (r.getHeight());
        g.setColour (juce::Colours::black);
        g.drawRect (voiceIconBounds);

        voiceIconBounds.reduce (1, 1);
        g.setColour (hasBeenPurchased ? juce::Colours::white : juce::Colours::grey); // [10]
        g.fillRect (voiceIconBounds);

        g.drawImage (avatar, voiceIconBounds.toFloat());

        if (!hasBeenPurchased)
        {
            g.setColour (juce::Colours::white.withAlpha (0.8f)); // [11]
            g.fillRect (voiceIconBounds);
また、update()関数のコードを変更して、名前と価格のラベルに購入状態を反映します。以前に定義したヘルパー関数を使用して、まず行インデックスからVoiceProductを取得し [12]、アイテムが購入されたかどうかを示す一時変数を設定します [13]。次に、GUIを以下のように更新します:
void update (int rowNumber, bool rowIsSelected)
{
    isSelected = rowIsSelected;
    rowSelected = rowNumber;

    if (juce::isPositiveAndBelow (rowNumber, voices.size()))
    {
        auto imageResourceName = voices[rowNumber] + ".png";

        nameLabel.setText (voices[rowNumber], juce::NotificationType::dontSendNotification);

        auto purchase = purchases.getPurchase (rowNumber); // [12]
        hasBeenPurchased = purchase.isPurchased; // [13]
if (rowNumber == 0)
{
    purchaseButton.setButtonText ("Internal");
    purchaseButton.setEnabled (false);
}
else
{
    purchaseButton.setButtonText (hasBeenPurchased ? "Purchased" : "Purchase");
    purchaseButton.setEnabled (!hasBeenPurchased && purchase.priceIsKnown);
}

setInterceptsMouseClicks (!hasBeenPurchased, !hasBeenPurchased); // [14]
このコードでは、主にアイテムが購入されたときにデフォルトのままにし、色を白に変更するように、名前と価格のラベルのフォントスタイルを更新しています。さらに、対応する製品が購入可能な場合は購入ボタンを有効にします。また、顧客への課金エラーを避けるために、購入後にこれらのボタンのマウスクリックを無効にする必要があります [14]。
製品の購入
このセクションは物理デバイスでのみ動作します。シミュレータでは正しく機能しないため、試みないでください。
アプリに購入動作をまだ実装していないので、それを行いましょう。VoicePurchasesクラスにpurchaseVoice()パブリック関数を実装し、InAppPurchasesインスタンスにリクエストを転送します:
void purchaseVoice (int voiceIndex)
{
    if (havePricesBeenFetched && juce::isPositiveAndBelow (voiceIndex, voiceProducts.size()))
    {
        auto& product = voiceProducts.getReference (voiceIndex); // [1]

        if (!product.isPurchased)
        {
            purchaseInProgress = true;

            product.purchaseInProgress = true; // [2]
            juce::InAppPurchases::getInstance()->purchaseProduct (product.identifier); // [3]
- [1]:まず、インデックスを使用してVoiceProductを取得する前に、価格が取得されたかどうかを確認します。
- [2]:製品が以前に購入されていない場合、適切な変数を設定して購入状態に入ります。
- [3]:これで、正しい識別子を指定してInAppPurchasesインスタンスに製品の購入をリクエストできます。
これにより、購入が終了し応答が受信されたときにサーバーからコールバックがトリガーされます。このproductPurchaseFinished()コールバックをここで実装します:
void productPurchaseFinished (const PurchaseInfo& info, bool success, const juce::String&) override
{
    purchaseInProgress = false;

    for (const auto& productId : info.purchase.productIds)
    {
        auto idx = findVoiceIndexFromIdentifier (productId); // [4]

        if (juce::isPositiveAndBelow (idx, voiceProducts.size()))
        {
            auto& voiceProduct = voiceProducts.getReference (idx); // [5]

            voiceProduct.isPurchased = success;
            voiceProduct.purchaseInProgress = false;
        }
        else
        {
            // On failure Play Store will not tell us which purchase failed
            for (auto& voiceProduct : voiceProducts)
                voiceProduct.purchaseInProgress = false;
        }
    }

    guiUpdater.triggerAsyncUpdate();
}
以前と同じヘルパー関数を使用して、識別子からVoiceProductインデックスを取得し [4]、購入が成功したかどうかに応じて問題のオブジェクトに適切な変数を設定し、購入状態を終了します [5]。
サーバーからの応答を待っている間にユーザーに購入状態を示すために、VoiceModelクラスのpaint()関数でスピニングアニメーションを表示します [6]:
if (!hasBeenPurchased)
{
    g.setColour (juce::Colours::white.withAlpha (0.8f)); // [11]
    g.fillRect (voiceIconBounds);

    if (purchaseInProgress) // [6]
        getLookAndFeel().drawSpinningWaitAnimation (g, juce::Colours::darkgrey, voiceIconBounds.getX(), voiceIconBounds.getY(), voiceIconBounds.getWidth(), voiceIconBounds.getHeight());
}
}
}
ユーザーがUIと対話したときに購入プロセスを開始するためのclickPurchase()関数を実装しましょう:
void clickPurchase()
{
    if (rowSelected >= 0)
    {
        if (!hasBeenPurchased)
        {
            purchases.purchaseVoice (rowSelected); // [7]
            purchaseInProgress = true;
            startTimer (1000 / 50); // [8]
        }
    }
}

void timerCallback() override { repaint(); } // [9]
- [7]:行インデックスが有効で、アイテムが以前に購入されていない場合、
purchaseVoice()関数を呼び出して購入状態に入ります。 - [8]:購入が進行中の間、スピニングホイールアニメーションを更新するためにタイマーを開始します。
- [9]:アニメーション用に画面を再描画するためにタイマーコールバックを実装します。
最後にupdate()関数で、行固有の製品の購入状態を取得し [10]、購入が完了した場合はstopTimer()関数を呼び出してスピニングアニメーションを停止します [11]:
purchaseInProgress = purchase.purchaseInProgress; // [10]

if (purchaseInProgress)
    startTimer (1000 / 50);
else
    stopTimer(); // [11]
製品購入と製品情報の取得を処理するメカニズムは、このチュートリアルのこの時点ですべて実装されましたが、GUIにいつ更新するかを伝える必要があります。
非同期更新の処理
購入とIAPサーバーとの同期は別のスレッドで行われるため、応答を非同期的に処理する必要があります。MainContentComponentクラスで、AsyncUpdaterクラスを継承し [1]、このクラスの参照をVoicePurchasesインスタンスに渡します [2]:
class MainContentComponent : public juce::Component,
                             private juce::AsyncUpdater // [1]
{
juce::SoundPlayer player;
VoicePurchases purchases { *this }; // [2]
juce::AudioDeviceManager dm;
VoicePurchasesコンストラクタとメンバー初期化リストで、AsyncUpdaterインスタンスへの参照をプライベート変数に割り当てます [3]:
VoicePurchases (juce::AsyncUpdater& asyncUpdater) // [3]
    : guiUpdater (asyncUpdater)
{
後でAsyncUpdaterを参照できるように、その変数をプライベートメンバーとして宣言します [4]:
//==============================================================================
juce::AsyncUpdater& guiUpdater; // [4]
purchaseVoice()関数とInAppPurchasesインスタンスのすべてのコールバック関数、すなわちproductsInfoReturned()、purchasesListRestored()、productPurchaseFinished()で、対応するコードセグメントの最後のステップとしてGUIへの非同期更新をトリガーします [5]:
void purchaseVoice (int voiceIndex)
{
    if (havePricesBeenFetched && juce::isPositiveAndBelow (voiceIndex, voiceProducts.size()))
    {
        //...

        if (!product.isPurchased)
        {
            //...

            guiUpdater.triggerAsyncUpdate(); // [5.1]
        }
    }
}

//...

void productsInfoReturned (const juce::Array<InAppPurchases::Product>& products) override
{
    //...

    guiUpdater.triggerAsyncUpdate(); // [5.2]
}

//...

void productPurchaseFinished (const PurchaseInfo& info, bool success, const juce::String&) override
{
    //...

    guiUpdater.triggerAsyncUpdate(); // [5.3]
}

//...

void purchasesListRestored (const juce::Array<PurchaseInfo>& infos, bool success, const juce::String&) override
{
    if (success)
    {
        //...

        guiUpdater.triggerAsyncUpdate(); // [5.4]
    }

    //...
}
VoicePurchasesクラスでAsyncUpdaterインスタンスでtriggerAsyncUpdate()関数が呼び出されるたびに、handleAsyncUpdate()関数でコールバックを処理して、古くなったGUIコンポーネントを更新できます [6]:
void handleAsyncUpdate() override
{
    voiceListBox.updateContent();
    voiceListBox.setEnabled (!purchases.isPurchaseInProgress());
    voiceListBox.repaint();
}
VoicePurchasesクラスにパブリックヘルパー関数として以下のゲッターを追加します:
bool isPurchaseInProgress() const noexcept { return purchaseInProgress; }
これにより、購入が行われたり取得されたりするたびにGUIが更新されます。アプリを再度起動すると、以前に行われたアプリ内課金が表示されるはずです。
演習:ユーザーが特定の音声でフレーズを再生するたびにトークンを消費することで、これらのIAP製品の消費型バージョンを実装してください。
サウンドの再生
ユーザーが再生ボタンをクリックすると、正しい音声とフレーズを使用して正しいオーディオファイルを再生する必要があります。オーディオファイルは、音声の名前とフレーズ番号に関連するインデックスを命名規則として使用して、バイナリリソースとして格納されています。MainContentComponentクラスで、動作を以下のように処理します:
void playStopPhrase()
{
    juce::MemoryOutputStream resourceName;

    auto idx = voiceListBox.getSelectedRow(); // [1]
    if (juce::isPositiveAndBelow (idx, soundNames.size()))
    {
        resourceName << soundNames[idx] << phraseListBox.getSelectedRow() << ".ogg"; // [2]

        auto dir = juce::File::getCurrentWorkingDirectory();

        int numTries = 0;

        while (!dir.getChildFile ("Resources").exists() && numTries++ < 15)
            dir = dir.getParentDirectory();

        auto file = dir.getChildFile ("Resources").getChildFile ("Sounds").getChildFile (resourceName.toString().toRawUTF8());

        if (file.exists())
            player.play (file); // [3]
    }
}
- [1]:まず、音声テーブルで選択された行のインデックスを取得し、オーディオファイルの配列に対してインデックスが有効かどうかを確認します。
- [2]:次に、MemoryOutputStreamオブジェクトと上記の命名規則を使用して正しいファイル名を構築します。
- [3]:最後に、以前に構築したファイル名に基づいてオーディオファイルをロードできるかどうかを確認し、対応するファイルでSoundPlayerの
play()関数を呼び出します。
再生ボタンを押すと、対応する音声で話されたフレーズが聞こえるはずです。
このコードの変更版のソースコードは、デモプロジェクトのInAppPurchaseTutorial_02.hファイルにあります。
まとめ
このチュートリアルでは、モバイルとデスクトップでアプリ内課金を処理する方法を学びました。特に:
- さまざまなデプロイメントプラットフォームの予備設定をカバーしました。
- ユーザーインターフェースにさまざまなIAP製品情報を表示しました。
- 過去のユーザー購入を取得し、GUIを非同期的に更新しました。
- アプリ内での非消費型製品の購入を処理しました。