チュートリアル:Androidの始め方
このチュートリアルでは、JUCEベースのプロジェクトを作成するためのAndroid Studioの使用を紹介します。
レベル: 初級
プラットフォーム: Android
はじめに
このチュートリアルでは、Android Studioアプリケーションを使用してJUCEベースのアプリケーションを構築するために必要なツールをインストールおよび設定します。
ツールと開発キットのインストール
Android用のJUCEアプリケーションを作成する前に、標準ツール、Android SDK、およびAndroid NDK(Native Development Kit)のいくつかが必要です。
Android Studioのインストール
以下のURLからAndroid Studioをダウンロードしてください:
https://developer.android.com/sdk/index.html
ダウンロードはかなり大きいため、時間がかかる場合があります(macOSとWindowsで約700MB)。これは最初のダウンロードだけであり、後でインストールする項目がさらにあります。このプロセス全体に時間がかかることを覚悟してください。ダウンロードが完了したら、ダウンロードを開始した後に表示されるはずの「Installing Android Studio」ページのすべての指示に従ってください。
OSによっては、JDK(Java Development Kit)を7.0以降に更新する必要があるかもしれません。インストールプロセス中(Windows)またはAndroid Studioを初めて起動したとき(Mac OS X)に、必要に応じてこれをインストールするよう促されるはずです。
Android Studioの標準インストールを実行してください。これはWindowsではインストーラーを使用して行いますが、Mac OS Xでは、Android Studioが初めて開かれたときにインストールを完了する必要があります。これは以下のスクリーンショットに示されています。
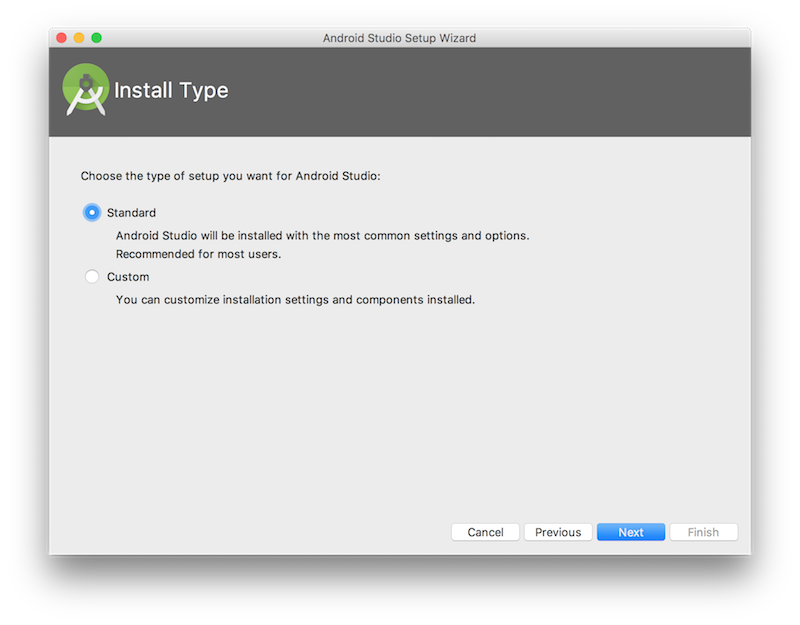
物理的なAndroidデバイスのコレクションがあっても、仮想デバイスでテストすると便利なので、プロンプトが表示されたらこのオプションを選択してください。
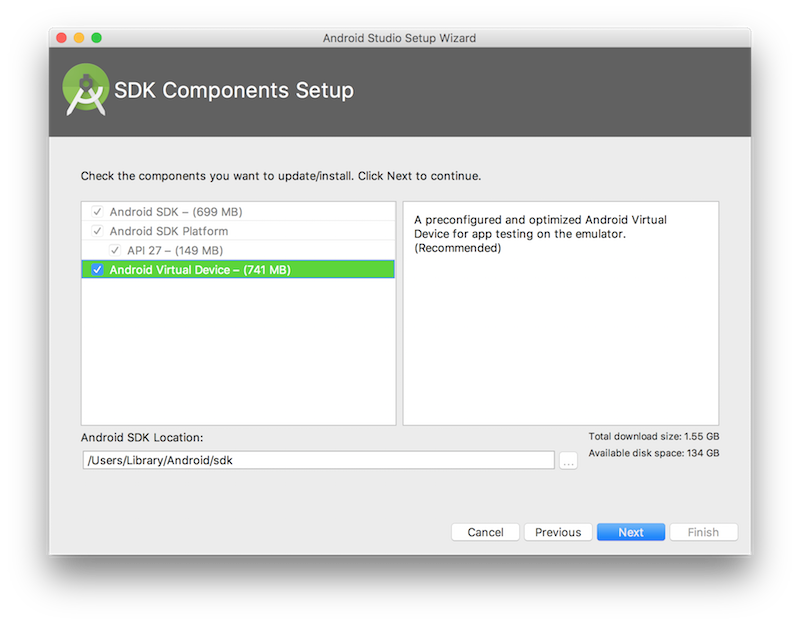

インストールプロセスが完了するまで、クリックし続けてください(Nextをクリック)。
追加SDKのインストール
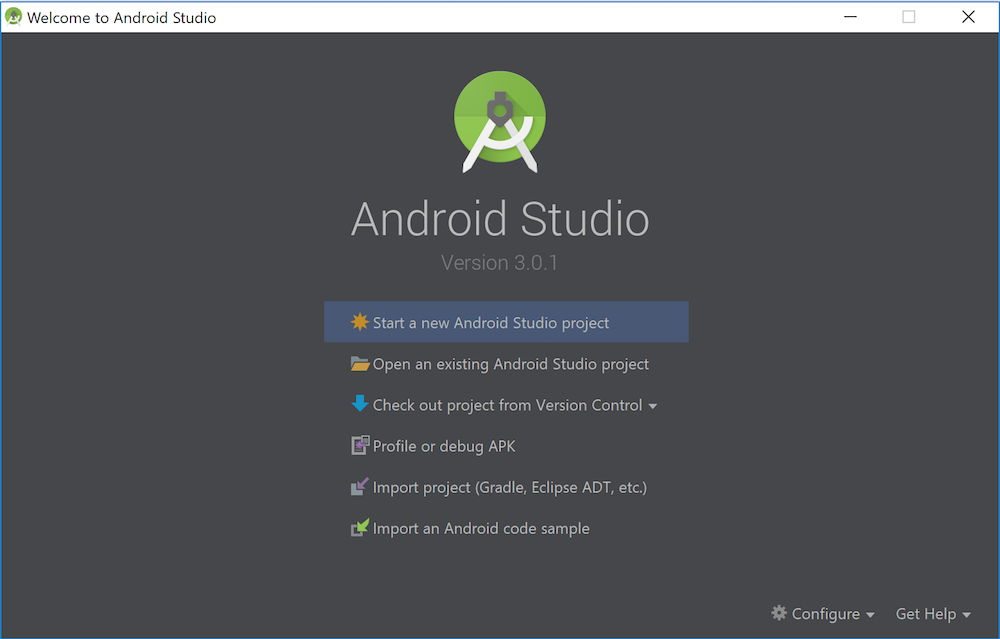
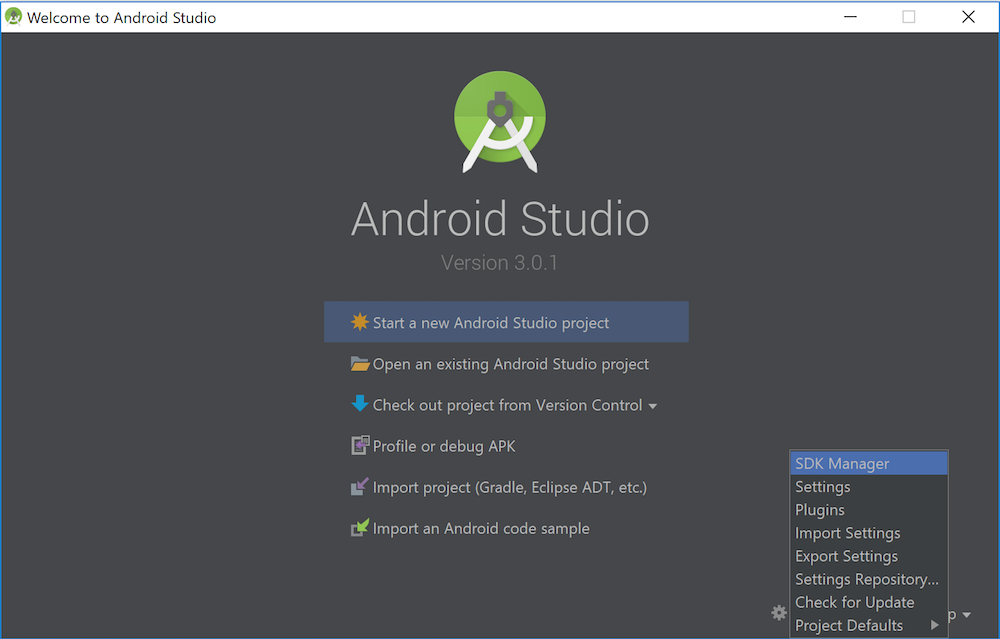
Android Studio自体がインストールされたので、いくつかの追加ツールが必要です。Welcome to Android Studioウィンドウで、右下隅にあるConfigureボタンをクリックします。
次に、SDK Managerボタンをクリックします。
他のSDKプラットフォームが必要な場合は、SDK Platformsタブで必要なものを選択できます。デフォルトで問題なく動作するはずです。
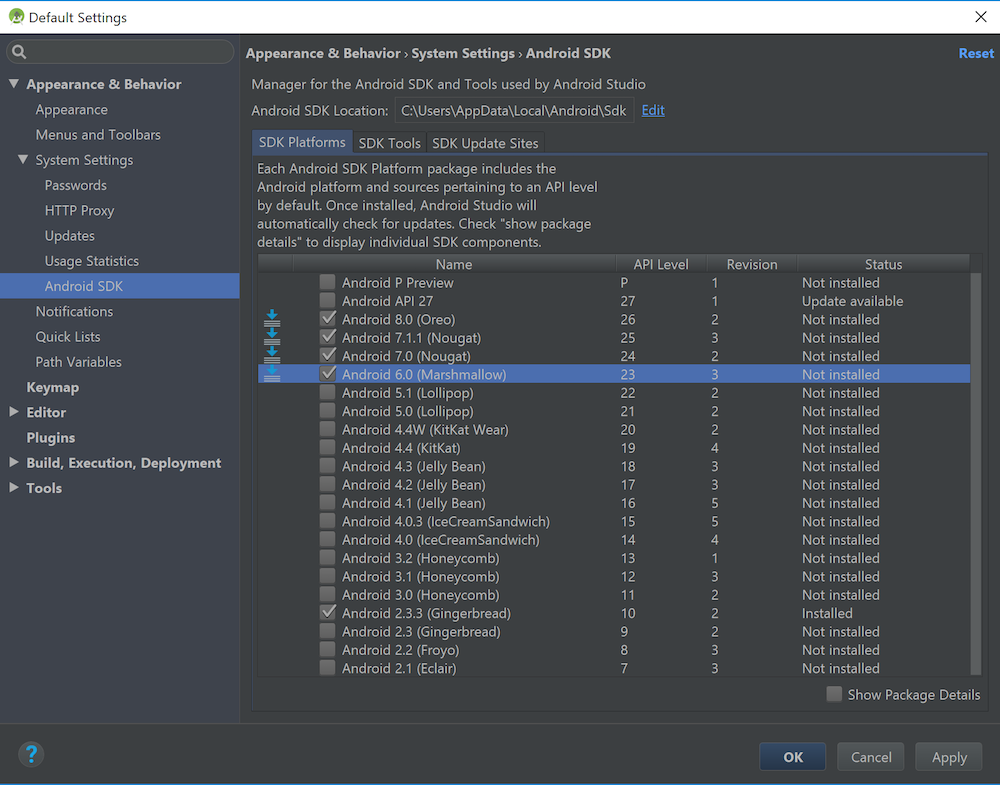
もう1つ必要なものは_Android NDK_です。これは、AndroidアプリケーションをC/C++で記述するためのAPIを提供するため、JUCEがAndroidで動作するために不可欠です。CMakeがインストールされていることを確認してください。これはアプリをビルドするために必要であり、C/C++コードをデバッグするためのLLDBも必要です。これらはすでにインストールされている可能性があることに注意してください。これらをインストールするには、SDK Manager内のSDK Toolsタブを選択し、項目を選択して、以下のスクリーンショットに示すようにApplyを押します:
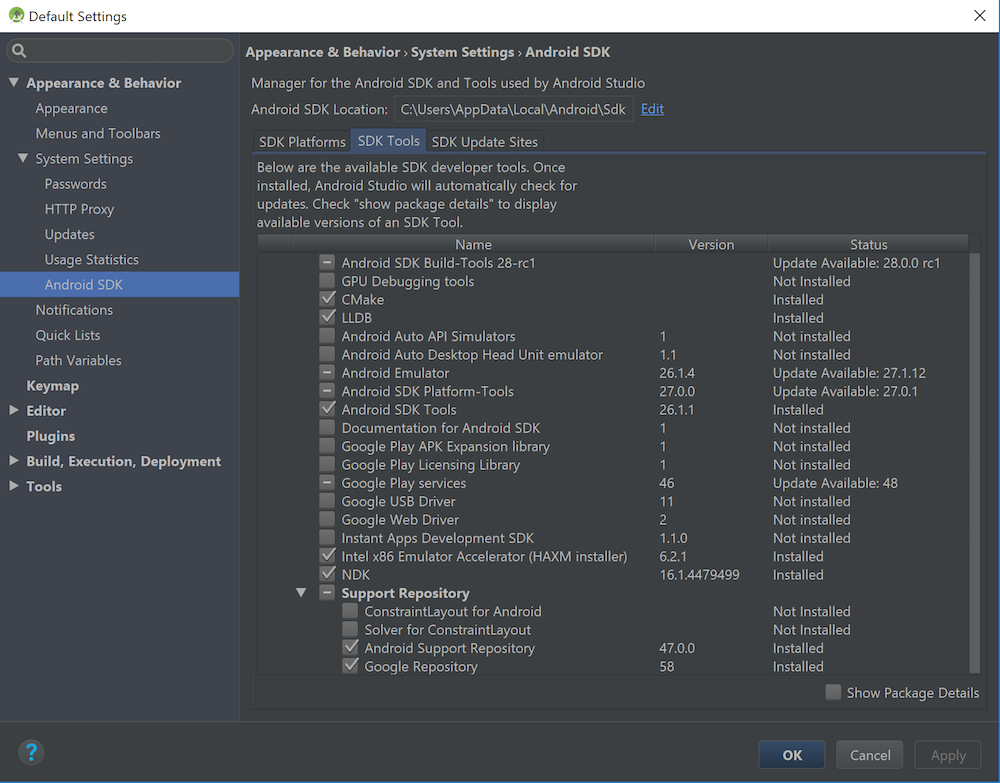
上記のスクリーンショットで選択されている項目が、お使いのシステム(WindowsまたはMac OS X)で少なくとも選択されていることを確認してください。必要に応じて追加の項目をインストールしても構いません。完了したらApplyボタンをクリックします。
Projucerの使用
Android Studio、Android SDK、Android NDKがインストールされたので、ProjucerでJUCEベースのAndroid Studioプロジェクトを作成するように設定できます。(Projucerに慣れていない場合は、チュートリアル:Projucer Part 1: Projucerを始めようを参照してください。)これを行うには、Android SDK(およびNDK)がどこにインストールされているかを知る必要があります。
Android SDKの場所は、SDK Managerウィンドウの上部に表示されます。パスは次のようになります(「username」はあなたのユーザー名です):
C:\\Users\\username\\AppData\\Local\\Android\\sdk(Windows)/Users/username/Library/Android/sdk(Mac OS X)
このパスをSDK Managerウィンドウからクリップボードにコピーしてください(Mac OS Xでは「CMD-C」、Windowsでは「Ctrl-C」)。
Projucerアプリケーションを開き、メニュー項目Projucer > Global Search Paths...に移動します。パスをAndroid SDKフィールドに貼り付けます(Mac OS Xでは「CMD-V」、Windowsでは「Ctrl-V」)。「Return」を押すと、テキストが白いテキストで表示されるはずです。これは以下のスクリーンショットに示されています:

SDKが見つからない、または正しくインストールされていない場合、Projucerは入力したパスを赤で表示します。
NDKはSDK内のndk-bundleディレクトリにあります。次のようになります:
C:\\Users\\username\\AppData\\Local\\Android\\sdk\\ndk-bundle(Windows)/Users/username/Library/Android/sdk/ndk-bundle(Mac OS X)
Global Search Pathsウィンドウ内のAndroid NDKフィールドに、ndk-bundleディレクトリを追加したSDKパスを入力してください。

パスが正しく、NDKが正しくインストールされている場合は白で表示されます(そうでない場合は赤)。
Projucerプロジェクトの作成
では、新しいプロジェクトを作成しましょう。メニュー項目**File > New Project...**に移動します。GUI Applicationプロジェクトタイプを選択し、プロジェクトの場所を選択し、Androidターゲットプラットフォームがチェックされていることを確認してください。これは以下のスクリーンショットに示されています:
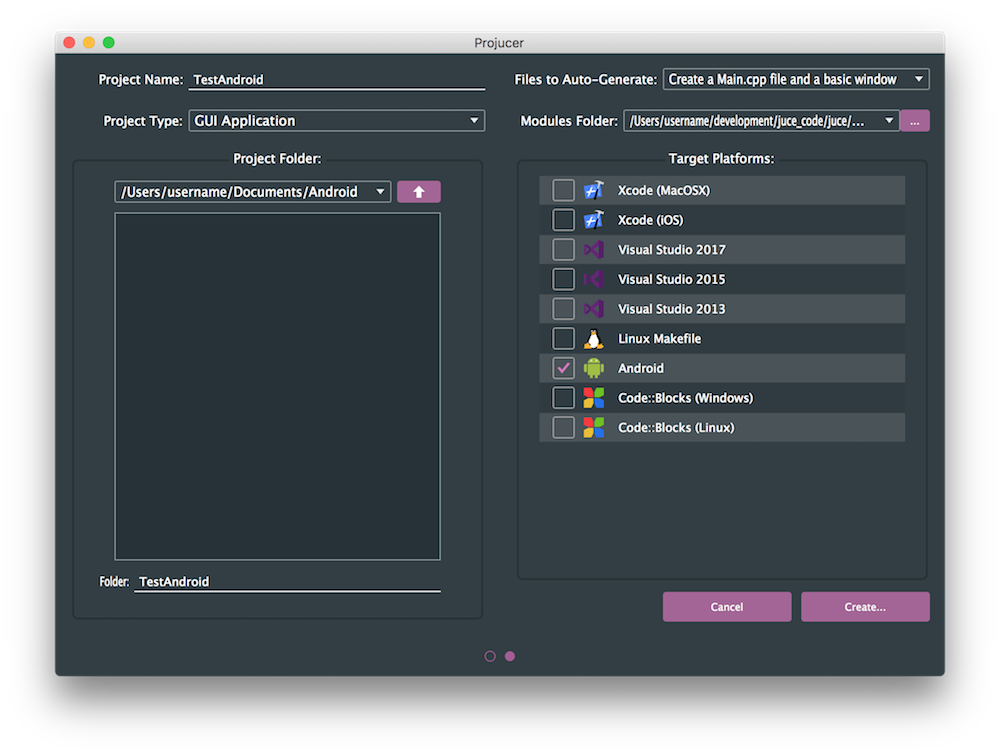
**Create...**ボタンをクリックします。
以前にすべてのAndroid SDKをインストールしていない限り、ProjucerプロジェクトでサポートされるMinimum SDK Versionを変更する必要があります。左側の列でAndroidエクスポーターを選択し、Minimum SDK Versionフィールドを見つけます。以下のスクリーンショットに示すように、23から27の間の値を入力することをお勧めします:

アプリケーションコードの変更
Androidデバイスで画面レイアウトに関してうまく機能するように、アプリケーションコードに軽微な変更を加えることができます。Projucerで、Filesタブを選択し、Main.cppを選択します。MainWindowコンストラクタを以下のように更新します:
//...
MainWindow (juce::String name) : DocumentWindow (name,
                                     juce::Colours::lightgrey,
                                     DocumentWindow::allButtons)
{
    setUsingNativeTitleBar (true);
    setContentOwned (new MainContentComponent(), true);

    setFullScreen (true); // centreWithSize()を呼び出す代わりにフルスクリーンに設定
    setVisible (true);
}
//...
これにより、アプリケーションは(デスクトッププラットフォームでの通常のような)ウィンドウ内ではなく、フルスクリーンで実行されます。
Android Studioで開く
Projucerの**Save Project and Open in IDE...**ボタンをクリックすることで、プロジェクトをAndroid Studioで開くことができます。Android Studioが開き、次のウィンドウが表示されるはずです:
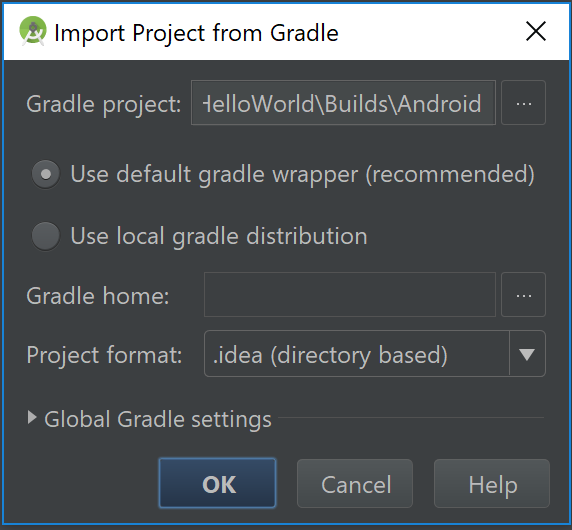
OKボタンをクリックすると、プロジェクトがインポートされて開きます。プロジェクトのコンパイルに失敗した場合は、追加のSDKをインストールする指示に従ってください。プロジェクトをコンパイルするために、古いバージョンのSDKをインストールする必要があるかもしれません。これで、Android Studio内からプロジェクトを実行できるはずです。「run」ボタンを押してください:

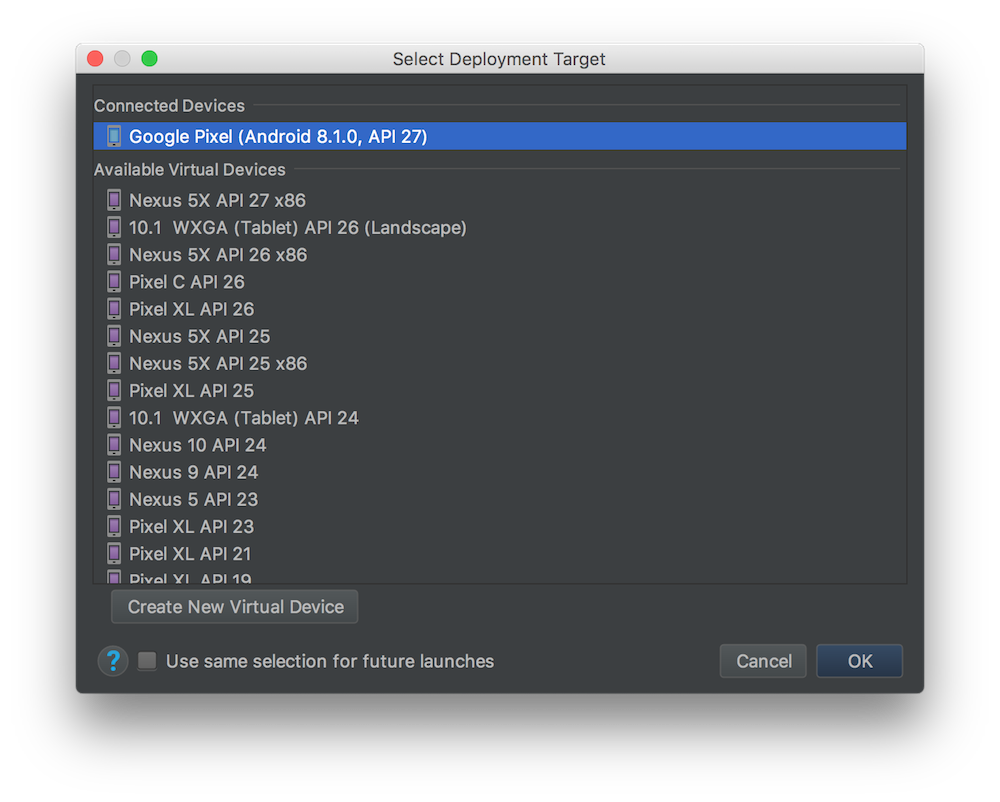
Android Studioはどのデバイスを使用するか尋ねてきます。これがアプリを初めて起動するときなので、実行するための仮想デバイスを作成する必要があります。Create New Virtual Deviceボタンをクリックして新しいデバイスを設定し、お好みのデバイスを選択します。これで仮想デバイスができたので、リストで選択してOKボタンをクリックできます。(USB経由でAndroidデバイスを接続している場合は、そのウィンドウにも表示されるはずです。)これは以下のスクリーンショットに示されています:
アプリケーションがデバイスで起動するはずです!以下のスクリーンショットのようになるはずです(これはデバイスを横向きに回転させた状態を示しています):
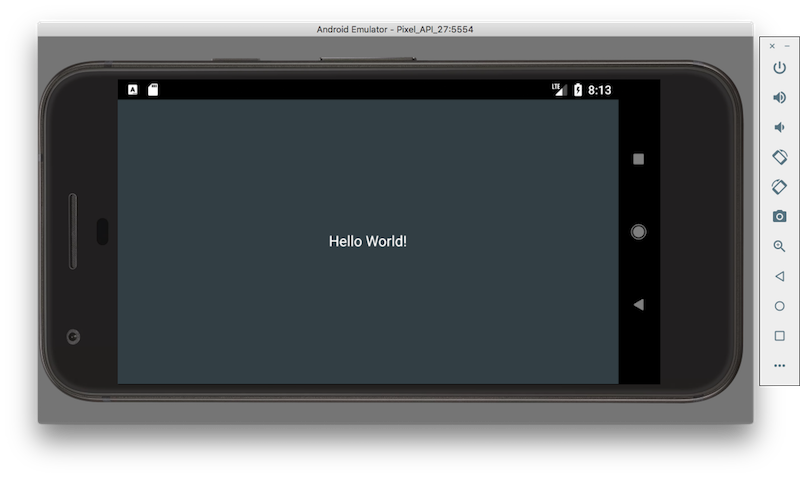
仮想デバイスを回転させるには、「Control-F11」で反時計回りに、「Control-F12」で時計回りに回転させます。(Mac OS Xでは「fn」キーも押し続ける必要があります。)
まとめ
このチュートリアルでは、以下のトピックをカバーしました:
- Android Studioのダウンロードとインストール。
- Android SDKとAndroid NDKのダウンロード。
- Android Studio用のProjucerプロジェクトの作成。
- Projucerで生成されたプロジェクトをAndroid Studioで開く。
- 仮想(または実際の)デバイスでプロジェクトを実行する。