チュートリアル:Androidの画面サイズの管理
さまざまな画面サイズに対応したアプリケーションを構築します。Androidには多くの利用可能な画面サイズがあり、このチュートリアルではこれを管理するためのいくつかの戦略を検討します。
レベル: 中級
プラットフォーム: Android, macOS, Windows
クラス: Desktop, AffineTransform, TabbedComponent
はじめに
このチュートリアルでは、JUCEを使用してAndroidプラットフォームでさまざまな画面サイズを管理するためのいくつかの戦略を説明します。このチュートリアルには、いくつかのデモプロジェクトが付属しています。これらのプロジェクトへのダウンロードリンクは、チュートリアルの関連セクションで提供されています。
これらのセクションのそれぞれでこの手順についてサポートが必要な場合は、チュートリアル:Projucer Part 1: Projucerを始めようを参照してください。
デモプロジェクト
このチュートリアルで提供されるデモプロジェクトは、JUCEを使用してAndroidプラットフォームでさまざまな画面サイズを管理するためのいくつかの異なる方法を示しています。大まかに、これらの方法は以下のとおりです:
- メインコンポーネント内の子コンポーネントのリサイズ。
- トランスフォームを使用したメインコンポーネントのリサイズ。
- 異なる向きに対して異なるコンポーネントレイアウトを設計する。
- 異なるサイズに対して異なるコンポーネントレイアウトを設計する。
Androidの画面サイズ
特にフルスクリーン操作を期待するデバイス(モバイルデバイスなど)では、すべての画面サイズとさまざまなデバイスの向きに対して効果的なユーザーインターフェースを設計することは課題です。これは、多くの可能な画面サイズと解像度があるAndroidプラットフォームでは特に課題となります。ここには3つの主な問題があります:
- 物理サイズ:標準的な測定単位で測定された画面の物理サイズ(一般的な測定は画面の対角線の距離で、インチで測定されます)。
- 解像度:ピクセル単位で測定された画面解像度。
- 向き:デバイスの向き、横向きまたは縦向き。
物理サイズと解像度の関係は重要です。物理ピクセルが標準解像度画面よりも小さく、より密に詰まっている高解像度画面を検討する場合、特に重要です。特定の物理画面サイズとその解像度の組み合わせにより、画面の_ドット・パー・インチ_(DPI)が決まります。これは画面の_ピクセル密度_に関連しています。これは、標準密度画面上のピクセルとして、各次元で「ソフトウェア」ピクセルのスペースを占める物理ピクセルの数です。
一部のアプリケーションでは、物理サイズが最も重要になります。例えば、繊細な指の動きを含む複雑なインタラクションを使用するアプリケーションの場合です。この場合、画面サイズと典型的なユーザーの手のサイズが重要です。他のアプリケーションでは、画面のDPIがより重要です。例えば、テキストはより高いDPIではより小さいフォントサイズでも読みやすくなります。しかし、画面上の物理サイズで測定した場合、テキストがどれだけ読みやすくなるかには限界があります。アプリケーションを設計する際には、物理サイズと解像度(したがってDPI)の両方を考慮する必要がある場合があります。
デフォルトでは、JUCEは画面のピクセル密度に基づいて座標システムをスケーリングします。これは、高密度画面に描画される図形やテキストは、標準密度画面での物理サイズとほぼ同じに見えるはずであることを意味します。JUCEでは、Desktopクラスを介して特定のディスプレイに関する情報にアクセスできます。ここでは、利用可能なディスプレイとどれが「メインディスプレイ」としてマークされているか(特に複数のディスプレイがある場合)を確認できます。
残念ながら、JUCEがディスプレイのDPIを取得するためにアクセスできる値は近似値に過ぎません(すべての画面デバイスがこの情報を正しく報告するわけではないため)。これは、ユーザーの画面の物理サイズを正確に測定できないことを意味します。しかし、Desktopクラスが提供する情報は、アプリケーションのニーズに応じてユーザーインターフェースをスケーリングするためのガイドとしては十分なはずです。
以下の各例では、親コンポーネント(MainContentComponent)によって管理およびリサイズされるResizingCompという子コンポーネントを使用しています。
これらのプロジェクトをmacOSまたはWindowsでテストすると、メインウィンドウの幅と高さを動的にリサイズできます。これはある程度機能しますが、テスト目的を除いて、プロジェクトの機能として意図されていません。プロジェクトは、サイズの変更がまれであることを期待するように設計されています。例えば、アプリケーションが起動するときの1回限りの設定、またはユーザーがAndroidデバイスを回転させたときです。
子コンポーネントのリサイズ(シンプルリサイズ)
このセクションのデモプロジェクトをこちらからダウンロードしてください:PIP | ZIP。プロジェクトを解凍し、最初のヘッダファイルをProjucerで開いてください。
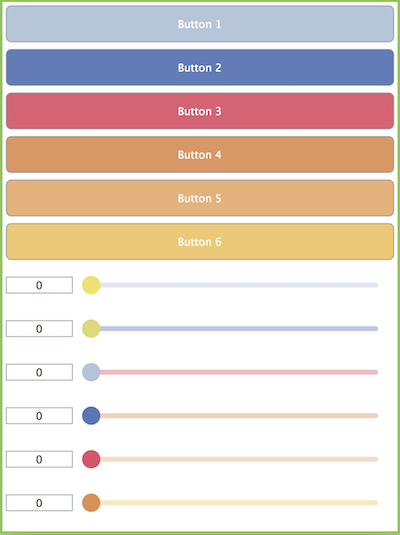
この例では、スライダーとボタンのコレクションを含むシンプルなインターフェースを使用しています。これらの子コンポーネントはそれぞれ、画面の高さの一部(エッジの周りの小さな境界を差し引いた)が与えられます。水平方向でも同様のアプローチを取ることができます。シンプルにするために、スライダーとボタンは画面の全幅を占めるだけです(同様に、小さな境界を差し引いた)。縦向きで数百ピクセルの範囲のサイズの画面では、以下のスクリーンショットのようになります:
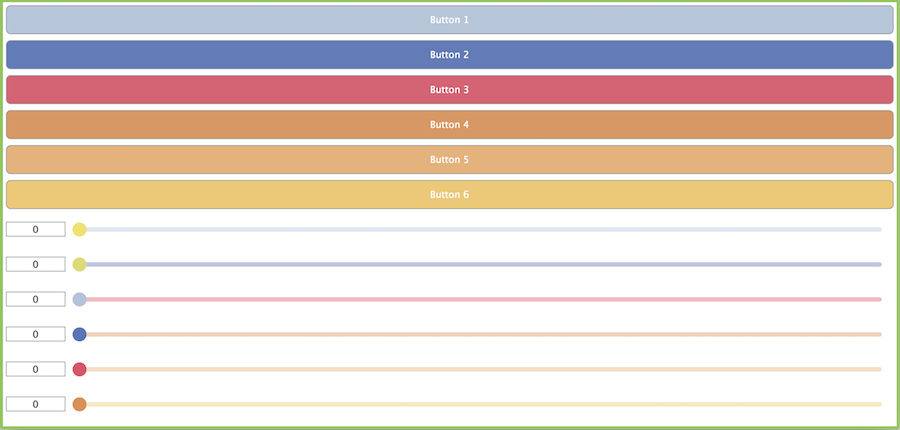
横向きでは、以下のスクリーンショットのようになります:
コンポーネントの配列
ResizingCompクラスにボタンとスライダーを格納するために、OwnedArrayテンプレートクラスを使用します(これは、これらの子コンポーネントがResizingCompデストラクタで自動的に削除されることを意味します)。まず、ResizingCompコンストラクタで、Colourオブジェクトの配列を構築します。これらは、ボタン、スライダーのサム、スライダートラックの色を設定するために使用されます:
ResizingComp()
{
    juce::Array<juce::Colour> colours { juce::Colour (0xffb3c3Da), juce::Colour (0xff5973b8), juce::Colour (0xffd65667), juce::Colour (0xffd99154), juce::Colour (0xffe5ad6c), juce::Colour (0xffecc664), juce::Colour (0xffefe369), juce::Colour (0xffdddB74) };
これらはたまたまJUCEロゴの色です!
次に、for()ループを使用して複数のボタンを割り当てて設定します:
for (auto i = 0; i < 6; ++i)
{
    auto* button = buttons.add (new juce::TextButton (juce::String ("Button ") + juce::String (i + 1)));
    addAndMakeVisible (button);

    button->setColour (juce::TextButton::buttonColourId,
        colours.getUnchecked (i % colours.size()));
}
スライダーも同様に設定されます(ただし、興味深く保つために色の配列を使用して色の選択を混ぜています):
for (auto i = 0; i < 6; ++i)
{
    auto* slider = sliders.add (new juce::Slider());
    addAndMakeVisible (slider);

    slider->setColour (juce::Slider::thumbColourId,
        colours.getUnchecked ((buttons.size() + i) % colours.size()));
    slider->setColour (juce::Slider::backgroundColourId,
        colours.getUnchecked ((buttons.size() + i + 2) % colours.size()).withAlpha (0.4f));
    slider->setColour (juce::Slider::trackColourId,
        colours.getUnchecked ((buttons.size() + i + 2) % colours.size()));
    slider->setColour (juce::Slider::textBoxTextColourId, juce::Colours::black);
}
カスタムスライダーサムサイズの使用
タッチスクリーンインターフェースでより使いやすくするために、スライダーのサムは通常、標準サイズよりも大きくなるようにカスタマイズされています。これを行うために、LookAndFeel_V4のサブクラスを追加し、LookAndFeel::getSliderThumbRadius()関数をオーバーライドしました。
class CustomLookAndFeel : public juce::LookAndFeel_V4
{
public:
    int getSliderThumbRadius (juce::Slider& slider) override
    {
        return juce::jmin (slider.getWidth(), slider.getHeight()) / 2;
    }
};
このクラスのインスタンスをResizingCompクラスのメンバーとして追加します:
juce::OwnedArray<juce::Button> buttons;
juce::OwnedArray<juce::Slider> sliders;
CustomLookAndFeel lf;
};
そして、ResizingCompコンストラクタの最後で、これをこのコンポーネントとそのすべての子のルック・アンド・フィールとして設定します。
setLookAndFeel (&lf);
ResizingCompデストラクタでは、これをnullptrに設定します。
~ResizingComp() override
{
    setLookAndFeel (nullptr);
}
ボタンとスライダーのリサイズ
ResizingComp::resized()関数では、ボタンとスライダーの配列を反復処理し、それらの境界を設定します:
void resized() override
{
    auto space = 8;
    auto widgetHeight = (getHeight() - space) / (buttons.size() + sliders.size()) - space;

    for (auto* button : buttons)
        button->setBounds (space, space + (widgetHeight + space) * buttons.indexOf (button), getWidth() - space - space, widgetHeight);

    for (auto* slider : sliders)
        slider->setBounds (space, space + (widgetHeight + space) * (sliders.indexOf (slider) + buttons.size()), getWidth() - space - space, widgetHeight);
}
ここでは、コンポーネントを分離するために定数値(8)を使用します。次に、利用可能な高さと「ウィジェット」(ボタンとスライダー)の数に基づいて「ウィジェットの高さ」を計算します。
画面サイズが小さすぎると、以下のスクリーンショットに示されるように、インターフェースは使用不能になり読めなくなります:
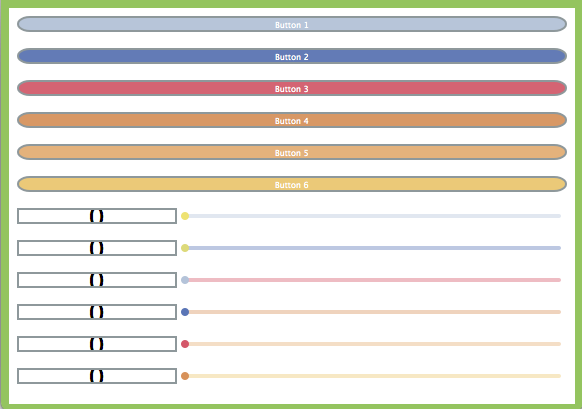
とはいえ、ほとんどのAndroidデバイスでは妥当に見えるはずです。
演習:インターフェース内のスライダーとボタンの数を変更してみてください。
トランスフォームを使用したメインコンポーネントのリサイズ
このセクションのデモプロジェクトをこちらからダウンロードしてください:PIP | ZIP。プロジェクトを解凍し、最初のヘッダファイルをProjucerで開いてください。
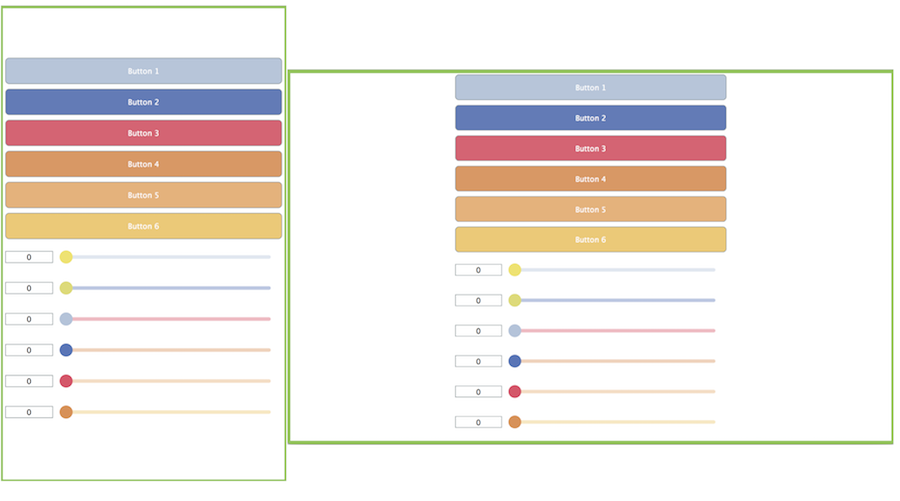
この例では、子コンポーネントのリサイズの代替手段を使用します。代わりに、ResizingCompコンポーネントは公称サイズ(480×640ピクセル)に設定され、MainContentComponentオブジェクトは画面サイズに合わせてスケールアップまたはスケールダウンするためのアフィン変換を適用します。これは、同じアスペクト比を維持しながら行われます(スライダーとボタンの横または上下に空白が残ります)。ResizingCompクラスのコードは、シンプルリサイズの例と同じです。しかし、MainContentComponent::resized()関数では、ResizingCompコンポーネントのサイズを設定してから、必要な変換を計算します:
void resized() override
{
    auto contentWidth = 480;
    auto contentHeight = 640;

    auto scaleX = (float) getWidth() / static_cast<float> (contentWidth);
    auto scaleY = (float) getHeight() / static_cast<float> (contentHeight);
    auto scale = juce::jmin (scaleX, scaleY);

    resizingComp->setTransform (juce::AffineTransform::scale (scale, scale));
    resizingComp->centreWithSize (contentWidth, contentHeight);
}
このコードは、公称サイズとソフトウェアピクセルでの画面の実際のサイズとの比率を計算します。次に、アスペクト比を維持しながら、すべてのコンテンツを画面上に保つために、これらの比率の最小値を選択します。次に、AffineTransform::scale()関数を使用してAffineTransformクラスのインスタンスを作成し、スケール変換を画面の中央に配置します。変換はComponent::setTransform()関数を使用してコンポーネントに適用されます。結果はシンプルリサイズ方法とはかなり異なります。
コンポーネントにトランスフォームを適用すると、ユーザーインターフェースの描画だけでなく、タッチ(およびマウス)アクティビティの位置も変換されます。
異なる向きに対して異なるレイアウトを設計する
このセクションのデモプロジェクトをこちらからダウンロードしてください:PIP | ZIP。プロジェクトを解凍し、最初のヘッダファイルをProjucerで開いてください。
この例では、画面(またはデバイス)の向きに応じて異なるレイアウトを表示する1つの方法を見ています。Desktop::getCurrentOrientation()関数は、デバイスの向きにアクセスする手段を提供します。実際には、4つの可能な向きがあります:
- 直立(縦向き)。
- 上下逆(縦向きを180度回転)。
- デバイスを時計回りに90度回転(横向きの1つのバージョン)。
- デバイスを反時計回りに90度回転(横向きのもう1つのバージョン)。
シンプルにするために、このチュートリアルでは、縦向きを高さが幅より大きい画面として扱い、横向きを幅が高さより大きい画面として扱います。
この例では、以前に見たトランスフォームを使用したユーザーインターフェースをスケーリングするのと同じ技術を使用します。違いは、このResizingCompクラスは向きに応じて異なるレイアウトを使用し、MainContentComponentクラスには2つの公称サイズ(横向き用と縦向き用)があることです。向きはMainContentComponent::resized()関数で決定されます:
void resized() override
{
    auto isLandscape = getWidth() > getHeight();
    auto contentWidth = isLandscape ? 640 : 480;
    auto contentHeight = isLandscape ? 480 : 640;
次に、ResizingComp::resized()関数で、向きに応じて2つのリサイズ関数から選択します:
void resized() override
{
    if (getHeight() > getWidth())
        resizedPortrait();
    else
        resizedLandscape();
}
resizedPortrait()とresizedLandscape()関数は、ボタンとスライダーをレイアウトするために異なる算術を使用します。
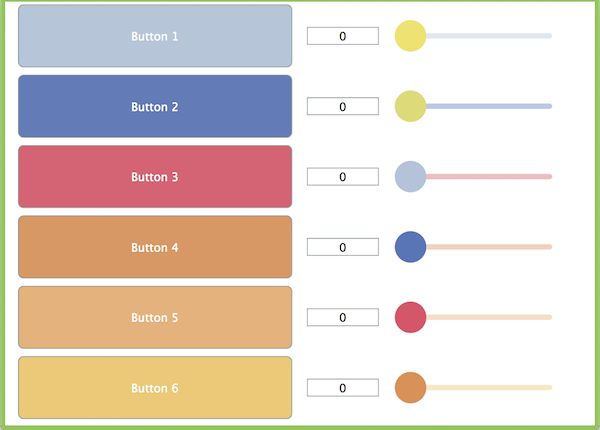
横向きが使用される場合、ボタンとスライダーは1列ではなく2列で表示されます。これは以下のスクリーンショットに示されています:
演習:画面の幅と高さを比較する代わりに、Desktop::getCurrentOrientation()関数を使用して画面の向きを決定するようにコードを変更してください。
異なる画面サイズに対して異なるレイアウトを設計する
このセクションのデモプロジェクトをこちらからダウンロードしてください:PIP | ZIP。プロジェクトを解凍し、最初のヘッダファイルをProjucerで開いてください。
この最後の例では、異なる画面の向きと画面サイズに対して異なるレイアウトを使用します。このような技術は、画面の向きに対してまったく異なるレイアウトを使用したい場合、またはAndroidの電話とタブレット用のユニバーサルアプリケーションを作成したい場合に特に便利かもしれません。ここで使用される方法は、コンポーネントが単一のページに収まらない場合に、TabbedComponentクラスを使用してコンポーネントのページを配置することです。
このプロジェクトでのResizingCompクラスの責任は、以前の3つのプロジェクトと比較して少し変わります。特に、ボタンとスライダーを直接の子コンポーネントとして追加しません。以下のコンストラクタのコードで、Component::addAndMakeVisible()関数の呼び出しがないことに注意してください:
ResizingComp()
{
    juce::Array<juce::Colour> colours { juce::Colour (0xffb3c3Da), juce::Colour (0xff5973b8), juce::Colour (0xffd65667), juce::Colour (0xffd99154), juce::Colour (0xffe5ad6c), juce::Colour (0xffecc664), juce::Colour (0xffefe369), juce::Colour (0xffdddB74) };

    for (auto i = 0; i < 6; ++i)
    {
        auto* button = buttons.add (new juce::TextButton (juce::String ("Button ") + juce::String (i + 1)));

        button->setColour (juce::TextButton::buttonColourId,
            colours.getUnchecked (i % colours.size()));
    }

    for (auto i = 0; i < 6; ++i)
    {
        auto* slider = sliders.add (new juce::Slider());

        slider->setColour (juce::Slider::thumbColourId,
            colours.getUnchecked ((buttons.size() + i) % colours.size()));
        slider->setColour (juce::Slider::backgroundColourId,
            colours.getUnchecked ((buttons.size() + i + 2) % colours.size()).withAlpha (0.4f));
        slider->setColour (juce::Slider::trackColourId,
            colours.getUnchecked ((buttons.size() + i + 2) % colours.size()));
        slider->setColour (juce::Slider::textBoxTextColourId, juce::Colours::black);
    }

    setLookAndFeel (&lf);
}
ResizingCompクラスはボタンとスライダーの寿命を管理しますが、コンポーネント階層の観点からは、それらはComponentHolderと呼ばれる別のコンポーネントクラスの1つ以上のインスタンスに追加されます。
シングルページまたは複数ページの選択
画面サイズが大きい場合、これらのComponentHolderコンポーネントの1つだけが作成され、すべてのボタンとスライダーがそれに追加されます。画面サイズが小さい場合、ResizingCompクラスはTabbedComponentオブジェクトを使用し、TabbedComponentのタブを形成するためにComponentHolderクラスの2つのインスタンスを追加します。シングルページまたは複数ページを使用するかどうかの決定は、ResizingComp::resized()関数でResizingCompクラスによって管理されます。
void resized() override
{
    if (holder.get() != nullptr)
    {
        removeChildComponent (holder.get());
        holder.reset();
    }

    auto minimumDimension = juce::jmin (getWidth(), getHeight());

    if (minimumDimension >= 480)
        layoutSinglePage();
    else
        layoutTabs();
}
ここでは、「大きな」画面はその寸法の1つが480ソフトウェアピクセル以上であるものと言っています。もちろん、アプリケーションに異なる値を選択できます。ResizingComp::layoutSinglePage()関数は簡単です:
void layoutSinglePage()
{
    holder.reset (new ComponentHolder());

    for (auto* button : buttons)
        dynamic_cast<ComponentHolder*> (holder.get())->addComp (button);

    for (auto* slider : sliders)
        dynamic_cast<ComponentHolder*> (holder.get())->addComp (slider);

    addAndMakeVisible (holder.get());
    holder->setBounds (getLocalBounds());
}
ここでは、すべてのボタンとスライダーをComponentHolderインスタンスに追加し、ResizingCompオブジェクトの子コンポーネントとして追加しています。ResizingComp::layoutTabs()関数はもう少し複雑です:
void layoutTabs()
{
    auto orientation = getWidth() < getHeight() ? juce::TabbedButtonBar::TabsAtBottom
                                                : juce::TabbedButtonBar::TabsAtLeft;

    holder.reset (new juce::TabbedComponent (orientation)); // [1]
    addAndMakeVisible (holder.get()); // [2]

    auto* buttonTab = new ComponentHolder(); // [3]
    auto* sliderTab = new ComponentHolder();

    dynamic_cast<juce::TabbedComponent*> (holder.get())->addTab ("Buttons", juce::Colours::white, buttonTab, true); // [4]
    dynamic_cast<juce::TabbedComponent*> (holder.get())->addTab ("Sliders", juce::Colours::white, sliderTab, true);

    for (auto* button : buttons) // [5]
        buttonTab->addComp (button);

    for (auto* slider : sliders) // [6]
        sliderTab->addComp (slider);

    holder->setBounds (getLocalBounds()); // [7]
}
- [1]:画面の向きを使用してタブボタンを配置し、TabbedComponentオブジェクトを作成して
holderメンバーに格納します。 - [2]:TabbedComponentオブジェクトを子コンポーネントとして追加します。
- [3]:
ComponentHolderオブジェクトを作成します。 - [4]:これらをTabbedComponentオブジェクトにタブとして追加します(最後の
true引数は、TabbedComponentオブジェクトに、不要になったときにComponentHolderオブジェクトを削除できることを伝えます)。 - [5]:ボタンを「Buttons」タブに追加します。
- [6]:スライダーを「Sliders」タブに追加します。
- [7]:TabbedComponentオブジェクトのサイズを
ResizingCompオブジェクトの境界を埋めるように設定します。
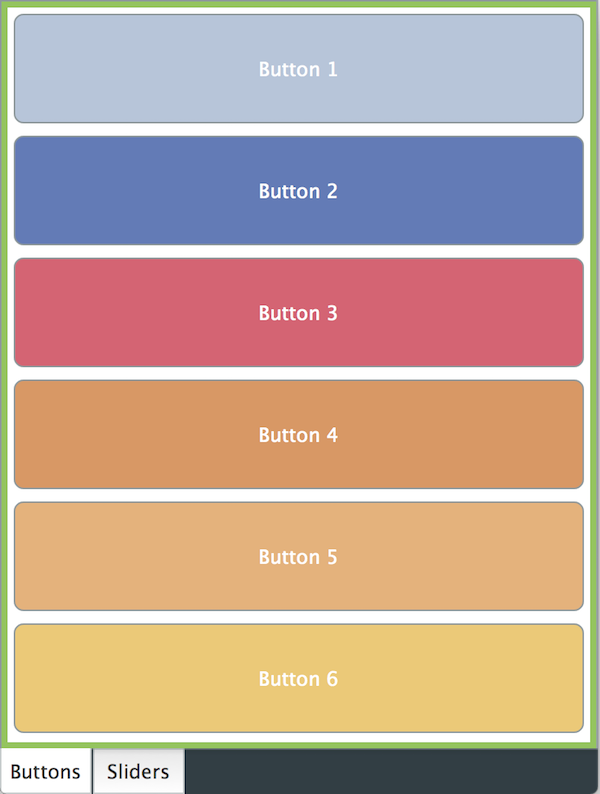
画面のサイズが「小さい」と判断された場合、以下のスクリーンショットに示すようにTabbedComponentが使用されます。
演習:インターフェース内のスライダーとボタンの数を増やし、必要に応じてこれらのコントロールを2つ以上のタブに分散させる方法を考案してください。
まとめ
このチュートリアルでは、Androidデバイスの画面サイズと向きに関するさまざまな問題を検討しました。特に:
- 親コンポーネントの寸法に基づいてコンポーネントをスケーリングする基本的な方法を示しました。
- AffineTransformクラスを使用してコンポーネントをスケーリングする方法を示しました。
- デバイスの向きに応じて異なるコンテンツを表示する方法を示しました。
- TabbedComponentクラスを使用してユーザーインターフェースを複数のページに分散させる方法を示しました。