チュートリアル: MPE ゾーンを理解する
MPE 規格で定義されているゾーンの概念とゾーンレイアウトの規約を学びます。MPE シンセサイザーを MPE 対応デバイスに接続しましょう。
レベル: 中級
プラットフォーム: Windows, macOS, Linux
クラス: MPEZoneLayout, MPEZoneLayout::Zone, MPEMessages, MPESynthesiser
はじめに
このチュートリアルのデモプロジェクトをダウンロードしてください: PIP | ZIP 。プロジェクトを解凍し、最初のヘッダーファイルを Projucer で開きます。
この手順でヘルプが必要な場合は、チュートリアル: Projucer Part 1: Projucer の使い方を参照してください。
いくつかの箇所で参考にしているため、先にチュートリアル: マルチポリフォニックシンセサイザーの構築を読んでおくと役立ちます。
デモプロジェクト
デモプロジェクトは、JUCE/examples ディレクトリにある MPEDemo プロジェクトに似ており、チュートリアル: マルチポリフォニックシンセサイザーの構築の簡略版を基にしています。このチュートリアルを最大限に活用するには、MPE 対応コントローラーが必要です。MPE は MIDI Polyphonic Expression の略で、オーディオ製品間で多次元データを通信できるようにする仕様です。
このような MPE 対応デバイスの例としては、ROLI の Seaboard シリーズ(Seaboard RISE など)や BLOCKS シリーズ(Lightpad Block など)があります。
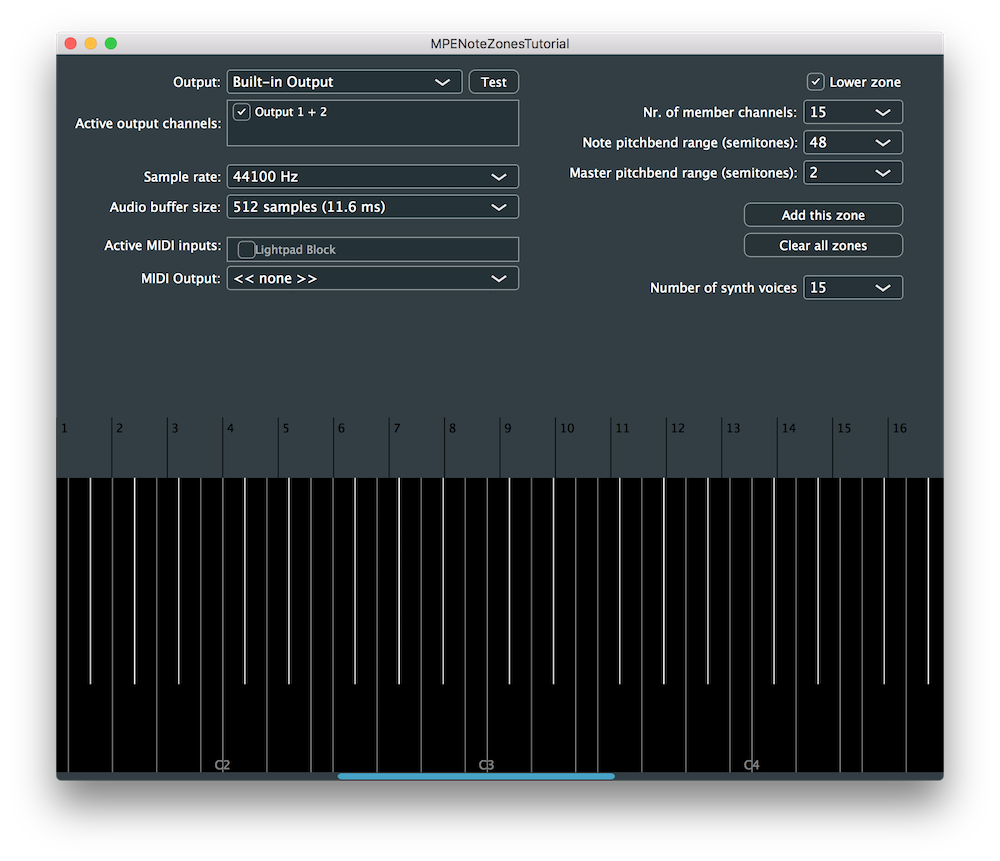
コンピューターに Lightpad Block を接続すると、デモアプリケーションのウィンドウは次のスクリーンショットのようになります:

MIDI 入力のいずれかを有効にする必要があります(ここでは Lightpad Block がオプションとして表示されています)。
MPE 対応デバイスで演奏されたノートは、チュートリアル: マルチポリフォニックシンセサイザーの構築チュートリアルで説明されているように、ウィンドウの下部に表示されます。
MPE 仕様
入門チュートリアルチュートリアル: マルチポリフォニックシンセサイザーの構築では、レガシーモードを使用して標準の MPE 設定プロセスをバイパスすることで、MPE 対応シンセサイザーを簡単に実装できました。このチュートリアルでは、最新の MPE 規格で説明されている手順に従ってシンセサイザーを設定しましょう。
シンセサイザーが MPE モードで動作しているかどうかを判断できるようにすることは、MPE ゾーンの概念に関係しています。MPE Configuration Message(MCM)を使用して少なくとも 1 つのゾーンが定義されている場合、MPE モードになります。それ以外の場合、ゾーンが定義されていない場合は、MPE モードはオフです。では、ゾーンとは何でしょうか?
MPE ゾーン
ゾーンの概念は、1 つのマスターチャンネルと 1 つ以上のメンバーチャンネルで構成される連続した MIDI チャンネルのグループを表す MPE 固有の用語です。
マスターチャンネルは、ゾーン全体に適用されるメッセージを受信し、メンバーチャンネルは、個別にのみ適用されるメッセージを受信します。
MPE では、最大 2 つのゾーンを持つことができ、Lower ゾーンと Upper ゾーンとして定義されます。
- Lower Zone: チャンネル 1 をマスターチャンネルとし、チャンネル 2 から増加して割り当てられる 1 つ以上のメンバーチャンネル。
- Upper Zone: チャンネル 16 をマスターチャンネルとし、チャンネル 15 から減少して割り当てられる 1 つ以上のメンバーチャンネル。
メンバーチャンネルは一度に 1 つのゾーンにのみ属することができ、最新の MCM が以前のものより優先されます。
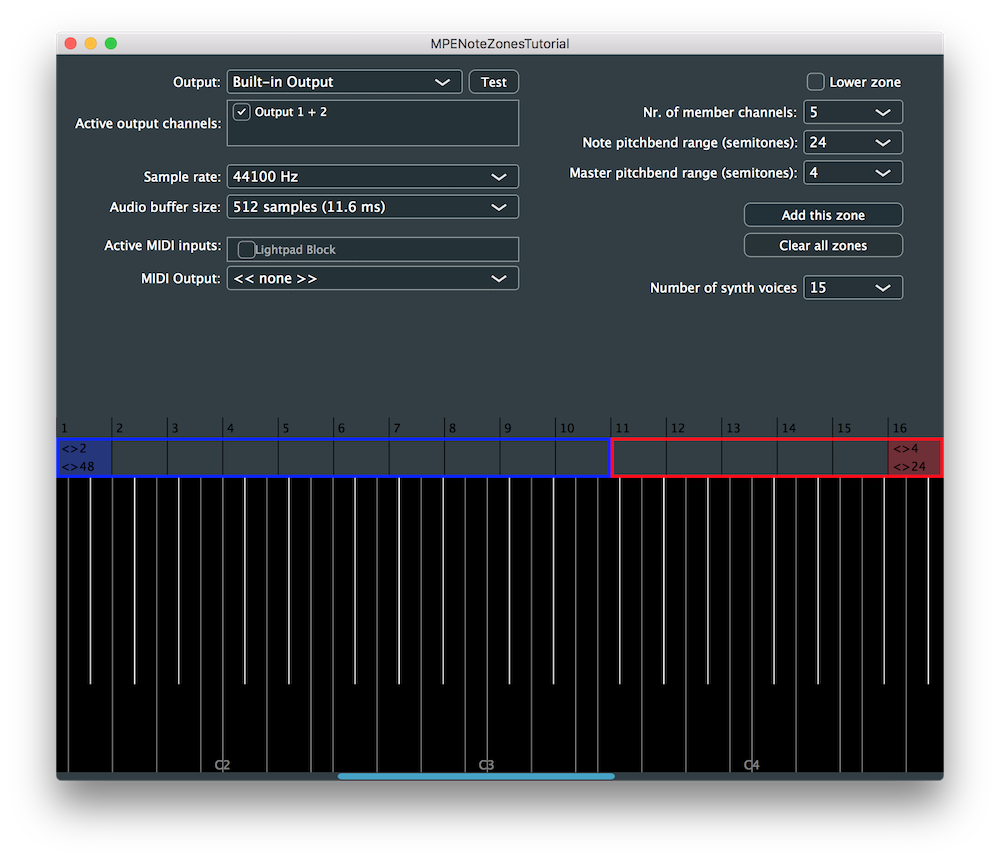
例として、Lower Zone にチャンネル 2 から 10 を含み、Upper Zone にチャンネル 11 から 15 を含むように設定できます。
あるいは、Lower ゾーンまたは Upper ゾーンのいずれかを使用して、単一のゾーンに制限することもできます。ただし、デフォルトでは Lower Zone を使用することをお勧めします。単一ゾーンのシナリオでは、残りの未使用のマスターチャンネルを他のゾーンのメンバーチャンネルとして使用でき、最大 15 個のメンバーチャンネルが得られます。
MPE ゾーンは、メンバーチャンネルなしで MCM をゾーンのマスターチャンネルに送信することでオフにでき、したがって、すべてのゾーンが空の場合、MPE モードはオフになります。
JUCE では、ゾーンの実装は MPEZoneLayout::Zone 構造体にカプセル化されており、MPEZoneLayout クラスを使用してさまざまなゾーン設定を定義できます。
ゾーンは、1 つの MPE コントローラーのみを使用してさまざまな音色特性を提供するための便利な手段であり、マスターチャンネルを使用してチャンネルグループ間で MIDI メッセージの伝播を容易にします。
MIDI モード
MPE でサポートされている主な MIDI モードは、MIDI Mode 3 と 4 の 2 つです。
- MIDI Mode 3(Poly Mode): Poly Mode では、単一の MIDI チャンネルで複数のノートを同時に保持できますが、チャンネルメッセージはそのチャンネル上のすべてのアクティブなノートに影響します。新しい MIDI ノートが作成されると、コントローラーは可能な場合は空のチャンネルに割り当てようとし、そうでない場合は既存のアクティブなノートを持つチャンネルに割り当てます。
- MIDI Mode 4(Mono Mode): Mono Mode では、単一の MIDI チャンネルは単一のノートのみを保持でき、新しい MIDI ノートが作成されたときに他のチャンネルがいっぱいの場合、コントローラーは既存のアクティブなノートを上書きします。
MPE は MIDI Mode 3(Poly Mode)を使用して適切に動作するように設計されていますが、MIDI Mode 4(Mono Mode)を使用しても使用できます。
Note Level メッセージと Zone Level メッセージ
MIDI メッセージがマスターチャンネルで送信されるか、メンバーチャンネルで送信されるかによって、それぞれ Zone Level メッセージまたは Note Level メッセージと呼びます。一部のメッセージは、ゾーン内のマスターチャンネルとメンバーチャンネルの両方に送信できます。これが発生した場合、受信シンセサイザーは両方の情報を適切な方法で組み合わせる必要があります。
Zone Level として送信する必要があるメッセージは次のとおりです:
- CC #1, #33: Modulation の Control Change。この CC は Note Level で送信できますが、無視されます。
- CC #7, #39: Volume の Control Change。この CC は Note Level で送信できますが、無視されます。
- CC #64: Damper Pedal の Control Change。この CC は Note Level で送信できますが、無視されます。
- CC #120: すべてのサウンドをオフにする Control Change。この CC は Note Level で送信できますが、無視されます。
- CC #127: すべてのコントローラーをリセットする Control Change。この CC は Zone Level でのみ送信できます。
- Polyphonic Key Pressure: PKP は、マスターチャンネルで送信される MPE 仕様の将来の拡張です。
- MPE Configuration(MCM): MCM は、前述のように設定するためにマスターチャンネルで送信されます。
Zone Level と Note Level の両方として送信できるメッセージは次のとおりです:
- Pitch Bend: Glide とも呼ばれる第 1 次元の Control Change。Pitch Bend 情報は、両方のメッセージレベルで受信した場合、組み合わせる必要があります。
- Channel Pressure: Press とも呼ばれる第 2 次元の Control Change。Channel Pressure 情報は、両方のメッセージレベルで受信した場合、組み合わせる必要があります。
- Timbre(CC #74): Slide とも呼ばれる第 3 次元の Control Change。Timbre 情報は、両方のメッセージレベルで受信した場合、組み合わせる必要があります。
- Pitch Bend Sensitivity: ピッチベンド感度を変更する Control Change で、Note Level として使用する場合はすべてのメンバーチャンネルに送信する必要があります。
- Program Change/Bank Select: Program Change は、MIDI Mode 4 でメンバーチャンネルに送信される場合を除き、マスターチャンネルで送信されます。
通常 Note Level として送信されるメッセージは次のとおりです:
- Note On/Off: Note On および Note Off メッセージは、適切なメンバーチャンネルで送信する必要がありますが、下位互換性のためにマスターチャンネルでも許可されます。
- MIDI Mode(CC #126, #127): MIDI Mode 3 と 4 を切り替える Control Change は、最も低いメンバーチャンネルに送信されます。
これらのメッセージレベルは、シンセサイザー内でゾーンを定義する際の設計上の決定に影響するため、覚えておくことが重要です。
ゾーンの設定
チュートリアル: マルチポリフォニックシンセサイザーの構築で実装されたレガシーモードがない場合、少なくとも 1 つのゾーンを設定するまでシンセサイザーは音を出力しません。
MPESetupComponent クラスでは、ゾーンの作成と削除を可能にするラムダ関数を使用して 3 つのボタンコールバックを追加します。Lower ゾーンと Upper ゾーンを作成するか、ゾーンレイアウトのすべてのゾーンをクリアできます。
MPESetupComponent()
{
    addAndMakeVisible (isLowerZoneButton);
    isLowerZoneButton.setToggleState (true, juce::NotificationType::dontSendNotification);
addAndMakeVisible (setZoneButton);
setZoneButton.onClick = [this]
{
    auto isLowerZone = isLowerZoneButton.getToggleState();
    auto numMemberChannels = memberChannels.getValue();
    auto perNotePb = notePitchbendRange.getValue();
    auto masterPb = masterPitchbendRange.getValue();

    setZoneButtonClicked (isLowerZone, numMemberChannels, perNotePb, masterPb);
};
addAndMakeVisible (clearAllZonesButton);
clearAllZonesButton.onClick = [this]
{
    clearAllZonesButtonClicked();
};
まず、Lower/Upper ゾーンの選択、メンバーチャンネルの数、Zone Level のピッチベンド、Note Level のピッチベンドを保存する新しいローカル変数を作成します。次に、対応する setLowerZone() または setUpperZone() 関数を呼び出して、MPEZoneLayout オブジェクトにゾーンを設定します。
ゾーンをクリアするときのコールバックを処理するには、次のように MPEZoneLayout オブジェクトで clearAllZones() 関数を呼び出すだけです:
void clearAllZonesButtonClicked()
{
    zoneLayout.clearAllZones();
    listeners.call ([] (Listener& l) { l.allZonesCleared(); });
}
シンセサイザーの設定
MPESetupComponent クラスはブロードキャスターとして機能するため、ゾーンレイアウトが変更されたときにコールバックを受信するために、MainComponent クラスでリスナーとして登録できます。
class MainComponent : public juce::Component,
                      private juce::AudioIODeviceCallback,
                      private juce::MidiInputCallback,
                      private MPESetupComponent::Listener
{
public:
その後、対応する関数をオーバーライドして、シンセサイザーを適切に設定できます。
zoneChanged() コールバックでは、新しく作成されたゾーンを MPEZoneLayout メンバー変数に設定します [1]。その後、setZoneLayout() を呼び出して MPEZoneLayout オブジェクトを MPESynthesiser に渡すことができます [2]:
void zoneChanged (bool isLowerZone, int numMemberChannels, int perNotePitchbendRange, int masterPitchbendRange) override
{
    auto* midiOutput = audioDeviceManager.getDefaultMidiOutput();
    if (midiOutput != nullptr)
    {
        if (isLowerZone)
            midiOutput->sendBlockOfMessagesNow (juce::MPEMessages::setLowerZone (numMemberChannels, perNotePitchbendRange, masterPitchbendRange));
        else
            midiOutput->sendBlockOfMessagesNow (juce::MPEMessages::setUpperZone (numMemberChannels, perNotePitchbendRange, masterPitchbendRange));
    }

    if (isLowerZone)
        zoneLayout.setLowerZone (numMemberChannels, perNotePitchbendRange, masterPitchbendRange);
    else
        zoneLayout.setUpperZone (numMemberChannels, perNotePitchbendRange, masterPitchbendRange);

    visualiserInstrument.setZoneLayout (zoneLayout);
    synth.setZoneLayout (zoneLayout);
    colourPicker.setZoneLayout (zoneLayout);
}
allZonesCleared() コールバックでは、MPEZoneLayout メンバー変数のすべてのゾーンを空にします [3]。その後、同様に setZoneLayout() を呼び出して MPEZoneLayout オブジェクトを MPESynthesiser に渡すことができます [4]:
void allZonesCleared() override
{
    auto* midiOutput = audioDeviceManager.getDefaultMidiOutput();
    if (midiOutput != nullptr)
        midiOutput->sendBlockOfMessagesNow (juce::MPEMessages::clearAllZones());

    zoneLayout.clearAllZones();
    visualiserInstrument.setZoneLayout (zoneLayout);
    synth.setZoneLayout (zoneLayout);
    colourPicker.setZoneLayout (zoneLayout);
}
MPESynthesiserVoice オブジェクトの数が変更されると、numberOfVoicesChanged() コールバックを受信します。これにより、MPESynthesiser オブジェクトでそれぞれ reduceNumVoices() および addVoice() 関数を使用して、ボイスを削除または追加できます:
void numberOfVoicesChanged (int numberOfVoices) override
{
    if (numberOfVoices < synth.getNumVoices())
        synth.reduceNumVoices (numberOfVoices);
    else
        while (synth.getNumVoices() < numberOfVoices)
            synth.addVoice (new MPEDemoSynthVoice());
}
ピッチベンドの割り当て
シンセサイザーを実行すると、ゾーンごとにカスタマイズ可能な数のメンバーチャンネルで Lower ゾーンと Upper ゾーンを追加できます。

Lower ゾーンと Upper ゾーンに異なるピッチベンド感度を割り当てて、異なるゾーンの MIDI チャンネルに割り当てられたノートのピッチベンドへの影響に注目してください。
演習: MPEDemoSynthVoice クラスで Lower ゾーンと Upper ゾーンに異なるサウンドを割り当て、timbre パラメーターに応じて三角波とノコギリ波の間でクロスフェードします。
この演習のソースコードは、デモプロジェクトの MPEZonesTutorial_02.h ファイルにあります。
まとめ
このチュートリアルでは、MPE ゾーンとノートを管理する方法を学びました。特に、次のことを行いました:
- Zone と MPEZoneLayout を設定する際の規約を学びました。
- MPE と互換性のある 2 つの MIDI モードを理解しました。
- さまざまな Note Level および Zone Level メッセージを探求しました。
- Lower ゾーンと Upper ゾーンに異なるピッチベンド感度を割り当てました。