チュートリアル: MIDIイベントの処理
このチュートリアルでは、MIDI入力イベントの処理方法を示します。外部ソースからのMIDIデータの処理に加えて、画面上のキーボードコンポーネントも紹介します。
レベル: 中級
プラットフォーム: Windows, macOS, Linux
クラス: AudioDeviceManager, MidiMessage, MidiInputCallback, ComboBox, MidiKeyboardComponent, MidiKeyboardState, CallbackMessage, ScopedValueSetter
はじめに
このチュートリアルのデモプロジェクトをダウンロードしてください: PIP | ZIP。プロジェクトを解凍し、Projucerで最初のヘッダーファイルを開いてください。
この手順でヘルプが必要な場合は、Tutorial: Projucer Part 1: Getting started with the Projucerを参照してください。
理想的には、コンピュータに外部MIDIソースを接続する必要があります。それができない場合は、コンピュータ上に仮想MIDIポートを作成する何らかの仮想MIDIソース)が役立ちます。
デモプロジェクト
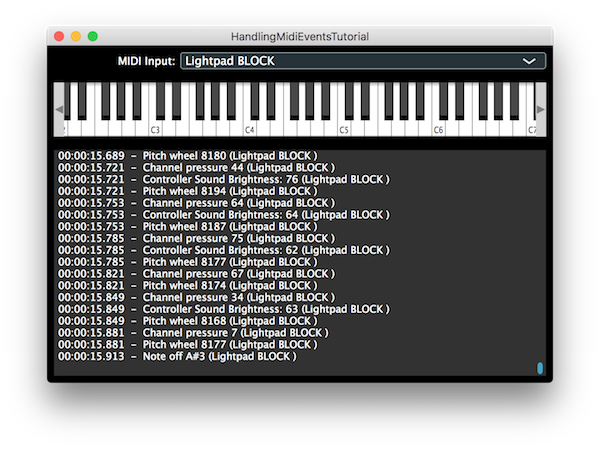
このデモプロジェクトは、画面上のMIDIキーボードを表示し、ユーザーがコンボボックスを使用してハードウェアデバイスのMIDI入力の1つを選択できるようにします。これらのソースのいずれかから受信したMIDIイベントは、ウィンドウの下部に表示されます。これは次のスクリーンショットに示されています:

MIDI入力
このチュートリアルでは、基本的なアプリケーションでMIDI入力を処理する方法を示します。JUCEを使用すると、接続されているハードウェアMIDIインターフェイスのリストを簡単に見つけることができます。また、画面上のキーボードを表示できるMidiKeyboardComponentクラスも提供します。まず、MainContentComponentクラスのメンバー変数を見てみましょう:
juce::AudioDeviceManager deviceManager; // [1]
juce::ComboBox midiInputList; // [2]
juce::Label midiInputListLabel;
int lastInputIndex = 0; // [3]
bool isAddingFromMidiInput = false; // [4]

juce::MidiKeyboardState keyboardState; // [5]
juce::MidiKeyboardComponent keyboardComponent; // [6]

juce::TextEditor midiMessagesBox;
double startTime;
- [1]: AudioDeviceManagerクラスを使用して、有効になっているMIDI入力デバイスを見つけます。
- [2]: ユーザーが選択できるように、MIDI入力デバイスの名前をこのコンボボックスに表示します。
- [3]: これは、ユーザーが別の入力を選択したときに、以前に選択したMIDI入力の登録を解除するために使用されます。
- [4]: このフラグは、画面上のキーボードのマウスクリックではなく、外部ソースからMIDIデータが到着していることを示すために使用されます。
- [5]: MidiKeyboardStateクラスは、現在押されているMIDIキーを追跡します。
- [6]: これは、画面上のキーボードコンポーネントです。
MainContentComponentコンストラクタでは、[3]、[4]、および[6]を初期化します。また、MIDIデータのタイムスタンプをこれに対して相対的に表示できるように、アプリケーションの開始時刻をメモします。
MainContentComponent()
    : keyboardComponent (keyboardState, juce::MidiKeyboardComponent::horizontalKeyboard),
      startTime (juce::Time::getMillisecondCounterHiRes() * 0.001)
{
MidiKeyboardComponentオブジェクトを初期化するには、MidiKeyboardStateオブジェクトを渡す必要があります。また、これらは静的に割り当てられたオブジェクトであるため、MidiKeyboardStateはメンバー変数で最初にリストする必要があります。
MIDI入力リスト
MIDI入力のリストを含むコンボボックスは、MidiInputクラスからMidiInput::getDevices()関数を使用してコンピュータに接続されているMIDI入力のリストを取得することで入力されます:
addAndMakeVisible (midiInputList);
midiInputList.setTextWhenNoChoicesAvailable ("No MIDI Inputs Enabled");
auto midiInputs = juce::MidiInput::getAvailableDevices();

juce::StringArray midiInputNames;

for (auto input : midiInputs)
    midiInputNames.add (input.name);

midiInputList.addItemList (midiInputNames, 1);
midiInputList.onChange = [this] { setMidiInput (midiInputList.getSelectedItemIndex()); };

// find the first enabled device and use that by default
for (auto input : midiInputs)
{
    if (deviceManager.isMidiInputDeviceEnabled (input.identifier))
    {
        setMidiInput (midiInputs.indexOf (input));
        break;
    }
}

// if no enabled devices were found just use the first one in the list
if (midiInputList.getSelectedId() == 0)
    setMidiInput (0);
ユーザーが選択したMIDI入力を変更すると、ComboBox::onChangeヘルパーオブジェクトに割り当てられたラムダ関数が呼び出されます:
midiInputList.onChange = [this] { setMidiInput (midiInputList.getSelectedItemIndex()); };
setMidiInput()関数により、アプリケーションは選択したデバイスをリスニングし始めます。また、現在無効になっている場合は、デバイスを有効にします:
void setMidiInput (int index)
{
    auto list = juce::MidiInput::getAvailableDevices();

    deviceManager.removeMidiInputDeviceCallback (list[lastInputIndex].identifier, this);

    auto newInput = list[index];

    if (!deviceManager.isMidiInputDeviceEnabled (newInput.identifier))
        deviceManager.setMidiInputDeviceEnabled (newInput.identifier, true);

    deviceManager.addMidiInputDeviceCallback (newInput.identifier, this);
    midiInputList.setSelectedId (index + 1, juce::dontSendNotification);

    lastInputIndex = index;
}
外部MIDI入力の処理
MidiInputCallback::handleIncomingMidiMessage()純粋仮想関数を実装します。これにより、キーボードの状態が更新されます(これにより、MidiKeyboardComponentオブジェクトも更新されます):
void handleIncomingMidiMessage (juce::MidiInput* source, const juce::MidiMessage& message) override
{
    const juce::ScopedValueSetter<bool> scopedInputFlag (isAddingFromMidiInput, true);
    keyboardState.processNextMidiEvent (message);
    postMessageToList (message, source->getName());
}
scopedInputFlag変数は、ScopedValueSetterクラスを利用していることに注意してください。これは次のことを行います:
isAddingFromMidiInputメンバーの現在の状態を保存します。isAddingFromMidiInputメンバーをtrueに設定します。- 関数が終了すると、
isAddingFromMidiInputメンバーの値を関数の開始時の状態にリセットします。
MIDIキーボードの状態とコンポーネント
MainContentComponentコンストラクタでは、MidiKeyboardComponentオブジェクトをMainContentComponent親コンポーネントに追加して表示します。また、MidiKeyboardStateオブジェクト(コンポーネント_ではなく_)をリスニングします:
addAndMakeVisible (keyboardComponent);
keyboardState.addListener (this);
MidiKeyboardStateListenerクラスには、実装する必要がある2つの純粋仮想関数があります。これらは、MidiKeyboardStateListener::handleNoteOn()およびMidiKeyboardStateListener::handleNoteOff()関数です。
void handleNoteOn (juce::MidiKeyboardState*, int midiChannel, int midiNoteNumber, float velocity) override
{
    if (!isAddingFromMidiInput)
    {
        auto m = juce::MidiMessage::noteOn (midiChannel, midiNoteNumber, velocity);
        m.setTimeStamp (juce::Time::getMillisecondCounterHiRes() * 0.001);
        postMessageToList (m, "On-Screen Keyboard");
    }
}

void handleNoteOff (juce::MidiKeyboardState*, int midiChannel, int midiNoteNumber, float /*velocity*/) override
{
    if (!isAddingFromMidiInput)
    {
        auto m = juce::MidiMessage::noteOff (midiChannel, midiNoteNumber);
        m.setTimeStamp (juce::Time::getMillisecondCounterHiRes() * 0.001);
        postMessageToList (m, "On-Screen Keyboard");
    }
}
ここで、isAddingFromMidiInputメンバーがどのように使用されているかを確認できます。これにより、ハードウェア入力から到着したイベントが複数回リストに投稿されるのを防ぎます。
リストへのメッセージの投稿
postMessageToList()関数は、最初は少し異常に見えるかもしれません:
void postMessageToList (const juce::MidiMessage& message, const juce::String& source)
{
    (new IncomingMessageCallback (this, message, source))->post();
}
IncomingMessageCallbackクラスは、CallbackMessageクラスのサブクラスです。postMessageToList()関数がどのスレッドから呼び出されるかわからないため、これを使用する必要があります。ユーザーがMidiKeyboardComponentオブジェクトをクリックすると、メッセージスレッドから呼び出されます。しかし、データが外部MIDIソースから到着した場合は、バックグラウンドMIDIスレッド(おそらくオペレーティングシステムのスレッド)から呼び出されます。
CallbackMessageクラスは、メッセージスレッドで関数を呼び出す手段を提供します。CallbackMessageクラスは、ReferenceCountedObjectクラスの一種です。これが、IncomingMessageCallbackオブジェクトをどこかに保存する必要がない(見かけ上)理由です。実際、IncomingMessageCallback::post()関数(MessageManager::MessageBase::post()関数)は、オブジェクトをMessageManagerクラスによって処理されるキューに追加します。MessageManagerクラスは、最終的にキュー内のこのオブジェクトを見つけて、メッセージスレッドでIncomingMessageCallback::messageCallback()関数を呼び出します。この関数が呼び出されると、IncomingMessageCallbackオブジェクトは削除されます。したがって、このオブジェクトの寿命は(ほぼ)自動的に処理されます。
これは、データをメッセージスレッドに送信する必要があるため、実際に必要なだけです。MIDIアプリケーションでは、何らかのスレッド間通信が必要になる可能性がありますが、正確な実装は状況によって異なります。
メッセージの表示
addMessageToList()およびgetMidiMessageDescription()関数は、Tutorial: Create MIDI dataのこれらの関数と非常に似ています。主な違いは、MIDIメッセージのソース[7](どのハードウェア入力、または画面上のキーボード)をメモすることです:
void addMessageToList (const juce::MidiMessage& message, const juce::String& source)
{
    auto time = message.getTimeStamp() - startTime;

    auto hours = ((int) (time / 3600.0)) % 24;
    auto minutes = ((int) (time / 60.0)) % 60;
    auto seconds = ((int) time) % 60;
    auto millis = ((int) (time * 1000.0)) % 1000;

    auto timecode = juce::String::formatted ("%02d:%02d:%02d.%03d",
        hours,
        minutes,
        seconds,
        millis);

    auto description = getMidiMessageDescription (message);

    juce::String midiMessageString (timecode + " - " + description + " (" + source + ")"); // [7]
    logMessage (midiMessageString);
}
演習: ユーザーインターフェイスにいくつかのスライダーを追加して、モジュレーションホイール(CC1)やピッチホイールなどのメッセージを送信および応答します。
まとめ
このチュートリアルでは、MIDI入力イベントを処理および表示するためのいくつかのクラスを紹介しました。特に、次のことができるようになります:
- 利用可能なMIDI入力デバイスをリストする。
- MIDI入力デバイスのメニューを作成する。
- ハードウェア入力に到着したMIDIをリスニングする。
- MidiKeyboardComponentクラスを使用してMIDIノートデータを表示する。
- CallbackMessageクラスを使用して、他のスレッドからメッセージスレッドで処理されるメッセージを投稿する。