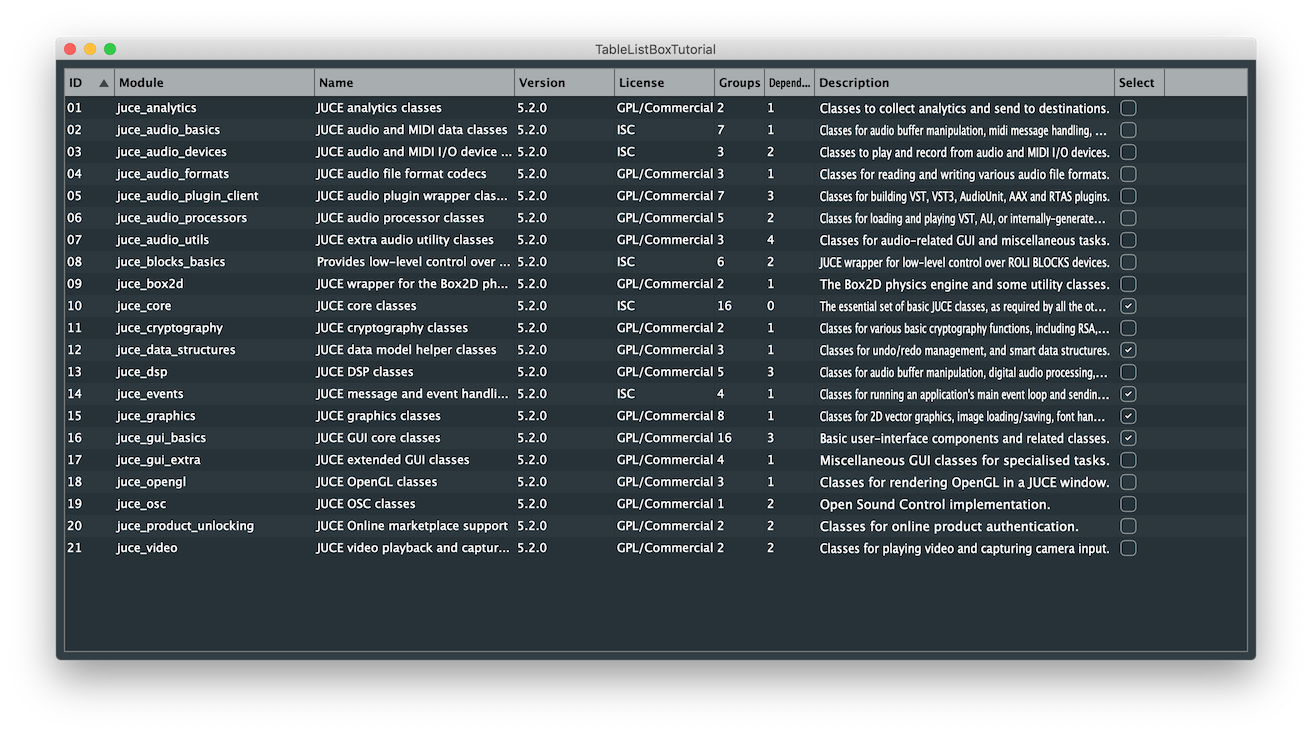
チュートリアル:TableListBox クラス
JUCE ユーザーインターフェースにテーブルを組み込みます。XML ファイルから読み込んだデータを表示し、テーブルの形式をカスタマイズします。
レベル: 中級
プラットフォーム: Windows, macOS, Linux
クラス: TableListBox, TableListBoxModel, ListBox, ListBoxModel, TableHeaderComponent, XmlDocument, XmlElement
はじめに
このチュートリアルのデモプロジェクトをこちらからダウンロードしてください:PIP | ZIP。プロジェクトを解凍し、最初のヘッダファイルを Projucer で開いてください。
このプロジェクトの PIP バージョンを使用する場合は、Resourcesフォルダを生成された Projucer プロジェクトにコピーしてください。
この手順でサポートが必要な場合は、チュートリアル:Projucer Part 1: Projucer を始めようを参照してください。
デモプロジェクト
デモプロジェクトは、JUCE モジュールに関する情報を含む XML ファイルから読み込んだテーブルを表示します。テーブルは選択した列に従ってソートでき、特定のエントリは編集可能で、列は非表示にできます。

ListBox クラス
JUCE でテーブルを表示できる基本のComponentクラスはListBoxクラスと呼ばれます。ListBoxの動作は、表示するデータモデルを記述するListBoxModelクラスによって管理されます。これは、スクロール可能なビューポートに項目のリストを表示するのに便利ですが、列を記述するヘッダー付きの適切なテーブルにするには、それぞれTableListBoxとTableListBoxModelクラスを使用できます。これらのクラスは対応するクラスと同じ動作をカプセル化しますが、列ヘッダーを表示するためのTableHeaderComponentの機能を組み込んでいます。
TableListBoxを実装し、TableListBoxModelを継承する場合、オーバーライドすべきいくつかの関数があります:
getNumRows():テーブル内の現在の行数を返す必要があります。paintRowBackground():提供されたGraphicsコンテキストを使用して、行番号で指定された行の背景を描画する必要があります。paintCell():提供されたGraphicsコンテキストを使用して、行番号と列番号で指定されたセルを描画する必要があります。refreshComponentForCell():オプションで、テーブル内のカスタムコンポーネントを作成および更新するためにこのメソッドをオーバーライドできます。getColumnAutoSizeWidth():列の幅に自動サイズを使用する場合、オプションで列がどのようにリサイズするかを指定できます。sortOrderChanged():カスタムソート順序を使用する場合、オプションで列がどのように並べ替えられるかを指定できます。
追加機能のためにオーバーライドできる他の関数もありますが、このチュートリアルではここに示されている関数を実装します。
XML からのデータの読み込み
テーブルに表示したいデータを XML ドキュメントから読み込むことから始めましょう。
プロジェクトのResourcesフォルダには、このチュートリアルで使用するサンプルデータがTableData.xmlというファイルに以下の形式で含まれています:
<TABLE_DATA>
<HEADERS>
<COLUMN columnId="1" name="ID" width="50"/>
//...
</HEADERS>
<DATA>
<ITEM ID="01" Module="juce_module" Name="JUCE example classes" Version="5.2.0" License="ISC" Groups="2" Dependencies="1" Description="..." Select="0"/>
//...
</DATA>
</TABLE_DATA>
ここでは、ファイル全体をTABLE_DATAタグでカプセル化し、テーブルヘッダーと実際のデータはそれぞれHEADERSとDATAタグを使用して分離されています。列は個々のCOLUMNタグで定義され、行はITEMタグを使用して定義され、その行の各列のコンテンツには属性が使用されます。
このプロジェクトのコードの実装は、このファイル構造に合わせて作られていますが、XML タグは好きなように変更できます。
TableTutorialComponentクラスでは、ファイルの内容を単一のXmlElementメンバー変数に一時的に格納するポインタを定義し、また列コンテンツと行コンテンツのための 2 つの追加の XmlElement も定義します。以下に示されています:
class TableTutorialComponent : public juce::Component,
                               public juce::TableListBoxModel
{
std::unique_ptr<juce::XmlElement> tutorialData;
juce::XmlElement* columnList = nullptr;
juce::XmlElement* dataList = nullptr;
クラスコンストラクタでは、表示するデータファイルを選択するためにFileChooserを起動します。FileChooserが完了すると、callbackラムダ関数を呼び出して、ファイルコンテンツをXmlElementオブジェクトに読み込みます[1]。XML ファイルからデータを読み込んだら、for()ループとXmlElement::getChildIteratorを使用して列ヘッダーを反復処理し、addColumn()関数を使用してテーブルヘッダーを割り当てます[2]:
TableTutorialComponent()
{
    const auto callback = [this] (const juce::FileChooser& chooser) {
loadData (chooser.getResult()); // [1]
if (columnList != nullptr)
{
    for (auto* columnXml : columnList->getChildIterator())
    {
        table.getHeader().addColumn (columnXml->getStringAttribute ("name"), // [2]
            columnXml->getIntAttribute ("columnId"),
            columnXml->getIntAttribute ("width"),
            50,
            400,
            juce::TableHeaderComponent::defaultFlags);
    }
}
この関数は、列のソート可能性とリサイズ可能性を定義するプロパティフラグとともに、列の名前、幅、ID を指定します。
コンストラクタで呼び出されるloadData()ヘルパー関数では、まずResourcesディレクトリと読み込む XML ファイルを見つけ、このFileオブジェクトをparse()関数を使用して解析します[3]。次に、XML 構造をトラバースし、getChildByName()関数で対応するタグを見つけることで、一時的なXmlElementから行と列を取得できます[4]。これは、データXmlElementに対してgetNumChildElements()を呼び出すことで行数を設定するのに適した場所です[5]:
void loadData (juce::File tableFile)
{
    if (tableFile == juce::File() || !tableFile.exists())
        return;

    tutorialData = juce::XmlDocument::parse (tableFile); // [3]

    dataList = tutorialData->getChildByName ("DATA");
    columnList = tutorialData->getChildByName ("HEADERS"); // [4]

    numRows = dataList->getNumChildElements(); // [5]
}
このチュートリアルのリソースで提供されている「TableData.xml」ファイルを選択してください。
また、後で便利になるgetAttributeNameForColumnId()というヘルパー関数を定義しましょう。これは ID に基づいて列の名前を返します:
juce::String getAttributeNameForColumnId (const int columnId) const
{
    for (auto* columnXml : columnList->getChildIterator())
    {
        if (columnXml->getIntAttribute ("columnId") == columnId)
            return columnXml->getStringAttribute ("name");
    }

    return {};
}
ここでは、子 XML 要素を反復処理し、一致する列 ID を見つけてその名前属性を返します。
カスタムセルコンポーネント
TableListBoxは、テキストだけでなく、セルにカスタムコンポーネントを保持できます。以下のセクションでは、列の 1 つにToggleButtonを組み込む方法と、ユーザー入力をリッスンする編集可能なLabelを探ります。
編集可能なラベル
EditableTextCustomComponentクラスでは、まずLabelクラスを継承して、ユーザーがダブルクリックしたときに編集可能に設定します:
class EditableTextCustomComponent : public juce::Label
{
public:
    EditableTextCustomComponent (TableTutorialComponent& td)
        : owner (td)
    {
        setEditable (false, true, false);
    }
private:
    TableTutorialComponent & owner;
    int row, columnId;
    juce::Colour textColour;
};
ここでは、このオブジェクトがどの行と列に表示されているかと、実際のテーブルへの参照も追跡しています。
ユーザーがLabelを操作するとき、テーブルでの複数選択を考慮して、通常のmouseDown()機能を拡張する必要があります。これは、テーブルに対してselectRowsBasedOnModifierKeys()を呼び出し、修飾キーを引数として渡すことで実現されます。ここでも、元の動作を維持するために基底クラスの関数を呼び出す必要があることに注意してください:
void mouseDown (const juce::MouseEvent& event) override
{
    owner.table.selectRowsBasedOnModifierKeys (row, event.mods, false);

    Label::mouseDown (event);
}
ユーザーがLabelのテキストを編集すると、textWasEdited()関数からコールバックを受け取り、対応するXmlElementオブジェクトに変更を保存するために、TableTutorialComponentクラスで後で定義されるヘルパー関数setText()を呼び出します:
void textWasEdited() override
{
    owner.setText (columnId, row, getText());
}
以下の関数は、EditableTextCustomComponentオブジェクトを作成または更新するときにTableListBoxModelによって呼び出され、後で定義されるgetText()ヘルパー関数を使用して、行、列、およびXmlElementからの表示テキストを設定します:
void setRowAndColumn (const int newRow, const int newColumn)
{
    row = newRow;
    columnId = newColumn;
    setText (owner.getText (columnId, row), juce::dontSendNotification);
}
getText()とsetText()ヘルパー関数は以下のように定義されています:
juce::String getText (const int columnNumber, const int rowNumber) const
{
    return dataList->getChildElement (rowNumber)->getStringAttribute (getAttributeNameForColumnId (columnNumber));
}
ここでは、XmlElement内の子要素から行番号と列番号のテキストを見つけます。
void setText (const int columnNumber, const int rowNumber, const juce::String& newText)
{
    const auto& columnName = table.getHeader().getColumnName (columnNumber);
    dataList->getChildElement (rowNumber)->setAttribute (columnName, newText);
}
ここでは、行番号と列番号からXmlElement内の子要素にテキストを格納します。
選択可能なボタン
SelectionColumnCustomComponentクラスでは、まずComponentクラスを継承して、ToggleButtonを子Componentとして設定し、ユーザーが操作したときに呼び出されるコールバック関数を割り当てます:
class SelectionColumnCustomComponent : public Component
{
public:
    SelectionColumnCustomComponent (TableTutorialComponent& td)
        : owner (td)
    {
        addAndMakeVisible (toggleButton);

        toggleButton.onClick = [this] { owner.setSelection (row, (int) toggleButton.getToggleState()); };
    }
private:
    TableTutorialComponent & owner;
    juce::ToggleButton toggleButton;
    int row, columnId;
};
ここでは、このオブジェクトがどの行と列に表示されているかと、実際のテーブルへの参照も追跡しています。ラムダ関数は、ボタンのトグル状態を設定するsetSelection()ヘルパー関数を呼び出します。
void resized() override
{
    toggleButton.setBoundsInset (juce::BorderSize<int> (2));
}
resized()関数は、ToggleButtonオブジェクトの境界を設定します。
以下の関数は、SelectionColumnCustomComponentオブジェクトを作成または更新するときにTableListBoxModelによって呼び出され、後で定義されるgetSelection()ヘルパー関数を使用して、行、列、およびXmlElementからのトグル状態を設定します:
void setRowAndColumn (int newRow, int newColumn)
{
    row = newRow;
    columnId = newColumn;
    toggleButton.setToggleState ((bool) owner.getSelection (row), juce::dontSendNotification);
}
getSelection()とsetSelection()ヘルパー関数は以下のように定義されています:
int getSelection (const int rowNumber) const
{
    return dataList->getChildElement (rowNumber)->getIntAttribute ("Select");
}
ここでは、XmlElement内の子要素から行番号と列番号のトグル状態を見つけます。
void setSelection (const int rowNumber, const int newSelection)
{
    dataList->getChildElement (rowNumber)->setAttribute ("Select", newSelection);
}
ここでは、行番号と列番号からXmlElement内の子要素にトグル状態を格納します。
演習:ComboBox、TextButton、またはSliderコンポーネントを組み込んだ追加のカスタムセルコンポーネントを作成してください。
データのソート
テーブルが選択した列に基づいて要素をソートするには、XmlElementオブジェクトのsortChildElements()関数によって使用されるテンプレートクラスとして渡すことができるコンパレータクラスを定義する必要があります。
このクラスをTutorialDataSorterと名付け、ソートするXmlElement属性の名前とソートアルゴリズムの昇順または降順の方向を追跡します:
class TutorialDataSorter
{
public:
    TutorialDataSorter (const juce::String& attributeToSortBy, bool forwards)
        : attributeToSort (attributeToSortBy),
          direction (forwards ? 1 : -1)
    {
    }
private:
    juce::String attributeToSort;
    int direction;
};
sortChildElements()関数がTutorialDataSorterを有効なコンパレータとして認識するためには、2 つのXmlElementオブジェクトを受け取り、順序を int として返すcompareElements()という名前の関数を宣言する必要があります。
この関数は以下を返す必要があります:
- 最初のものが 2 番目のものより前に来る場合は負の値。
- 2 つのオブジェクトが等価な場合は 0 の値。
- 2 番目のものが最初のものより前に来る場合は正の値。
int compareElements (juce::XmlElement* first, juce::XmlElement* second) const
{
    auto result = first->getStringAttribute (attributeToSort)
                      .compareNatural (second->getStringAttribute (attributeToSort)); // [1]

    if (result == 0)
        result = first->getStringAttribute ("ID")
                     .compareNatural (second->getStringAttribute ("ID")); // [2]

    return direction * result; // [3]
}
したがって、上記の関数では、同じルールセットで int を返すStringクラスのcompareNatural()メソッドを使用して、両方の XmlElement の文字列属性を比較します[1]。問題の属性の 2 つの文字列が等価な場合、これら 2 つの要素の ID 列を比較します[2]。最後に、ソートの方向が逆の場合は結果を反転する必要があります[3]。
モデルの設定
TableListBoxModelを実装して、すべてのピースを組み立てましょう。
まず、ここに示すようにTableTutorialComponentクラスでTableListBoxModelクラスを継承します:
class TableTutorialComponent : public juce::Component,
                               public juce::TableListBoxModel
{
private:
    juce::TableListBox table { {}, this };
    juce::Font font { 14.0f };

    std::unique_ptr<juce::XmlElement> tutorialData;
    juce::XmlElement* columnList = nullptr;
    juce::XmlElement* dataList = nullptr;
    int numRows = 0;
ここでは、TableListBoxメンバー変数を定義し、このクラスをそのTableListBoxModelとして設定します。これは、このシナリオではモデルクラスが実際にテーブル自体を保持していることを意味します。また、モデルが必要とするテーブル内の行数も追跡しています。
クラスコンストラクタでは、TableListBoxを子Componentとして追加します[1]。また、アウトライン色とその厚さなど、テーブルの外観のプロパティを指定することもできます[2]。
addAndMakeVisible (table); // [1]

table.setColour (juce::ListBox::outlineColourId, juce::Colours::grey); // [2]
table.setOutlineThickness (1);
table.getHeader().setSortColumnId (1, true); // [3]

table.setMultipleSelectionEnabled (true); // [4]
ソート列と列の表示/非表示は、テーブルのTableHeaderComponentに対して対応する関数を呼び出すことで設定され[3]、テーブルでの複数選択も許可します[4]。
オーバーライドする最初の関数は、行数を保持するメンバー変数を返すgetNumRows()関数です。この関数は、モデルがテーブルを適切に更新するために必要です:
int getNumRows() override
{
    return numRows;
}
paintRowBackground()関数は、まずテーブルのデフォルト背景色を補完する交互色を見つけることで実装されます:
void paintRowBackground (juce::Graphics& g, int rowNumber, int /*width*/, int /*height*/, bool rowIsSelected) override
{
    auto alternateColour = getLookAndFeel().findColour (juce::ListBox::backgroundColourId).interpolatedWith (getLookAndFeel().findColour (juce::ListBox::textColourId), 0.03f);
    if (rowIsSelected)
        g.fillAll (juce::Colours::lightblue);
    else if (rowNumber % 2)
        g.fillAll (alternateColour);
}
行が選択されている場合は薄い青で塗りつぶされ、そうでなければこの交互色で他のすべての行を塗りつぶします。
セルにコンテンツを埋めるために、paintCell()関数を以下のようにオーバーライドします:
void paintCell (juce::Graphics& g, int rowNumber, int columnId, int width, int height, bool rowIsSelected) override
{
    g.setColour (rowIsSelected ? juce::Colours::darkblue : getLookAndFeel().findColour (juce::ListBox::textColourId)); // [5]
    g.setFont (font);

    if (auto* rowElement = dataList->getChildElement (rowNumber))
    {
        auto text = rowElement->getStringAttribute (getAttributeNameForColumnId (columnId));

        g.drawText (text, 2, 0, width - 4, height, juce::Justification::centredLeft, true); // [6]
    }

    g.setColour (getLookAndFeel().findColour (juce::ListBox::backgroundColourId));
    g.fillRect (width - 1, 0, 1, height); // [7]
}
- [5]:まず、行が選択されているかどうかに応じて適切なテキストの色を選択し、フォントサイズを設定します。
- [6]:子行要素がXmlElementオブジェクトに存在する場合、行から適切な列を取得し、セルにXmlElementからの対応するテキストを埋めます。
- [7]:最後に、デフォルトの背景色でセルの右側に区切り線を描画します。
void sortOrderChanged (int newSortColumnId, bool isForwards) override
{
    if (newSortColumnId != 0)
    {
        TutorialDataSorter sorter (getAttributeNameForColumnId (newSortColumnId), isForwards);
        dataList->sortChildElements (sorter);

        table.updateContent();
    }
}
ユーザーによってソート順序の変更が要求されると、sortOrderChanged()コールバック関数が呼び出され、ソート列が有効な場合、正しい属性と方向でTutorialDataSorterオブジェクトをインスタンス化します。次に、そのオブジェクトをXmlElementのsortChildElements()関数に渡し、テーブルに対してupdateContent()を呼び出すことでテーブルの更新を強制します。
refreshComponentForCell()関数は、カスタムセルコンポーネントをインスタンス化および更新できる場所です:
Component* refreshComponentForCell (int rowNumber, int columnId, bool /*isRowSelected*/, Component* existingComponentToUpdate) override
{
    if (columnId == 9) // [8]
    {
        auto* selectionBox = static_cast<SelectionColumnCustomComponent*> (existingComponentToUpdate);

        if (selectionBox == nullptr)
            selectionBox = new SelectionColumnCustomComponent (*this);

        selectionBox->setRowAndColumn (rowNumber, columnId);
        return selectionBox;
    }

    if (columnId == 8) // [9]
    {
        auto* textLabel = static_cast<EditableTextCustomComponent*> (existingComponentToUpdate);

        if (textLabel == nullptr)
            textLabel = new EditableTextCustomComponent (*this);

        textLabel->setRowAndColumn (rowNumber, columnId);
        return textLabel;
    }

    jassert (existingComponentToUpdate == nullptr);
    return nullptr; // [10]
}
- [8]:関数が選択セルの正しい「Select」列で呼び出された場合、
SelectionColumnCustomComponentがセルに既に存在するかどうかをチェックします。存在しない場合は新しいインスタンスをインスタンス化し、setRowAndColumn()関数を呼び出してその内容を更新し、Componentを返します。 - [9]:関数がテキストエディターセルの正しい「Description」列で呼び出された場合、
EditableTextCustomComponentがセルに既に存在するかどうかをチェックします。存在しない場合は新しいインスタンスをインスタンス化し、setRowAndColumn()関数を呼び出してその内容を更新し、Componentを返します。 - [10]:それ以外の場合、関数が通常の列で呼び出されたことを意味し、そのセルのカスタムComponentオブジェクトは存在しないはずです。
最後に、TableListBoxは、getColumnAutoSizeWidth()関数で以下に定義された自動動作に従って列をリサイズできる便利な機能を提供します:
int getColumnAutoSizeWidth (int columnId) override
{
    if (columnId == 9)
        return 50;

    int widest = 32;

    for (auto i = getNumRows(); --i >= 0;)
    {
        if (auto* rowElement = dataList->getChildElement (i))
        {
            auto text = rowElement->getStringAttribute (getAttributeNameForColumnId (columnId));

            widest = juce::jmax (widest, font.getStringWidth (text));
        }
    }

    return widest + 8;
}
ここでは、特定の列のすべての要素を検査し、セル内の最も幅の広いテキストを取得することを決定します。次に、パディングを追加した幅、または列がカスタムToggleButtonを持つ「Select」列の場合は固定幅を返します。
演習:追加の列やデータを追加し、それに応じて実装を変更して、XML ドキュメントの内容を変更してください。
まとめ
このチュートリアルでは、テーブルに情報を表示する方法を学びました。特に、以下のことを行いました:
- XML を使用してテーブルにデータを読み込む。
- テーブルセルにカスタムコンポーネントを組み込む。
- カスタムソート動作に従ってテーブルデータをソートする。