チュートリアル:高度な GUI レイアウト技術
コンポーネントの矩形を何度もさまざまな方法で細分化してコンポーネント全体をコンテンツで埋める、シンプルながら強力な技術でコンポーネントをレイアウトします。バグの少ないエレガントなコードが生成されます。
レベル: 中級
プラットフォーム: Windows, macOS, Linux, iOS, Android
クラス: Rectangle, TextButton, Colours
はじめに
このチュートリアルのデモプロジェクトをこちらからダウンロードしてください:PIP | ZIP。プロジェクトを解凍し、最初のヘッダファイルを Projucer で開いてください。
この手順でサポートが必要な場合は、チュートリアル:Projucer Part 1: Projucer を始めようを参照してください。
デモプロジェクト
デモプロジェクトは少数のボタンコンポーネントを使用し、親コンポーネント内にレイアウトします。この例ではボタンをプレースホルダーとして使用していますが、任意のタイプの JUCE コンポーネントにすることができます。IDE でアプリケーションをビルドして実行すると、メインウィンドウは以下のスクリーンショットのようになるはずです。
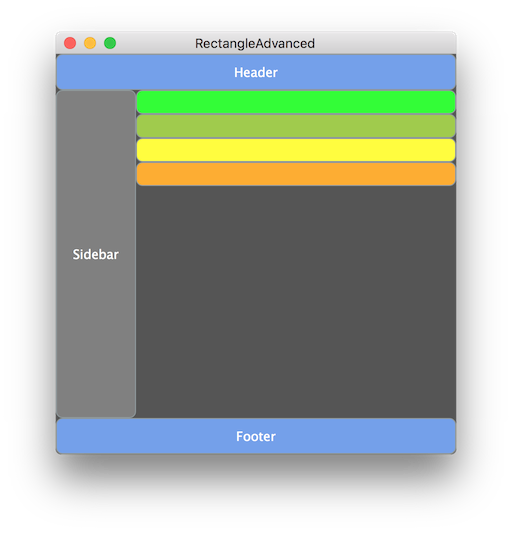
矩形レイアウト
このシンプルなアプリケーションには、メインウィンドウにいくつかのセクションがあります:
- タイトルやツールバーを含む可能性のあるヘッダーセクション。
- アプリケーションに関する他の情報を含む可能性のあるフッターセクション。
- 一連のセクションや他のコンテンツを含む可能性のあるサイドバー。
- ウィンドウの残りの部分にリストされたいくつかのコンテンツ項目。
これらはMainContentComponentコンストラクタで追加されます(チュートリアル:親コンポーネントと子コンポーネントとチュートリアル:JUCE での色を参照):
MainContentComponent()
{
    header.setColour (juce::TextButton::buttonColourId, juce::Colours::cornflowerblue);
    header.setButtonText ("Header");
    addAndMakeVisible (header);

    footer.setColour (juce::TextButton::buttonColourId, juce::Colours::cornflowerblue);
    footer.setButtonText ("Footer");
    addAndMakeVisible (footer);

    sidebar.setColour (juce::TextButton::buttonColourId, juce::Colours::grey);
    sidebar.setButtonText ("Sidebar");
    addAndMakeVisible (sidebar);

    limeContent.setColour (juce::TextButton::buttonColourId, juce::Colours::lime);
    addAndMakeVisible (limeContent);

    grapefruitContent.setColour (juce::TextButton::buttonColourId, juce::Colours::yellowgreen);
    addAndMakeVisible (grapefruitContent);

    lemonContent.setColour (juce::TextButton::buttonColourId, juce::Colours::yellow);
    addAndMakeVisible (lemonContent);

    orangeContent.setColour (juce::TextButton::buttonColourId, juce::Colours::orange);
    addAndMakeVisible (orangeContent);

    setSize (400, 400);
}
実際のレイアウトは通常、Component::resized()をオーバーライドして行われます。
従来のレイアウト
従来は、さまざまな位置とサイズを計算してコンポーネントをレイアウトし、これらが常に正しい合計サイズになるように注意します。ウィンドウのメイン部分に色付きボタンをレイアウトするだけでも面倒で、ミスが起きやすいです。4 つの等しいサイズのボタンをレイアウトするには、次のようにします:
//...
limeContent.setBounds (0, 0, 200, 24);
grapefruitContent.setBounds (0, 24, 200, 24);
lemonContent.setBounds (0, 48, 200, 24);
orangeContent.setBounds (0, 72, 200, 24);
//...
(このチュートリアルを書いているときに、最後のorangeContentコンポーネントを間違った位置に 2 回入れてしまい、自分の主張を証明しました!)
少なくとも、より重要なことにコーディング努力を集中できるときに、計算は時間がかかります!Rectangleクラスは、コンポーネントのレイアウト作業をより柔軟にし、技術に慣れれば、ある意味でより簡単にするためのシンプルながら強力な機能を提供します。これには、メインの矩形をより小さなサブ矩形に細分化することが含まれます。
矩形の細分化によるレイアウト
メインの矩形をより小さな部分に細分化してコンポーネントをレイアウトすることは、従来の方法と同等に見えるかもしれません。しかし、いくつかの利点があります:
- コード内でマジックナンバー(ハードコードされた値)の使用を減らすことを奨励し、将来のレイアウトの変更と保守を難しくします。
- 多くの場合、値を変更する必要なく、コードを単に並べ替えるだけでレイアウトを変更できます!
- 利用可能なスペースを正確に埋めることがはるかに簡単になり、レイアウトが親コンポーネントを超えたり、完全に埋まらなかったりすることがなくなります。
- リサイズ可能なコンポーネントで作業し、特定のセクションが少なくとも特定のサイズでなければならないというルールを作成することが容易になります。
デモアプリケーションのMainContentComponent::resized()関数のコードは以下のようになります:
void resized() override
{
    auto area = getLocalBounds();

    auto headerFooterHeight = 36;
    header.setBounds (area.removeFromTop (headerFooterHeight));
    footer.setBounds (area.removeFromBottom (headerFooterHeight));

    auto sidebarWidth = 80;
    sidebar.setBounds (area.removeFromLeft (sidebarWidth)); // [2]

    auto contentItemHeight = 24;
    orangeContent.setBounds (area.removeFromTop (contentItemHeight));
    limeContent.setBounds (area.removeFromTop (contentItemHeight)); // [1]
    grapefruitContent.setBounds (area.removeFromTop (contentItemHeight));
    lemonContent.setBounds (area.removeFromTop (contentItemHeight));
}
この関数の最初の数行を詳しく見てみましょう。まず、Component::getLocalBounds()関数を使用して、レイアウトしているコンポーネントのローカル境界を取得します。これは常に位置(0, 0)でコンポーネントと同じ幅と高さの矩形を返します:
auto area = getLocalBounds();
これは子コンポーネントをレイアウトするために細分化する矩形です。最初の細分化はヘッダーをレイアウトします:
header.setBounds (area.removeFromTop (headerFooterHeight));
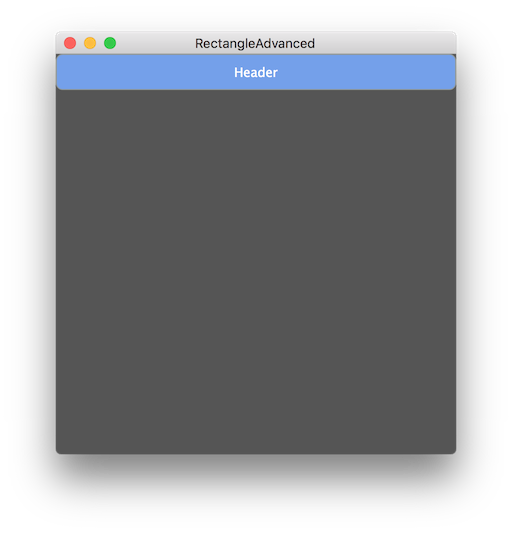
ここでは、コンポーネント全体を表す矩形を取り、効果的に 2 つの矩形を作成します。Rectangle::removeFromTop()関数は、元の矩形の位置にあり、同じ幅で、引数で要求された高さだけの矩形を返します。この場合、36 ピクセルの高さの矩形を要求しています。この関数が行うもう 1 つのことは、返した矩形を削除して元の矩形を変更することです。本質的に、上から 36 ピクセルの位置で矩形をスライスし、上の矩形を返し、元の矩形を下の矩形と等しくなるように変更します。
単独では、以下のようになります:
2 番目の細分化はフッターをレイアウトします:
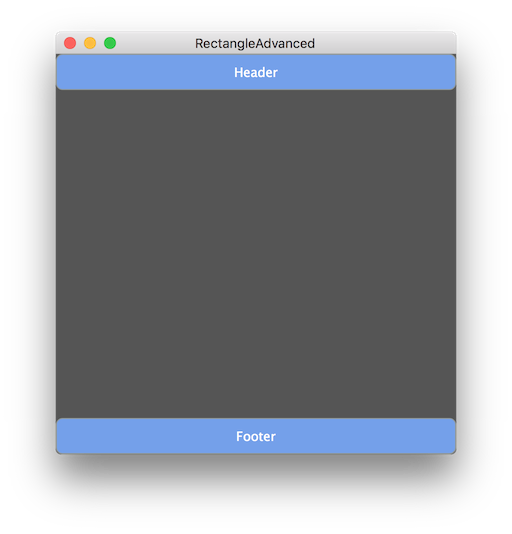
footer.setBounds (area.removeFromBottom (headerFooterHeight));
Rectangle::removeFromBottom()関数はRectangle::removeFromTop()関数と同じことを行いますが、メインの矩形の下から矩形を削除し、上の矩形を保持します。この時点で、コンポーネントは以下のようになります:
- 次に、残りの矩形の左から 80 ピクセルを削除してサイドバーを作成します。
- その後、Rectangle::removeFromTop()関数を使用して残りの矩形を複数回細分化します。
最終的に、完全にレイアウトされたコンポーネントになります。
項目の並べ替え
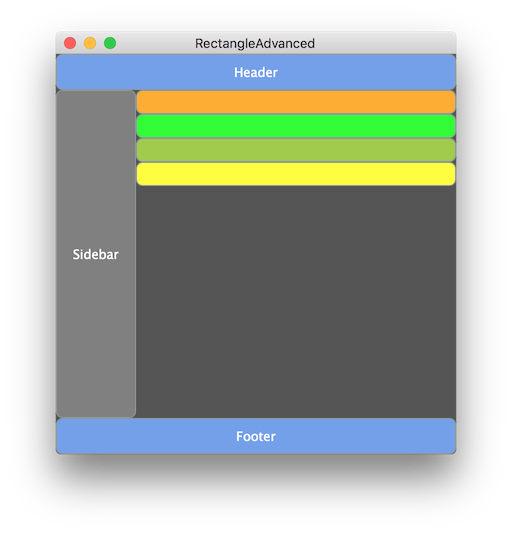
前述のように、この技術を使用すると項目を並べ替えるのが非常に簡単です。例えば、resized()関数で最初にリストするだけで、オレンジのコンテンツを先頭に移動できます[1]:
auto contentItemHeight = 24;
orangeContent.setBounds (area.removeFromTop (contentItemHeight));
limeContent.setBounds (area.removeFromTop (contentItemHeight)); // [1]
grapefruitContent.setBounds (area.removeFromTop (contentItemHeight));
lemonContent.setBounds (area.removeFromTop (contentItemHeight));
これは以下のようになります:
固定数のコンポーネントでは、このアプローチは明らかにエレガントです。可変コンテンツをレンダリングする場合はさらに便利です。
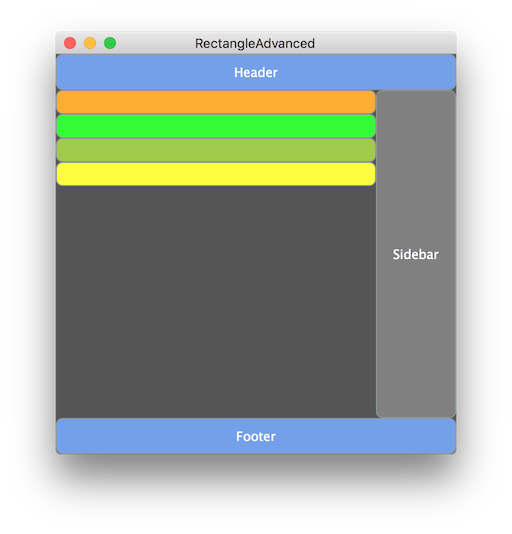
項目を並べ替えるだけではサイドバーを右側に移動できませんが、Rectangle::removeFromLeft()の代わりにRectangle::removeFromRight()関数を使用するだけです[2]:
auto sidebarWidth = 80;
sidebar.setBounds (area.removeFromLeft (sidebarWidth)); // [2]
これは以下のようになります:
コンポーネントのリサイズ
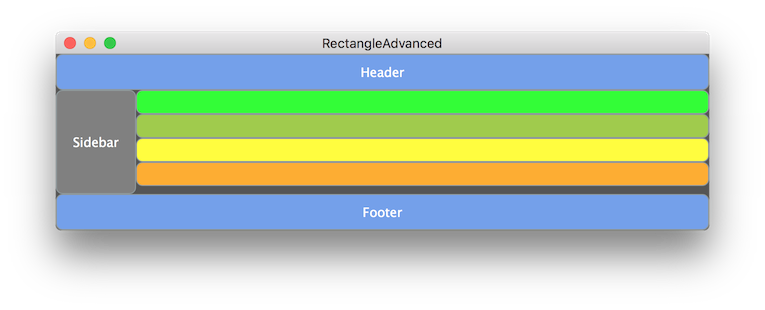
このアプローチでもう 1 つ無料で得られるのは、リサイズが「単に動作する」ことです。以下は、幅を広く、高さを低くしたコンポーネントです:
レイアウトの一部またはすべてを比例的にしたい場合は、コードに簡単に組み込むことができます。例えば、サイドバーを常に全幅の 4 分の 1 にしたい場合:
sidebar.setBounds (area.removeFromRight (area.getWidth() / 4));
これを試すと、下限の有用な制限があることがわかります。このアプローチでもこれを簡単に組み込むことができます。代わりに以下を試してください。これはサイドバーの幅を全幅の 4 分の 1 に設定しますが、80 ピクセルを下限にします:
sidebar.setBounds (area.removeFromRight (juce::jmax (80, area.getWidth() / 4)));
演習:異なる色のボタンをいくつか作成し、orangeContent、limeContent、grapefruitContent、lemonContentコンポーネントの下のセクションに水平に配置して追加してください。残りの幅全体を埋めるようにしてください。
他のシナリオ
これまでの例では、シーケンス内の次のコンポーネントを配置するために残りの矩形を細分化し続けました。いくつかのケースでは、サブ矩形の 1 つを保存し、代わりにそれを細分化する必要があります。
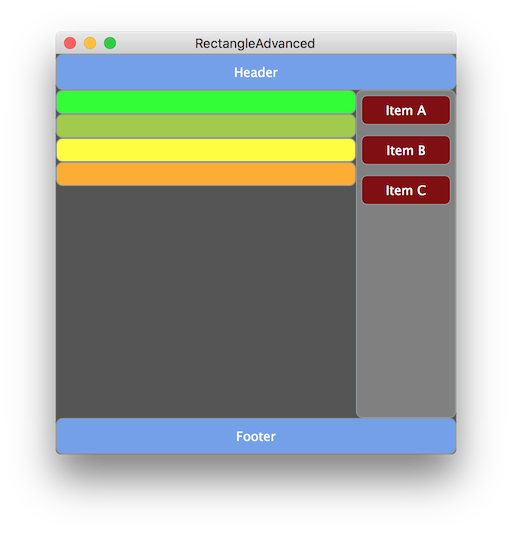
例えば、サイドバー内にリストの項目を配置するには、サイドバーの矩形を一時的に保存してからそれを細分化する必要があります。これを説明するために、デモプロジェクトに 3 つのコンポーネントを追加します[3]、[4]、[5]:
private:
juce::TextButton header;
juce::TextButton sidebar;

juce::TextButton sideItemA; // [3]
juce::TextButton sideItemB; // [4]
juce::TextButton sideItemC; // [5]

juce::TextButton limeContent;
juce::TextButton grapefruitContent;
juce::TextButton lemonContent;
juce::TextButton orangeContent;
juce::TextButton footer;
次にコンストラクタでそれらを設定し、サイドバーボタンからテキストを削除します[7]:
//...
sidebar.setColour (juce::TextButton::buttonColourId, juce::Colours::grey);
// [7]
addAndMakeVisible (sidebar);

sideItemA.setColour (juce::TextButton::buttonColourId, juce::Colours::maroon);
sideItemB.setColour (juce::TextButton::buttonColourId, juce::Colours::maroon);
sideItemC.setColour (juce::TextButton::buttonColourId, juce::Colours::maroon);
sideItemA.setButtonText ("Item A");
sideItemB.setButtonText ("Item B");
sideItemC.setButtonText ("Item C");
addAndMakeVisible (sideItemA);
addAndMakeVisible (sideItemB);
addAndMakeVisible (sideItemC);
//...
最後に、resized()関数を以下のように変更します:
void resized() override
{
    auto area = getLocalBounds();

    auto headerFooterHeight = 36;
    header.setBounds (area.removeFromTop (headerFooterHeight));
    footer.setBounds (area.removeFromBottom (headerFooterHeight));

    auto sideBarArea = area.removeFromRight (juce::jmax (80, area.getWidth() / 4));
    sidebar.setBounds (sideBarArea);

    auto sideItemHeight = 40;
    auto sideItemMargin = 5;
    sideItemA.setBounds (sideBarArea.removeFromTop (sideItemHeight).reduced (sideItemMargin));
    sideItemB.setBounds (sideBarArea.removeFromTop (sideItemHeight).reduced (sideItemMargin));
    sideItemC.setBounds (sideBarArea.removeFromTop (sideItemHeight).reduced (sideItemMargin));

    auto contentItemHeight = 24;
    orangeContent.setBounds (area.removeFromTop (contentItemHeight));
    limeContent.setBounds (area.removeFromTop (contentItemHeight));
    grapefruitContent.setBounds (area.removeFromTop (contentItemHeight));
    lemonContent.setBounds (area.removeFromTop (contentItemHeight));
}
Rectangle::reduced()関数の使用にも注意してください。これは矩形の端をインセットし、効果的にマージン内に矩形を配置します。アプリケーションをビルドして実行すると、以下のようになるはずです。
まとめ
このチュートリアルでは、矩形を細分化するためのRectangleクラス内の特定の関数セットの使用を探りました。特に、コンポーネントをレイアウトするためにこの技術を使用すると以下のことができることを見てきました:
- よりエレガントなコードでコンポーネントをレイアウトする。
- レイアウトコード内のマジックナンバーの使用を減らす。
- コードへの最小限の変更でレイアウト位置とコンポーネントのレイアウト順序を変更する。