チュートリアル:アプリのルック&フィールをカスタマイズ
アプリケーションの基本的なウィジェットの描画をカスタマイズします。独自のボタン、スライダー、その他のコンポーネントを描画して、アプリケーションのカスタムスキンを作成します。
レベル: 初級
プラットフォーム: Windows, macOS, Linux, iOS, Android
クラス: LookAndFeel, Slider, Button, Path, AffineTransform
はじめに
このチュートリアルのデモプロジェクトをこちらからダウンロードしてください:PIP | ZIP。プロジェクトを解凍し、最初のヘッダファイルを Projucer で開いてください。
この手順でサポートが必要な場合は、チュートリアル:Projucer Part 1: Projucer を始めようを参照してください。
デモプロジェクト
デモプロジェクトは、標準の JUCE ルック&フィールを使用して、2 つのボタンと 2 つの回転スライダーを持つ GUI を作成します:
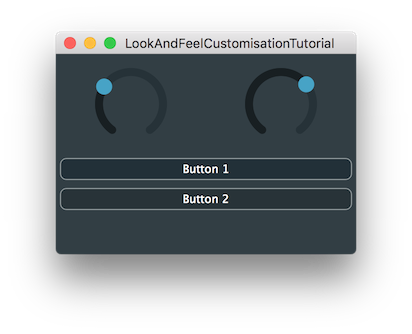
LookAndFeelクラスは、JUCE でカスタマイズされた GUI を作成するための基本です。LookAndFeelクラスを使用して、特定のコンポーネントのデフォルトの色を変更するなど、シンプルなカスタマイズを実行できます。しかし、多くの種類のコンポーネントの描画をカスタマイズすることもできます。例えば、これにより、カスタムの外観を持つボタンとスライダーを作成できます。
色のカスタマイズ
LookAndFeelオブジェクトがコンポーネントに適用されると、そのコンポーネントおよびその子コンポーネントに適用されます(チュートリアル:親コンポーネントと子コンポーネントを参照)。ただし、子コンポーネントに特別に別のルック&フィールが割り当てられている場合は除きます。
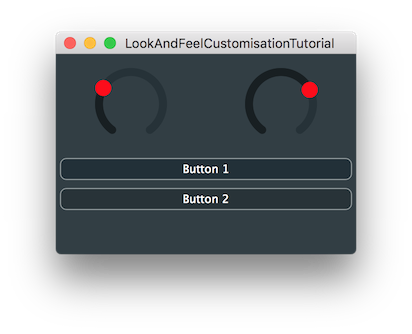
ルック&フィールシステムで実行できることの 1 つは、標準 JUCE コンポーネントの要素の特定の色をオーバーライドすることです(チュートリアル:JUCE での色を参照)。例えば、MainContentComponentコンストラクタに以下の行を追加すると、両方のダイアルが赤くなります:
getLookAndFeel().setColour (juce::Slider::thumbColourId, juce::Colours::red);
これは以下のスクリーンショットのようになるはずです:
2 つのダイアルを異なるように設定するには、新しいLookAndFeelインスタンスを作成し、それをダイアルの 1 つだけに適用できます。まず、メンバーとしてLookAndFeel_V4オブジェクトを追加します[1](これはデフォルトの JUCE ルック&フィールを実装するクラスです)。
private:
    juce::LookAndFeel_V4 otherLookAndFeel; // [1]
    juce::Slider dial1;
    juce::Slider dial2;
    juce::TextButton button1;
    juce::TextButton button2;
LookAndFeel は常に、それを使用するウィジェットやコンポーネントの前に宣言する必要があります!そうしないと、それらのクラスがまだ使用中にデストラクトされてしまいます。
次に、先ほど追加したコンストラクタ内のコード行を以下のように変更します:
otherLookAndFeel.setColour (juce::Slider::thumbColourId, juce::Colours::red);
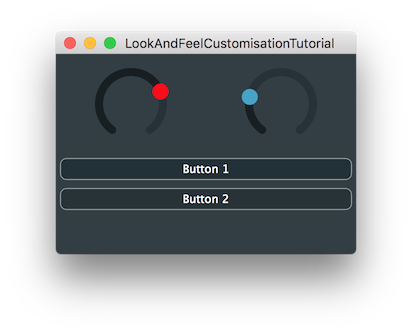
このルック&フィールを最初のダイアルだけに使用しましょう。MainContentComponentコンストラクタに以下のコード行を追加します:
dial1.setLookAndFeel (&otherLookAndFeel);
これにより、以下のスクリーンショットのような UI が作成されるはずです:
もちろん、このシンプルな例では、このアプローチはスライダーオブジェクトで直接Slider::thumbColourIdの色を設定するのと比較してメリットはありません。しかし、アプリでは異なる目的のために複数のスライダーを使用する場合があり、1 つの目的のスライダーには 1 セットの色を使用し、他の目的のスライダーには異なる色のセットを使用したい場合があります。このアプローチにより、各スライダーにそのタイプに適したルック&フィールが割り当てられている限り、これらの色をグローバルに変更できます。
このアプローチの利点は、実際の描画コードのカスタマイズを開始するとより明確になります。特に、カスタムルック&フィールクラスを作成する必要があります。
カスタムルック&フィール
特定のコンポーネントの描画をカスタマイズするには、LookAndFeelクラスを継承する新しいクラスを作成する必要があります。LookAndFeelクラス自体から直接継承する場合、すべての純粋仮想関数を実装する必要があります。すべてのこれらの関数が既に定義されているクラスの 1 つを継承する方がはるかに実用的です。そうすれば、必要なものだけをオーバーライドすれば済みます。デフォルトのルック&フィールと比較してこの 1 つの色変更だけが定義されたシンプルなカスタムルック&フィールを作成しましょう。
まず、先ほど追加した以下の行をコンストラクタから削除します:
otherLookAndFeel.setColour (juce::Slider::thumbColourId, juce::Colours::red);
次に、LookAndFeel_V4クラスを継承する新しいクラスをMainContentComponentクラスの前に追加します:
class OtherLookAndFeel : public juce::LookAndFeel_V4
{
public:
    OtherLookAndFeel()
    {
        setColour (juce::Slider::thumbColourId, juce::Colours::red);
    }
このコードを実行する前に、otherLookAndFeelメンバーのクラス名を OtherLookAndFeel に変更します[2]:
private:
OtherLookAndFeel otherLookAndFeel; // [2]
juce::Slider dial1;
juce::Slider dial2;
juce::TextButton button1;
juce::TextButton button2;
アプリケーションをビルドして実行すると、結果は前のスクリーンショットと同じように見えるはずです。
描画のカスタマイズ
LookAndFeelクラスには、多くの異なるタイプのコンポーネントのための多くの関数があります。特定のコンポーネントタイプ用に指定された関数は、関連するコンポーネントクラス内のLookAndFeelMethodsというネストされたクラス内に宣言されているため、簡単に見つけることができます。
スライダーのカスタマイズ
例えば、JUCE API ドキュメントのSlider::LookAndFeelMethodsを見てください。このリストには、Slider::LookAndFeelMethods::drawRotarySlider()という関数があることに気づくでしょう。
これをOtherLookAndFeelクラスでオーバーライドしましょう。クラスに宣言を追加します:
void drawRotarySlider (juce::Graphics& g, int x, int y, int width, int height, float sliderPos, const float rotaryStartAngle, const float rotaryEndAngle, juce::Slider&) override
ここでは、以下のデータが渡されます:
g:Graphicsコンテキスト。x:回転スライダーを描画する矩形の左上の x 座標。y:回転スライダーを描画する矩形の左上の y 座標。width:回転スライダーを描画する矩形の幅。height:回転スライダーを描画する矩形の高さ。sliderPos:0..1 の範囲の比率としてのスライダーの位置(これはスライダーの実際の値の範囲とは独立しています)。rotaryStartAngle:ダイアル回転の開始角度(ラジアン)。rotaryEndAngle:ダイアル回転の終了角度(ラジアン)。slider:Sliderオブジェクト自体。
x、y、width、height 引数は、スライダーが使用しているテキストボックスのサイズと位置を考慮しています。そのため、スライダーの位置とサイズにアクセスしてそれらの値を使用できます。
では、ダイアルのポインターを表す線を持つ塗りつぶされた円であるシンプルなダイアルを描画する関数本体を書きましょう。まず、渡された値に基づいて計算を助けるためにいくつかの一時変数が必要です:
auto radius = (float) juce::jmin (width / 2, height / 2) - 4.0f;
auto centreX = (float) x + (float) width * 0.5f;
auto centreY = (float) y + (float) height * 0.5f;
auto rx = centreX - radius;
auto ry = centreY - radius;
auto rw = radius * 2.0f;
auto angle = rotaryStartAngle + sliderPos * (rotaryEndAngle - rotaryStartAngle);
最後のangle変数にはダイアルが指すべき角度が含まれていることがわかります。
次に、ダイアルの色を塗りつぶし、アウトラインを描画するコードを追加しましょう:
// fill
g.setColour (juce::Colours::orange);
g.fillEllipse (rx, ry, rw, rw);

// outline
g.setColour (juce::Colours::red);
g.drawEllipse (rx, ry, rw, rw, 1.0f);
ポインター自体を描画するために、まずPathオブジェクトを使用し、必要な角度だけ平行移動と回転で位置に移動します:
juce::Path p;
auto pointerLength = radius * 0.33f;
auto pointerThickness = 2.0f;
p.addRectangle (-pointerThickness * 0.5f, -radius, pointerThickness, pointerLength);
p.applyTransform (juce::AffineTransform::rotation (angle).translated (centreX, centreY));
次に、このパスを塗りつぶしてポインターを描画します:
// pointer
g.setColour (juce::Colours::yellow);
g.fillPath (p);
このセクションの完成したコードは、このチュートリアルのデモプロジェクトのLookAndFeelCustomisationTutorial_02.hファイルにあります。
演習:ポインターの描画を変更してみてください。異なる長さ、少し太いが丸みを帯びた矩形、または矢印を描画してみることができます。
これはSliderのルック&フィールメソッドの 1 つのシンプルなカスタマイズだけを示しています。しかし、原則は他のメソッドにも適用されます。他のカスタマイズを作成する最良のアプローチは、おそらくLookAndFeel_V4またはLookAndFeel_V3クラスの既存の実装を見て、それを独自のコードの基礎として使用することです。
LookAndFeel_V4クラスはLookAndFeel_V3クラスから継承しており、一部のメソッドはLookAndFeel_V4クラスで再定義されていません。
ボタンのカスタマイズ
ボタンのカスタマイズを見てみましょう。まず、コンストラクタでこの行を使用して、MainContentComponent全体のルック&フィールとしてOtherLookAndFeelクラスを設定しましょう:
setLookAndFeel (&otherLookAndFeel);
また、MainContentComponentによってシャットダウン時にLookAndFeelオブジェクトが使用されなくなるように、デストラクタでこの行を提供して確認しましょう:
~MainContentComponent() override
{
    setLookAndFeel (nullptr);
}
これにより、もちろん両方のダイアルが前のセクションでカスタマイズした外観になります。では、Button::LookAndFeelMethods::drawButtonBackground()関数の宣言を追加しましょう:
void drawButtonBackground (juce::Graphics& g, juce::Button& button, const juce::Colour& backgroundColour, bool, bool isButtonDown) override
ここでは、以下のデータが渡されます:
g:Graphicsコンテキスト。button:Buttonオブジェクト自体。backgroundColour:使用すべき基本の背景色(ボタンのトグル状態に基づいてLookAndFeelの色から選択されます)。isMouseOverButton:マウスポインターがボタンの境界内にあるかどうか。isButtonDown:マウスボタンが押されているかどうか。
では、背景色でボタンの矩形を単に塗りつぶす非常にシンプルなボタン背景を作成する関数本体を追加しましょう:
auto buttonArea = button.getLocalBounds();
g.setColour (backgroundColour);
g.fillRect (buttonArea);
これをビルドして実行すると、以下のスクリーンショットのようになるはずです:
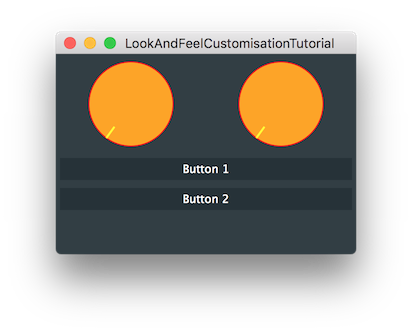
これを操作すると、ボタンがマウスポインターのインタラクションに視覚的に反応しないことに気づくでしょう。シンプルなシャドウ効果を実装しましょう。drawButtonBackground()関数を以下のように変更します:
auto buttonArea = button.getLocalBounds();
auto edge = 4;

buttonArea.removeFromLeft (edge);
buttonArea.removeFromTop (edge);

// shadow
g.setColour (juce::Colours::darkgrey.withAlpha (0.5f));
g.fillRect (buttonArea);

auto offset = isButtonDown ? -edge / 2 : -edge;
buttonArea.translate (offset, offset);

g.setColour (backgroundColour);
g.fillRect (buttonArea);
ボタンをクリックすると動いているように見えるようになります。残念ながら、テキストは静的なままなので、より信頼性を持たせるためにButton::LookAndFeelMethods::drawButtonText()関数をオーバーライドする必要があります。この関数を書くために、LookAndFeel_V2クラスからコードのコピーを開始し、OtherLookAndFeel クラスに追加します:
void drawButtonText (juce::Graphics& g, juce::TextButton& button, bool isMouseOverButton, bool isButtonDown) override
{
    auto font = getTextButtonFont (button, button.getHeight());
    g.setFont (font);
    g.setColour (button.findColour (button.getToggleState() ? juce::TextButton::textColourOnId
                                                            : juce::TextButton::textColourOffId)
                     .withMultipliedAlpha (button.isEnabled() ? 1.0f : 0.5f));

    auto yIndent = juce::jmin (4, button.proportionOfHeight (0.3f));
    auto cornerSize = juce::jmin (button.getHeight(), button.getWidth()) / 2;

    auto fontHeight = juce::roundToInt (font.getHeight() * 0.6f);
    auto leftIndent = juce::jmin (fontHeight, 2 + cornerSize / (button.isConnectedOnLeft() ? 4 : 2));
    auto rightIndent = juce::jmin (fontHeight, 2 + cornerSize / (button.isConnectedOnRight() ? 4 : 2));
    auto textWidth = button.getWidth() - leftIndent - rightIndent;

    if (textWidth > 0)
        g.drawFittedText (button.getButtonText(),
            leftIndent,
            yIndent,
            textWidth,
            button.getHeight() - yIndent * 2,
            juce::Justification::centred,
            2);
}
drawButtonBackground()関数での見かけの動きに合わせてテキストが描画されるオフセットを変更するだけで済みます。最後の数行だけを変更する必要があります:
auto textWidth = button.getWidth() - leftIndent - rightIndent;

auto edge = 4;
auto offset = isButtonDown ? edge / 2 : 0;

if (textWidth > 0)
    g.drawFittedText (button.getButtonText(),
        leftIndent + offset,
        yIndent + offset,
        textWidth,
        button.getHeight() - yIndent * 2 - edge,
        juce::Justification::centred,
        2);
}
これをビルドして実行すると、以下のスクリーンショットのようになるはずです。
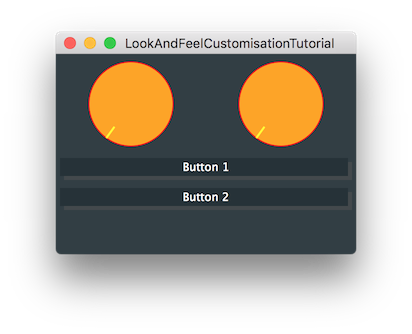
このセクションの完成したコードは、このチュートリアルのデモプロジェクトのLookAndFeelCustomisationTutorial_03.hファイルにあります。
演習:ボタンがマウスポインターがボタン上にあることに反応するように描画にいくつかの変更を追加してください。例えば、背景色を少し調整したり、シャドウの色を変更したり、矩形のサイズや位置を微妙に変更したりできます。
まとめ
このチュートリアルでは、LookAndFeelクラスを使用して JUCE コンポーネントのルック&フィールをカスタマイズする概念を紹介しました。特に以下のことができるようになったはずです:
- デフォルトのルック&フィールの色をカスタマイズする。
- 新しいルック&フィールクラスを作成する。
- スライダーとボタンの描画コードをカスタマイズする。
- 他のコンポーネントのルック&フィールメソッドを見つけて、任意の JUCE コンポーネントをカスタマイズできる。