チュートリアル:Label クラス
このチュートリアルでは、テキストを表示するためのコンポーネントであるLabelクラスを紹介します。Labelコンポーネントは編集可能に設定することもできるため、テキストの表示とシンプルなテキスト入力に非常に便利です。
レベル: 初級
プラットフォーム: Windows, macOS, Linux, iOS, Android
クラス: Label, TextEditor, Font, Colours
はじめに
このチュートリアルのデモプロジェクトをこちらからダウンロードしてください:PIP | ZIP。プロジェクトを解凍し、最初のヘッダファイルを Projucer で開いてください。
この手順でサポートが必要な場合は、チュートリアル:Projucer Part 1: Projucer を始めようを参照してください。
デモプロジェクト
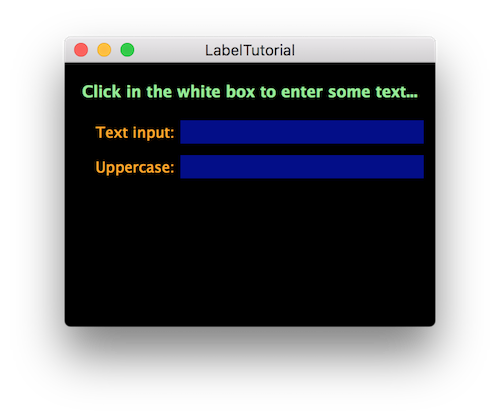
デモプロジェクトには複数のラベルが含まれています。一部はテキストの表示用ですが、1 つはテキストの入力用です。デモプロジェクトを実行すると、以下のスクリーンショットのようになるはずです:

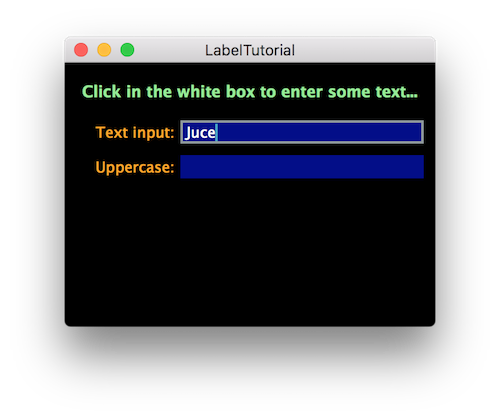
白い背景のラベルをクリックすると編集可能になり、ラベルには微妙な境界線が表示され、キャレットが現れます。これは以下のスクリーンショットに示されています。

その後、以下に示すようにこのラベルにテキストを入力できます:

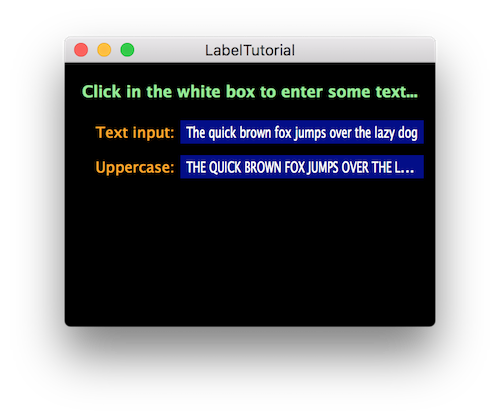
リターンキーを押すか、ラベルから離れてクリックすると、編集可能な状態から抜けます。これにより、リスナーにブロードキャストされる変更がコミットされます。この場合、テキストを大文字に変換して別のラベルに表示します:

これは、テキストの表示と入力の両方におけるLabelクラスのいくつかの異なる用途を示しています。ここには実際には 5 つのラベルがあり、わずかに異なる方法で使用されています:
- 見出しとして使用される上部の緑色のラベル。
- 他の固定テキストを表示するために使用される 2 つのオレンジ色のラベル。
- 動的に変化するテキストを表示するために使用される 2 つの長方形のボックス(1 つはユーザーからのテキスト入力を許可するため)。
長方形のボックスの 2 番目は、テキスト入力ボックスと区別するためにわずかにグレーアウトされています。
テキストの表示
このチュートリアルでは、Labelクラスの主な機能のほとんどをカバーしています。ラベルの最も基本的な機能は、テキストを表示することです!コンポーネントのpaint()関数で独自のテキストを描画できますが(チュートリアル:Graphics クラスを参照)、通常はLabelオブジェクト(または場合によってはTextEditorオブジェクト)を使用してテキストのレイアウトを管理する方がはるかに便利です。
ご想像のとおり、Labelオブジェクト内のテキストは、任意のフォント、フォントサイズ、太字、斜体などで表示できます。テキストは、コンポーネントの境界内で左、右、中央、上、下、およびその他のさまざまなオプションで両端揃え(配置)することもできます。
Labelクラスは、同じフォント、サイズ、両端揃えの単一のテキスト行のみを含むことができます。異なるスタイルの複数のテキスト行を表示するには(ワードプロセッサアプリケーションで見られるように)、TextEditorクラスを参照してください。TextEditorクラスは、大量のテキストを表示するための水平および垂直スクロールバーも含めることができます。
コンポーネントの境界が要求されたすべてのテキストを表示するには小さすぎる場合、Labelクラスはテキストを収めるためにいくつかの方法を試みます。まず、フォントのグリフを少し狭くします。グリフが狭すぎるとテキストが読めなくなるため、ある時点で諦めます。この場合、テキストが切り詰められたことを示すために末尾に省略記号(...)を表示してテキストを切り詰めます。今すぐこれを試すことができます。テキスト入力ラベルに「The quick brown fox jumps over the lazy dog」と入力してみてください。実際には、このページからテキストをコピー(Mac OS X では「CMD-C」、Windows では「Ctrl-C」)して、キーボードショートカット(Mac OS X では「CMD-V」、Windows では「Ctrl-V」)を使用してラベルに貼り付けることができます。この機能はコードを追加することなく組み込まれています!
結果は以下のようになるはずです:

元のテキストはなんとか収まりますが、水平軸で少し圧縮されています。大文字のバージョンは、大文字のグリフは通常小文字のグリフよりも幅が広いため、少し幅広くなります。Labelクラスは、大文字のバージョンがテキストを水平軸で圧縮して読みやすさを維持するには広すぎると判断しました。この場合、「LAZY」の「L」でテキストを切り詰め、省略記号を追加しました。
Label::setMinimumHorizontalScale()関数を使用して、各Labelオブジェクトのテキストがスケーリングされる量を変更できます。1.0fの値を使用するとスケーリングが無効になります。Font::getHeight()関数を使用して、特定のフォントでの単一行に必要な高さを測定できます。文字列全体が単一行に収まるために必要な幅を測定するには、Font::getStringWidth()関数を使用できます。
基本的なラベルの設定
MainContentComponentコンストラクタでは、アプリケーションの各ラベルが設定されます。まず、16 ポイントの太字フォント、表示すべきテキスト、テキストの色、およびテキストを中央に両端揃えするようにタイトルを設定します。
親コンポーネントにラベルを追加します:
addAndMakeVisible (titleLabel);
ラベルのフォントを設定します:
titleLabel.setFont (juce::Font (16.0f, juce::Font::bold));
ラベルに表示するテキストを設定します:
titleLabel.setText ("Click in the white box to enter some text...", juce::dontSendNotification);
ラベルテキストの色を設定します:
titleLabel.setColour (juce::Label::textColourId, juce::Colours::lightgreen);
ラベルテキストの表示を両端揃えします:
titleLabel.setJustificationType (juce::Justification::centred);
Justification::centredの値は、垂直軸と水平軸の両方でテキストを中央揃えにします。その他のオプションについてはJustificationクラスを参照してください。
別のコンポーネントへのラベルのアタッチ
名前が示すように、Labelコンポーネントは、別のコンポーネントのラベルとしてよく使用されます。この場合、Labelオブジェクトは別のコンポーネントにアタッチできます。ラベルがアタッチされると、オーナーコンポーネントのみを配置する必要があります。アタッチされたラベルは、親コンポーネント内でオーナーに追従します。私たちの場合、inputLabelオブジェクト(テキスト**Text input:**を表示)をinputTextオブジェクトにアタッチしたいと考えています。Label::attachToComponent()関数の 2 番目の引数は、ラベルを左側にアタッチするか上側にアタッチするかを指定します。true引数は左側にアタッチすることを意味します:
addAndMakeVisible (inputLabel);
inputLabel.setText ("Text input:", juce::dontSendNotification);
inputLabel.attachToComponent (&inputText, true);
inputLabel.setColour (juce::Label::textColourId, juce::Colours::orange);
inputLabel.setJustificationType (juce::Justification::right);
大文字テキストを表示するラベルも同様に設定されます:
addAndMakeVisible (uppercaseLabel);
uppercaseLabel.setText ("Uppercase:", juce::dontSendNotification);
uppercaseLabel.attachToComponent (&uppercaseText, true);
uppercaseLabel.setColour (juce::Label::textColourId, juce::Colours::orange);
uppercaseLabel.setJustificationType (juce::Justification::right);

addAndMakeVisible (uppercaseText);
uppercaseText.setColour (juce::Label::backgroundColourId, juce::Colours::darkblue);
resized()関数では、5 つのラベルのうち 3 つだけを配置する必要があります:
void resized() override
{
    titleLabel.setBounds (10, 10, getWidth() - 20, 30);
    inputText.setBounds (100, 50, getWidth() - 110, 20);
    uppercaseText.setBounds (100, 80, getWidth() - 110, 20);
}
ラベルを編集可能にする
MainContentComponentコンストラクタで設定する最後のラベルは、編集可能なテキストフィールドです。
addAndMakeVisible (inputText);
inputText.setEditable (true);
inputText.setColour (juce::Label::backgroundColourId, juce::Colours::darkblue);
inputText.onTextChange = [this] { uppercaseText.setText (inputText.getText().toUpperCase(), juce::dontSendNotification); };
Label::setEditable()関数を使用してラベルを編集可能に設定する場合のデフォルトの動作は、シングルクリックでエディターを表示することです。代わりにダブルクリックで編集可能になるようにラベルを設定できます。ユーザーがテキストを入力した後、ラベルの外側をクリックすると、「Return」キーを押さなくても確認されます。好みに応じて、ユーザーがデータ入力を確認するために「Return」キーを押すことを必須にするように変更することもできます。詳細については、この関数の API リファレンスを参照してください。
演習:インターフェースにボタンを追加し、これを使用してテキスト入力ラベルをクリアしてください。(チュートリアル:リスナーとブロードキャスターを参照。)
変更への応答
ラムダ関数は、Label::onTextChangeヘルパーオブジェクトのコールバックです。ここでは、入力されたテキストを取得し、Stringクラスを使用して大文字に変換し、uppercaseTextラベルのテキストを設定します。
inputText.onTextChange = [this] { uppercaseText.setText (inputText.getText().toUpperCase(), dontSendNotification); };
Label::setText()を呼び出すとき、dontSendNotificationの代わりにsendNotificationを使用できます。これにより、ユーザーインターフェースからテキストを変更することに加えて、テキストが現在の内容と異なる場合にラベルのリスナーに変更が通知されます。
演習:入力されたテキストを小文字で表示する別のラベルを追加してください。
その他のカスタマイズ
他にもいくつかのカスタマイズを行うことができます。特に、ラベルは複数行のテキストを表示できます。また、編集可能なラベルのエディターをカスタマイズしたい場合もあるでしょう。
複数行テキストの表示
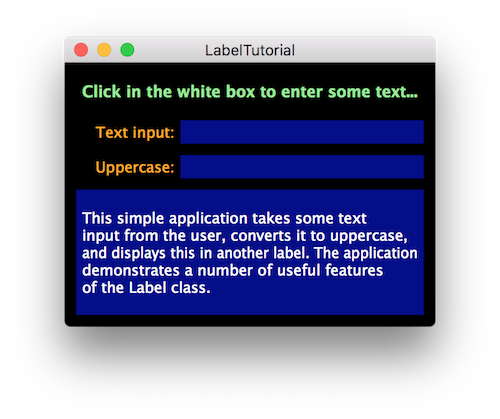
TextEditorクラスは大量のテキストに対してより柔軟ですが、Labelクラスは複数行のテキストを表示できます。これを行うには、コンポーネントの高さが複数行のテキストを表示するのに十分な大きさであることを確認するだけです。
これを説明するために、MainContentComponentクラスに次のメンバーを追加します:
juce::Label infoLabel;
そして、MainContentComponentコンストラクタに次のコードを追加します:
addAndMakeVisible (infoLabel);
juce::String infoText;
infoText << "This simple application takes some text input from the user, ";
infoText << "converts it to uppercase, and displays this in another label. ";
infoText << "The application demonstrates a number of useful features of the Label class.";
infoLabel.setText (infoText, juce::dontSendNotification);
infoLabel.setColour (juce::Label::backgroundColourId, juce::Colours::darkblue);
最後に、resized()関数でinfoLabelコンポーネントの境界を設定します:
infoLabel.setBounds (10, 110, getWidth() - 20, getHeight() - 120);
以前の演習でボタンや別のラベルを追加した場合は、境界を少し調整する必要があるかもしれません。
アプリケーションを実行すると、以下のようになるはずです:

エディターの外観の変更
Labelクラス自体を通じていくつかのエディター機能を設定できます。エディターが作成されると、Labelクラスはフォントスタイルと色をエディターにコピーします。Label::ColourIdsの値の一部はエディターに関連しています。例えば、編集中のラベルの周りの境界線を変更するには、Component::setColour()関数でLabel::outlineWhenEditingColourIdの値を使用できます:
addAndMakeVisible (inputText);
inputText.setEditable (true);
inputText.setColour (juce::Label::backgroundColourId, juce::Colours::darkblue);
inputText.setColour (juce::Label::outlineWhenEditingColourId, juce::Colours::orangered);
その他のカスタマイズは、Label::onEditorShowヘルパーオブジェクトを実装することで実現できます。例えば、編集中にテキストを斜体にすることができます:
inputText.onEditorShow = [this] {
    auto* editor = inputText.getCurrentTextEditor();

    auto editorFont = editor->getFont();
    editorFont.setItalic (true);
    editor->setFont (editorFont);
};
実際には---特に大規模なアプリケーションでは---アプリケーション全体の一貫性のためにLookAndFeelクラスを使用してすべてのコンポーネントの外観をカスタマイズすることになるでしょう。
まとめ
このチュートリアルでは、Labelクラスについて調べました。非常に使いやすいですが、強力にする多くの便利な機能があります。以下をカバーしました:
- ラベルに表示されるテキストのフォントの変更。
- ラベルに表示されるテキストの色の変更。
- ラベルをシンプルなテキストエディターとして使用し、その外観をカスタマイズする。
- 複数行テキストの表示。