チュートリアル:親コンポーネントと子コンポーネント
このチュートリアルでは、1 つのコンポーネントが 1 つ以上のネストされた子コンポーネントを含むことができるComponentクラスの階層的な性質を紹介します。これは JUCE でユーザーインターフェースをレイアウトするための鍵となります。
レベル: 初級
プラットフォーム: Windows, macOS, Linux, iOS, Android
クラス: Component, Path, Colours
はじめに
このチュートリアルはチュートリアル:Graphics クラスの続きです。まず最初にそのチュートリアルを読んで理解しておく必要があります。
このチュートリアルのデモプロジェクトをこちらからダウンロードしてください:PIP | ZIP。プロジェクトを解凍し、最初のヘッダファイルを Projucer で開いてください。
この手順でサポートが必要な場合は、チュートリアル:Projucer Part 1: Projucer を始めようを参照してください。
デモプロジェクト
デモプロジェクトは、以下のスクリーンショットに示すように、家のシンプルな描画を含むシーンを表示します:
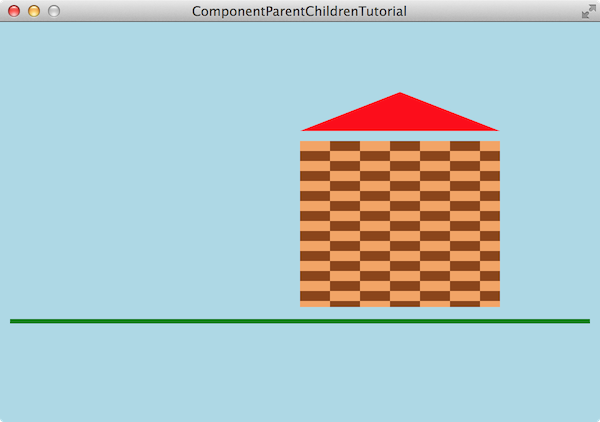
見覚えがありますか?チュートリアル:Graphics クラスの最終結果とかなり似ています!ここでの違いは、各パーツが別々のpaint()関数を使用して別々のComponentオブジェクトに描画されていることです。後で見るように、これらは論理的にグループ化されています。例えば、家の壁と屋根は 1 つの「家」オブジェクトにグループ化されています。
これがどのように組み立てられているか、そしてなぜこのようにコンポーネントを構造化することが良いアイデアなのかを探りましょう。
Component クラスの階層
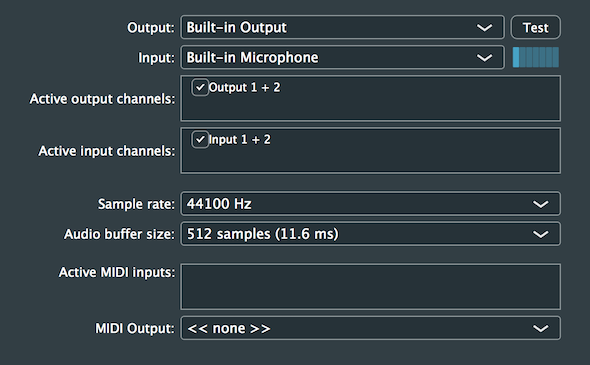
ほとんどのユーザーインターフェースは、テキスト、ボタン、スライダー、メニューなど、多数の要素で構成されています。例えば、以下のスクリーンショットはAudioDeviceSelectorComponentクラスを示しています(これはオーディオハードウェア設定を制御するためのものです。詳細についてはチュートリアル:AudioDeviceManager クラスを参照してください)。これにはボタン、いくつかのラベル、いくつかのメニュー(コンボボックス)、いくつかのラジオボタン、オーディオレベルインジケーターが含まれています。
個々のユーザーインターフェース要素の中には、他のユーザーインターフェース要素をグループ化してより便利なコントロールを形成するものもあります。例えば、JUCE のSliderクラスは、スライダー自体だけでなく、スライダーの現在の値を表示するテキストボックスも含むことができます。これは以下のスクリーンショットに示されています:

これらの各ケースで、個々の要素を階層の別々の部分に分離することで、インターフェースのレイアウトを設計し(ユーザーインタラクションに応答する)ことがはるかに容易になります。一部のコンポーネントはpaint()関数を使用して自分自身を描画します。他のコンポーネントは単に他のコンポーネントを含むだけです。一部のコンポーネントは他のコンポーネントを含みかつ描画も行います。設計の選択はかなり柔軟です。
MainContentComponent クラス
このチュートリアルでは、MainContentComponentクラスは別のコンポーネントクラスのインスタンスをメンバーとして含んでいます。これは実際のシーンを描画するSceneComponentクラスです。プロジェクト内のMainContentComponentクラスを見てください。SceneComponent オブジェクトが private メンバーとして追加されています:
private:
    SceneComponent scene;
    JUCE_DECLARE_NON_COPYABLE_WITH_LEAK_DETECTOR (MainContentComponent)
};
子コンポーネントの追加
MainContentComponentコンストラクタ内で、このSceneComponentオブジェクトは子コンポーネントとして追加され、MainContentComponentオブジェクトはその親になります。
子コンポーネントは常に 1 つの親を持つ必要があります。必要に応じて、子コンポーネントを親から削除してから別の親に追加できます。
子コンポーネントを表示するには、可視にする必要もあります。これら 2 つのステップは別々に行うこともできますが、JUCE では一般的に Component::addAndMakeVisible()関数を使用して両方のアクションを 1 つのステップで実行します:
MainContentComponent()
{
    addAndMakeVisible (scene);
    setSize (600, 400);
}
子コンポーネントの境界の設定
MainContentComponentクラスは構築中に独自のサイズを設定しますが、多くのコンポーネントオブジェクトは最初はゼロサイズです。Component::setSize()関数の呼び出しは、MainContentComponent::resized()関数の呼び出しをトリガーします。これは子コンポーネントのサイズと位置を設定するのに適した場所です:
void resized() override
{
    scene.setBounds (0, 0, getWidth(), getHeight());
}
ここで重要なのは、SceneComponent::setBounds()関数の呼び出しの座標は、親コンポーネント(この場合はMainContentComponentオブジェクト)に対して相対的であるということです。これは、親コンポーネントの左上隅が点(0, 0)であり、子コンポーネントはその左上隅がこの点に対して相対的に配置されることを意味します。実際、SceneComponentオブジェクトはMainContentComponentオブジェクトの内容全体を埋めます。これを書く別の方法は、Component::getLocalBounds()関数を使用することです。これは、呼び出したコンポーネントの境界を表すRectangleオブジェクトを返します。これにより、位置(0, 0)と幅と高さのサイズを持つ矩形が得られます。このRectangleオブジェクトはSceneComponent::setBounds()関数に渡すことができます。代替コードは以下のコードスニペットに示されています:
void resized() override
{
    scene.setBounds (getLocalBounds());
}
このチュートリアルの次のセクションは、このSceneComponentオブジェクトの構造を反映しています。
子コンポーネントは親コンポーネントの境界を超える位置に配置できますが、親コンポーネントの境界外のすべては描画されません。コンポーネントが見えない場合は、境界が正しく設定されていることを確認してください(例えば、親コンポーネントのresized()関数内で)。
シーン
SceneComponentクラスは独自の描画を行い、2 つの子コンポーネント(床と家を表す)を含んでいます。SceneComponentの宣言は以下のとおりです:
class SceneComponent : public juce::Component
{
    // ...
private:
    FloorComponent floor;
    HouseComponent house;

    //==============================================================================
    JUCE_DECLARE_NON_COPYABLE_WITH_LEAK_DETECTOR (SceneComponent)
};
FloorComponentとHouseComponentオブジェクトはコンストラクタで追加され、可視にされます:
SceneComponent()
{
    addAndMakeVisible (floor);
    addAndMakeVisible (house);
}
空を描画するために、SceneComponent::paint()関数でコンポーネント全体を水色で塗りつぶします。
void paint (juce::Graphics& g) override
{
    g.fillAll (juce::Colours::lightblue);
}
床と家はSceneComponent::resized()関数内で境界が位置付けられます:
void resized() override
{
    floor.setBounds (10, 297, 580, 5);
    house.setBounds (300, 70, 200, 220);
}
コンポーネントは最初に自分自身を描画し、次に子コンポーネントがその上に描画されます。子コンポーネントの上に描画する必要がある場合は、Component::paintOverChildren()関数をオーバーライドできます。子コンポーネントは親コンポーネントに追加された順序で描画されます。これは後で Component::toFront()、Component::toBack()、Component::toBehind()、または Component::setAlwaysOnTop()関数を使用して調整できます。
床と家がそれぞれのクラス内でどのように描画されているか見てみましょう。
床
床はチュートリアル:Graphics クラスと同様に、5 ピクセルの太さの緑色の水平線として描画され、コンポーネント内で垂直方向に中央に配置され、全幅にわたります。FloorComponent::paint()関数(FloorComponentクラスから)は以下のとおりです:
void paint (juce::Graphics& g) override
{
    g.setColour (juce::Colours::green);
    g.drawLine (0.0f, (float) getHeight() / 2.0f, (float) getWidth(), (float) getHeight() / 2.0f, 5.0f);
}
家
家自体は独自の描画を行わず(paint()関数を持たない)、HouseComponentクラス内の 2 つの他のコンポーネント(家の壁と屋根を表す)で構成されています:
class HouseComponent : public juce::Component
{
    // ...
private:
    WallComponent wall;
    RoofComponent roof;

    //==============================================================================
    JUCE_DECLARE_NON_COPYABLE_WITH_LEAK_DETECTOR (HouseComponent)
};
WallComponentとRoofComponentオブジェクトはコンストラクタで追加され、可視にされます:
HouseComponent()
{
    addAndMakeVisible (wall);
    addAndMakeVisible (roof);
}
これらはHouseComponent::resized()関数内で比例的に位置付けられます:
void resized() override
{
    auto separation = juce::jlimit (2, 10, getHeight() / 20); // [1]

    roof.setBounds (0, 0, getWidth(), (int) (getHeight() * 0.2) - separation / 2); // [2]
    wall.setBounds (0, (int) (getHeight() * 0.20) + separation / 2, getWidth(), (int) (getHeight() * 0.80) - separation); // [3]
}
- [1]:まず屋根と壁の間の隔を計算します。家の高さの1⁄20にしますが、jlimit()関数を使用して 2 ピクセルより小さくならないようにします。これにより、高さが小さい場合でも屋根と壁の間に常にギャップができます。高さが大きい場合、ギャップは高さに比例したままになります。
- [2]:屋根は家の全幅で、家の高さの1/5に設定されます。これは間隔を考慮して調整されます。
- [3]:壁は屋根の下に位置し、家の高さの4/5を占めます。これも間隔を考慮して調整されます。
壁
WallComponentクラスはシンプルです。WallComponent::paint()関数(WallComponentクラスから)でチェッカーボードパターンで自分自身を塗りつぶすだけです:
void paint (juce::Graphics& g) override
{
    g.fillCheckerBoard (getLocalBounds().toFloat(), 30, 10, juce::Colours::sandybrown, juce::Colours::saddlebrown);
}
屋根
RoofComponentクラスはRoofComponent::paint()関数でPathオブジェクトを使用して三角形を描画します:
void paint (juce::Graphics& g) override
{
    g.setColour (juce::Colours::red);

    juce::Path roof;
    roof.addTriangle (0.0f, (float) getHeight(), (float) getWidth(), (float) getHeight(), (float) getWidth() / 2.0f, 0.0f);
    g.fillPath (roof);
}
RoofComponentオブジェクトの幅をw、高さをhとすると、三角形を構成する 3 つの点は:(0, h)、(w, h)、(w/2, 0)です。
演習:シーン内のオブジェクトの位置を変更してみてください。
太陽の追加
シーンに太陽を追加しましょう。SunComponentクラスにいくつかの空の関数が用意されており、すぐにコードを追加します。
まず、SceneComponentクラスにいくつかの変更を加える必要があります。private セクションにSunComponentクラスのインスタンスを追加します[4]:
private:
    FloorComponent floor;
    HouseComponent house;
    SunComponent sun; // [4]

    JUCE_DECLARE_NON_COPYABLE_WITH_LEAK_DETECTOR (SceneComponent)
};
次に太陽を追加して可視にします[5]:
SceneComponent()
{
    addAndMakeVisible (floor);
    addAndMakeVisible (house);
    addAndMakeVisible (sun); // [5]
}
そして太陽を右上隅に位置付けます[6]:
void resized() override
{
    floor.setBounds (10, 297, 580, 5);
    house.setBounds (300, 70, 200, 220);
    sun.setBounds (530, 10, 60, 60); // [6]
}
SunComponent::paint()関数(SunComponentクラス内)に描画コードを追加する必要があります:
void paint (juce::Graphics& g) override
{
    g.setColour (juce::Colours::yellow);

    auto lineThickness = 3.0f;
    g.drawEllipse (lineThickness * 0.5f,
        lineThickness * 0.5f,
        (float) getWidth() - lineThickness * 2,
        (float) getHeight() - lineThickness * 2,
        lineThickness);
}
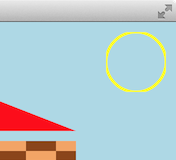
楕円をコンポーネントの境界内にわずかに位置付ける必要があることに注意してください。これは線の太さに依存する必要があります。これは、線の中心が指定された座標に正確に位置するためです。例えば、コンポーネントの端に線を描画すると、線の太さの半分がコンポーネントの境界外に位置します。楕円の位置とサイズをわずかに調整しなかった場合に何が起こるかを見るために、以下のスクリーンショットを見てください。
これを回避する別の方法は、Component::setPaintingIsUnclipped()関数を使用して、コンポーネントが境界を超えて描画できるようにすることです。この関数の使用にはいくつかの注意点があるため、必ずAPIドキュメントを読んでください。
最終的なシーンは次のようになります:
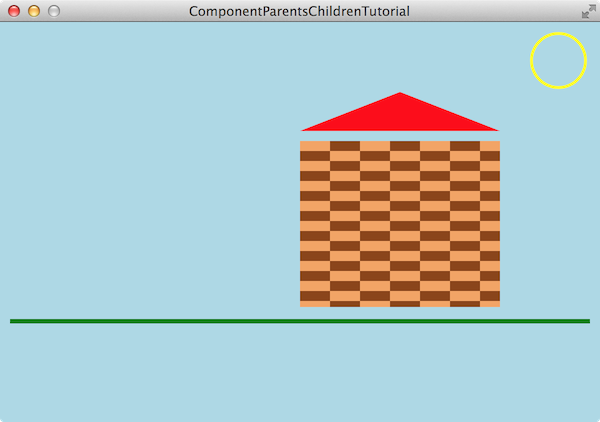
このステップの変更されたコードは、デモプロジェクトのComponentParentsChildrenTutorial_02.hファイルにあります。
演習:上記のコードを使用すると、太陽は常に楕円として描画されます。SunComponentオブジェクトを正方形に指定しているため、この潜在的な問題に気づきません。SunComponentクラスを修正して、幅と高さが同じでなくても、常に境界内に楕円ではなく円を描画するようにしてください。
コンポーネントの再利用
Componentクラスが使用する座標系の主な利点の 1 つは、描画が常にコンポーネントの左上に対して相対的に実行されることです。描画を別のクラスにカプセル化するもう 1 つの利点は、簡単に再利用できることです。
例えば、SceneComponentクラスに別の家[7]を簡単に追加できます:
private:
    FloorComponent floor;
    HouseComponent house;
    HouseComponent smallHouse; // [7]
    SunComponent sun;

    JUCE_DECLARE_NON_COPYABLE_WITH_LEAK_DETECTOR (SceneComponent)
};
次にSceneComponentコンストラクタで追加して可視にします[8]:
SceneComponent()
{
    addAndMakeVisible (floor);
    addAndMakeVisible (house);
    addAndMakeVisible (smallHouse); // [8]
    addAndMakeVisible (sun);
}
そしてSceneComponent::resized()関数で位置付けます[9]:
void resized() override
{
    floor.setBounds (10, 297, 580, 5);
    house.setBounds (300, 70, 200, 220);
    smallHouse.setBounds (50, 50, 50, 50); // [9]
    sun.setBounds (530, 10, 60, 60);
}
小さな家を追加すると、シーンは次のようになります:
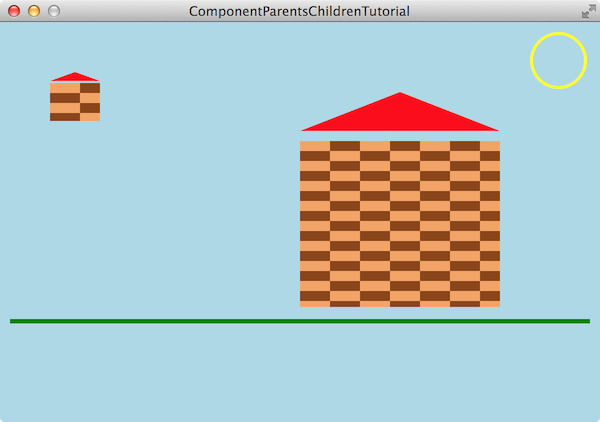
この最終ステップの変更されたコードは、デモプロジェクトのComponentParentsChildrenTutorial_03.hファイルにあります。
演習:複数のHouseComponentオブジェクトを一列に並べて街を形成する新しいクラスStreetComponentを作成し、プロジェクトに追加してください。SceneComponentクラスを変更して、いくつかの街と個々の家を含むようにしてください。
まとめ
このチュートリアルでは、Componentクラスが使用する階層的な親子システムを紹介しました。特に以下のことを学びました:
- Component::addAndMakeVisible()関数を使用して子コンポーネントを他のコンポーネントに追加する方法。
- 子コンポーネントを親コンポーネントに対して相対的に位置付けてサイズ設定する方法。
- コンポーネントは独自の描画を行うことも、描画を行う子コンポーネントを含むことも、両方を行うこともできること。
- コンポーネントは最初に描画を行い、次に子コンポーネントが親に追加された順序で描画されること。
- 描画は通常コンポーネントの境界にクリップされること。