チュートリアル:ComboBox クラス
このチュートリアルでは、ユーザーに項目のリストを表示するためのコンポーネントであるComboBoxクラスを紹介します。ComboBoxオブジェクトの内容は動的に変更でき、テキスト入力にも使用できます。
レベル: 初級
プラットフォーム: Windows, macOS, Linux, iOS, Android
クラス: ComboBox, Label, Font, Colour, Colours
はじめに
このチュートリアルのデモプロジェクトをこちらからダウンロードしてください:PIP | ZIP。プロジェクトを解凍し、最初のヘッダファイルを Projucer で開いてください。
この手順でサポートが必要な場合は、チュートリアル:Projucer Part 1: Projucer を始めようを参照してください。
デモプロジェクト
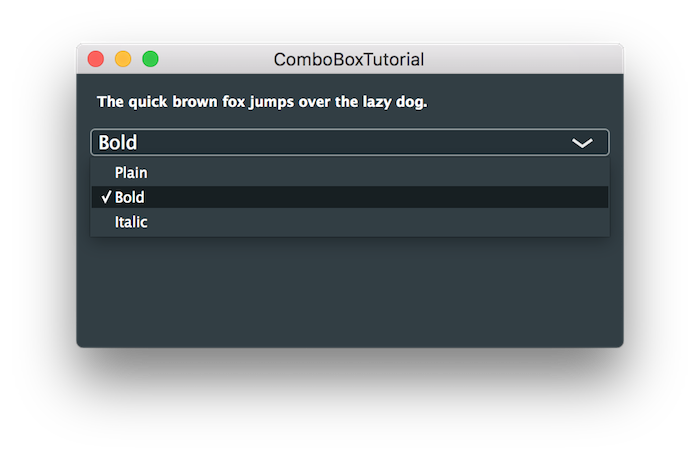
デモプロジェクトは、Labelコンポーネント内のウィンドウ上部にテキストを表示します(チュートリアル:Label クラスを参照)。ComboBoxコンポーネントには、Plain、Bold、Italicの項目が含まれています。ユーザーはこれらの項目のいずれかを選択して、ラベル内のテキストのスタイルを変更できます。

ComboBox クラス
このチュートリアルでは、ComboBoxクラスの多くの機能を紹介します。ComboBoxコンポーネントには、テキスト文字列のリストが含まれています。これらの各テキスト文字列は、ID 番号(int値)に関連付けられています。現在選択されている項目を照会できます:
- ComboBox::getSelectedId()関数を使用して現在選択されている ID を取得する。
- ComboBox::getText()関数を使用して現在表示されているテキストを要求する。
ComboBoxクラスはブロードキャスターでもあります。変更をリッスンするには、ComboBox::Listenerクラスを登録するか(チュートリアル:リスナーとブロードキャスターを参照)、代わりにComboBox::onChangeヘルパーオブジェクトでラムダ関数を使用できます。
デモプロジェクトを見てみましょう。MainContentComponentクラスには 4 つのプライベートメンバーがあります:
juce::Label textLabel { {}, "The quick brown fox jumps over the lazy dog." };
juce::Font textFont { 12.0f };
juce::ComboBox styleMenu;
LabelとFontオブジェクトはコンストラクタで設定されます:
MainContentComponent()
{
    addAndMakeVisible (textLabel);
    textLabel.setFont (textFont);
項目の追加
項目は、ComboBox::addItem()関数を使用してComboBoxオブジェクトに 1 つずつ追加できます。ここでは、「Plain」、「Bold」、「Italic」の項目をそれぞれ ID 番号 1、2、3 で追加します:
// add items to the combo-box
addAndMakeVisible (styleMenu);
styleMenu.addItem ("Plain", 1);
styleMenu.addItem ("Bold", 2);
styleMenu.addItem ("Italic", 3);

styleMenu.onChange = [this] { styleMenuChanged(); };
styleMenu.setSelectedId (1);

setSize (400, 200);
}
変更への応答
styleMenu ComboBoxオブジェクトがアプリケーションでユーザーによって変更されたときに通知を受けるために、MainContentComponentオブジェクトをリスナーとして登録することもできました。しかし、この場合はComboBox::onChangeヘルパーオブジェクトを実装してstyleMenuChanged()関数を直接呼び出します:
styleMenu.onChange = [this] { styleMenuChanged(); };
styleMenuChanged()関数はstyleMenuオブジェクトの変更を処理します:
void styleMenuChanged()
{
    switch (styleMenu.getSelectedId())
    {
        case 1:
            textFont.setStyleFlags (juce::Font::plain);
            break;
        case 2:
            textFont.setStyleFlags (juce::Font::bold);
            break;
        case 3:
            textFont.setStyleFlags (juce::Font::italic);
            break;
        default:
            break;
    }

    textLabel.setFont (textFont);
}
ここでは、ユーザーの選択に基づいてtextFont Fontオブジェクトを適切に設定していることがわかります。次に、このフォントを使用してtextLabel Labelオブジェクトのフォントを更新します。
項目 ID 番号の使用
項目 ID として任意の整数を使用できます。ただし、ゼロは使用できません。ゼロには特別な意味があります。項目がまだ選択されていない、またはComboBoxオブジェクトが他のカスタムテキストを表示していることを示すために使用されます。
少数の項目では、コード内で 1、2、3 のような単純な数字を使用するのは管理しやすいです。しかし、アプリをさらに開発すると、すぐに管理できなくなります。私たちの場合、enumを使用するとより明確になります。スタイル用のプライベートenumを追加しましょう:
enum FontStyles {
    stylePlain = 1,
    styleBold,
    styleItalic,
    numberOfStyles
};
次に、ComboBoxオブジェクトを設定するときにこれらの値を使用できます:
addAndMakeVisible (styleMenu);

// add items to the combo-box
styleMenu.addItem ("Plain", 1);
styleMenu.addItem ("Bold", 2);
styleMenu.addItem ("Italic", 3);

styleMenu.onChange = [this] { styleMenuChanged(); };
styleMenu.setSelectedId (stylePlain);
そしてstyleMenuChanged()関数でも:
void styleMenuChanged()
{
    switch (styleMenu.getSelectedId())
    {
        case stylePlain:
            textFont.setStyleFlags (juce::Font::plain);
            break;
        case styleBold:
            textFont.setStyleFlags (juce::Font::bold);
            break;
        case styleItalic:
            textFont.setStyleFlags (juce::Font::italic);
            break;
    }

    textLabel.setFont (textFont);
}
少なくとも、これによりコードがはるかに読みやすくなります。
ID 番号を使用する他の一般的な戦略は以下のとおりです:
- コンボボックスの項目に関連するデータを格納する配列を使用する。インデックス 0 を未使用のままにするか、オフセットを使用する必要がありますが、ID を配列へのインデックスとして使用できます。例えば、ID は 100 から始めることができます(100、101、102 など)。ID 100 は配列のインデックス 0 に関連付けられ、100 を加算または減算することで ID とインデックス間を簡単に変換できます。
- アプリ内の各コンボボックスに対して異なる範囲の整数のバッチを使用する。例えば、1 つのコンボボックスには ID 100、101、102...を使用し、別のコンボボックスには 200、201、202...などを使用できます。
- 項目テキストのハッシュを使用する。String::hashCode()を使用して文字列のおそらく一意のハッシュコードを取得できます。ただし、これがゼロを返す可能性があることに注意してください(この関数を空の文字列で使用するとゼロのハッシュコードが返されます)。
セクションと区切り線
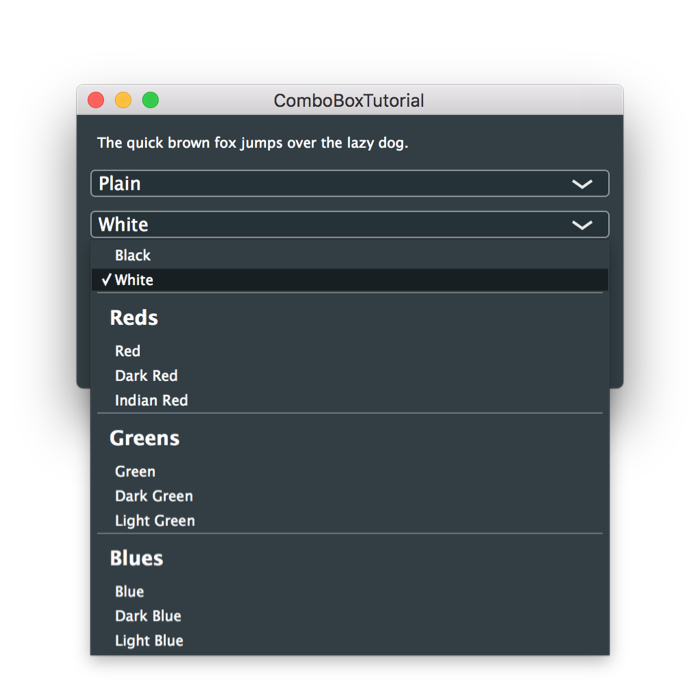
コンボボックスの項目リストには、区切り線とセクション見出しを含めることができます。これは非常に長いリストで特に便利です。テキストの色を変更するコンボボックスをアプリに追加しましょう。まず、色用の別のenumを追加します:
enum TextColours {
    black = 1,
    white,
    red,
    darkred,
    indianred,
    green,
    darkgreen,
    lightgreen,
    blue,
    darkblue,
    lightblue,
    numberOfColours
};
そしてMainContentComponentクラスに新しいメンバーを追加します:
juce::Label textLabel { {}, "The quick brown fox jumps over the lazy dog." };
juce::Font textFont { 12.0f };
juce::ComboBox styleMenu;
juce::ComboBox coloursMenu;
MainContentComponentコンストラクタでは、新しいコンボボックスを設定するコードを追加する必要があります。ここでは、ComboBox::addSeparator()とComboBox::addSectionHeading()という 2 つの新しい関数を紹介します:
addAndMakeVisible (coloursMenu);

coloursMenu.addItem ("Black", black);
coloursMenu.addItem ("White", white);
coloursMenu.addSeparator();

coloursMenu.addSectionHeading ("Reds");
coloursMenu.addItem ("Red", red);
coloursMenu.addItem ("Dark Red", darkred);
coloursMenu.addItem ("Indian Red", indianred);
coloursMenu.addSeparator();

coloursMenu.addSectionHeading ("Greens");
coloursMenu.addItem ("Green", green);
coloursMenu.addItem ("Dark Green", darkgreen);
coloursMenu.addItem ("Light Green", lightgreen);
coloursMenu.addSeparator();

coloursMenu.addSectionHeading ("Blues");
coloursMenu.addItem ("Blue", blue);
coloursMenu.addItem ("Dark Blue", darkblue);
coloursMenu.addItem ("Light Blue", lightblue);

coloursMenu.onChange = [this] { coloursMenuChanged(); };
coloursMenu.setSelectedId (black);

coloursMenu.setEditableText (true);

setSize (400, 200);
}
セクション見出しなしで区切り線を使用したり、区切り線なしでセクション見出しを使用したりできますが、これらは一緒にうまく機能します。
区切り線とセクション見出しは選択できず、関連する ID 番号がありません。
coloursMenuオブジェクトの変更を処理する新しい関数を実装する必要があります:
void coloursMenuChanged()
{
    juce::Colour textColour;

    switch (coloursMenu.getSelectedId())
    {
        case black:
            textColour = Colours::black;
            break;
        case white:
            textColour = Colours::white;
            break;

        case red:
            textColour = Colours::red;
            break;
        case darkred:
            textColour = Colours::darkred;
            break;
        case indianred:
            textColour = Colours::indianred;
            break;

        case green:
            textColour = Colours::green;
            break;
        case darkgreen:
            textColour = Colours::darkgreen;
            break;
        case lightgreen:
            textColour = Colours::lightgreen;
            break;

        case blue:
            textColour = Colours::blue;
            break;
        case darkblue:
            textColour = Colours::darkblue;
            break;
        case lightblue:
            textColour = Colours::lightblue;
            break;
    }

    textLabel.setColour (juce::Label::textColourId, textColour);
}
resized()関数でcoloursMenuオブジェクトの境界を設定することを忘れないでください:
void resized() override
{
    textLabel.setBounds (10, 10, getWidth() - 20, 20);
    styleMenu.setBounds (10, 40, getWidth() - 20, 20);
    coloursMenu.setBounds (10, 70, getWidth() - 20, 20);
}
プロジェクトを実行すると、ウィンドウは以下のようになるはずです:

これでラベルテキストの色を変更できます。
テキスト入力
コンボボックスのデフォルトの動作は、リストされている項目のみをユーザーが選択できるようにすることです。ただし、コンボボックスを編集可能にして、ユーザーが他のテキストを入力できるようにすることができます。MainContentComponentコンストラクタでcoloursMenuオブジェクトを編集可能にしましょう:
coloursMenu.setEditableText (true);
まとめ
このチュートリアルでは、ComboBoxクラスを紹介しました。このチュートリアルを読んだ後、以下のことができるようになるはずです:
- コンボボックスを作成し、項目を追加する。
- コンボボックスの項目に関連付けられた ID 番号を管理する。
- コンボボックスで選択された項目が変更されたときにユーザーに応答する。
- コンボボックスにカスタムテキストを入力できるようにする。
- コンボボックスの項目を無効化および有効化する。