チュートリアル:アプリケーションウィンドウ
このチュートリアルでは、アプリケーションウィンドウを持つ最小限のアプリを作成する方法と、そのウィンドウのサイズと外観をカスタマイズする方法を示します。これはあらゆる JUCE GUI アプリケーションにとって重要です。
レベル: 初級
プラットフォーム: Windows, macOS, Linux
クラス: JUCEApplication, DocumentWindow, ResizableWindow
はじめに
Projucer を起動し、MainWindowTutorialという名前で新しい GUI アプリケーションプロジェクトを作成します。Files to Auto-Generate:フィールドでCreate a Main.cpp file onlyを選択してください。
この手順でサポートが必要な場合は、チュートリアル:Projucer Part 1: Projucer を始めようを参照してください。
以下のようにMainWindowクラスを含めるようにMainWindowTutorialApplicationクラスを変更します:
//==============================================================================
class MainWindowTutorialApplication : public juce::JUCEApplication
{
public:
    //...

    //==============================================================================
    class MainWindow : public juce::DocumentWindow
    {
    public:
        MainWindow (juce::String name) : DocumentWindow (name,
                                             juce::Colours::lightgrey,
                                             DocumentWindow::allButtons)
        {
            centreWithSize (300, 200);
            setVisible (true);
        }

        void closeButtonPressed() override
        {
            juce::JUCEApplication::getInstance()->systemRequestedQuit();
        }

    private:
        JUCE_DECLARE_NON_COPYABLE_WITH_LEAK_DETECTOR (MainWindow)
    };

private:
    std::unique_ptr<MainWindow> mainWindow;
};
initialise()関数に以下の行を追加します:
void initialise (const juce::String& commandLine) override
{
    mainWindow.reset (new MainWindow (getApplicationName()));
}
最後に、shutdown()関数に以下の行を追加します:
void shutdown() override
{
    mainWindow = nullptr;
}
デモプロジェクト
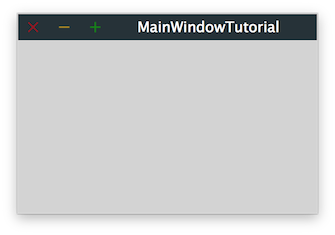
デモプロジェクトは、ソースファイルが 1 つだけの非常に最小限の JUCE アプリです:Main.cpp。アプリがすることは、空のアプリケーションウィンドウを作成して表示するだけです。このウィンドウはアプリを実行すると開きます:

このウィンドウをドラッグしたり、最大化や最小化したり、閉じて JUCE アプリを終了したりできます。
このアプリの C++コードは、動作するアプリに必要な最小限のコード量です。アプリケーションクラス自体(JUCEApplicationクラスから派生)は後のチュートリアルで説明します。今のところ、アプリがしていることは、アプリのMainWindowTutorialApplication::initialise()関数内の 1 行のコードだけです:
void initialise (const juce::String& commandLine) override
{
    mainWindow.reset (new MainWindow (getApplicationName()));
}
これはMainWindowクラスの新しいインスタンスを作成し、アプリケーションウィンドウが表示されます。
アプリケーションのinitialise()関数に入れたコードは、アプリが起動するとすぐに実行されます。
メインウィンドウの実装
MainWindow クラス
では、このMainWindowクラスの実装を見てみましょう。これは JUCE のDocumentWindowクラスから派生しており、タイトルバー、最大化、最小化、閉じるボタンを持つリサイズ可能なウィンドウです。これらはすべてアプリケーションウィンドウに期待される要素です。
一般的に、これがアプリケーションの異なるコンポーネントを実装する方法です:必要な機能を提供する適切な JUCE 基本クラスを継承する新しいクラスを作成します。この新しいクラスで、その上に独自のカスタム機能を追加できます。
MainWindowコンストラクタは以下のように定義されています:
MainWindow (juce::String name) : DocumentWindow (name,
                                     juce::Colours::lightgrey,
                                     DocumentWindow::allButtons)
{
    centreWithSize (300, 200);
    setVisible (true);
}
まず、基本クラス(DocumentWindow)が初期化され、3 つのパラメータが必要です:
- タイトルバーに表示されるウィンドウの名前。
- ウィンドウの背景色。
- タイトルバーの隅に表示されるボタン。
Main.cppのコードを見ると、最初のパラメータは実際にはアプリのinitialise()関数によってMainWindowコンストラクタに渡されていることに気づくでしょう。これは単にアプリの名前です(プロジェクトが作成されたときにProjucerによって自動生成される情報の一部で、アプリのバージョン番号やその他いくつかの情報とともに)。
演習:アプリのタイトルバーに表示される文字列を変更してみてください。
背景色の設定
次の 2 つの引数、背景色とボタンは、MainWindowコンストラクタで直接設定されます。ほとんどの一般的な色は JUCE で定義済みの定数があり、この例のように直接使用できます。そのため、Colours::lightgrey定数を、例えばColours::redやColours::blue定数に置き換えて、アプリウィンドウ全体の背景色をすばやく変更できます。もちろん、独自のカスタムカラーを定義することもできます。JUCE での色のより詳細な紹介については、チュートリアル:JUCE での色を参照してください。
ボタンにビットマスク引数を使用
DocumentWindow基本クラスコンストラクタに渡される 3 番目の引数は、DocumentWindow::allButtons定数です。これは、3 つのデフォルトボタン(最大化、最小化、閉じる)すべてがタイトルバーに表示されることを示します。enum DocumentWindow::TitleBarButtonsで定義された他の定数を使用して、このプロパティを変更できます:
C++演算子|(ビット単位の OR 演算子)を使用して、3 つの可能なボタンの他の任意の組み合わせを定義できます。例えば、閉じるボタンと最小化ボタンのみを表示するには、次のように入力できます:
MainWindow (juce::String name) : DocumentWindow (name,
                                     juce::Colours::lightgrey,
                                     DocumentWindow::closeButton | DocumentWindow::minimiseButton)
{
    centreWithSize (300, 200);
    setVisible (true);
}
フラグの組み合わせを関数に渡すこのアプローチはビットマスクと呼ばれ、JUCE の他の多くの場所で見られます。
ウィンドウサイズの設定
MainWindowオブジェクトが作成されると、コンストラクタの本体が実行されます。最初のステートメントは Component::centreWithSize()関数を呼び出してウィンドウの位置とサイズを設定します。2 番目のステートメント、Component::setVisible()関数の呼び出しは、作成後にウィンドウを表示するために常に必要です。
Component::centreWithSize()関数を使用して、ウィンドウの初期幅と高さをピクセル単位で指定できます。この関数は指定されたサイズを設定し、親コンポーネントに対してコンポーネントを中央に配置します。DocumentWindowクラスはTopLevelWindowクラスから派生しており、親コンポーネントを持たないため、画面全体に対して中央に配置されます。
ウィンドウに別の位置を指定したい場合があるかもしれません。Component::setBounds()関数はこの場合により多くのオプションを提供します。これを試すには、centreWithSize()関数の呼び出しを含む行を次のように変更します:
setBounds (50, 50, 800, 600);
これにより、サイズが 800 x 600 ピクセルに設定され、ウィンドウが画面の左上隅に近い位置に配置されます(画面端から 50 ピクセル離れた場所)。
演習:Component::setBoundsRelative()関数を使用して、絶対ピクセルではなく画面サイズに対する相対的な位置とサイズを設定してみてください。
サイズ、境界、位置についてより詳しくは、チュートリアル:親コンポーネントと子コンポーネントで学べます。
その他のカスタマイズオプション
ウィンドウをリサイズ可能にする
JUCE のDocumentWindowクラス自体はResizableWindowクラスから継承しています。この基本クラスは、ユーザーがウィンドウをリサイズ可能にする機能を追加します。これはResizableWindow::setResizable()関数で有効にできます。
MainWindowコンストラクタに以下の行を追加します:
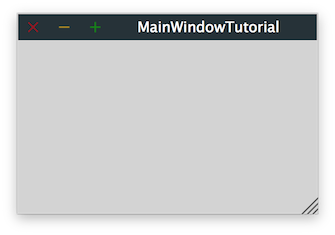
setResizable (true, true);
ResizableWindow::setResizable()関数のドキュメントを見て、2 つのブール引数の意味を調べてください。最初の引数はウィンドウがリサイズ可能かどうかを決定します。2 番目の引数は、ウィンドウをリサイズするためのハンドルを右下隅に追加するかどうかを指定します。この引数がfalseの場合、ウィンドウはウィンドウの端のいずれかでマウスでドラッグすることでリサイズ可能になります。

ネイティブタイトルバーの使用
これまで、アプリのメインウィンドウに JUCE のルック&フィールを使用してきました。その主な利点は、すべてのデスクトップオペレーティングシステム(Windows、Mac OS X、Linux)で同じ外観と動作をすることです。
ただし、JUCE のDocumentWindowクラスでは、実行中のオペレーティングシステム用の典型的なネイティブウィンドウの外観をウィンドウに使用させることができます。これはDocumentWindow::setUsingNativeTitleBar()関数を使用して実現されます。MainWindowコンストラクタに以下の行を追加します:
setUsingNativeTitleBar (true);
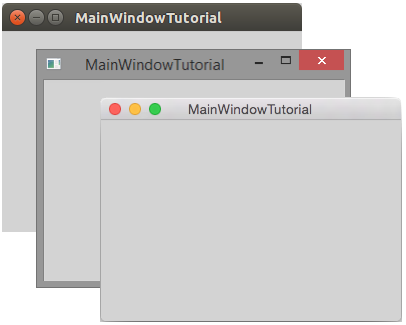
これでアプリケーションのウィンドウは次のようになります:

これは外観だけでなく、ウィンドウの動作もネイティブオペレーティングシステムウィンドウの動作に合わせて調整されることに注意してください。例えば、ResizableWindow::setResizable()関数のuseBottomRightCornerResizer引数は、もはやウィンドウのリサイズ動作を変更しなくなります。代わりに、マウスでのリサイズについては、実行中のオペレーティングシステムのネイティブルック&フィールがどのような動作であっても、ウィンドウはその動作を採用します。
ほとんどのアプリでは、メインアプリウィンドウにはネイティブルック&フィールがより良い選択です。なぜなら、これはユーザーが通常ネイティブアプリに期待するより馴染みのあるルック&フィールだからです。
その他のカスタマイズオプション
演習:DocumentWindowとResizableWindowクラスのドキュメントを見てください。ここで説明していない、アプリのウィンドウの他の側面をカスタマイズできる他の関数を試してみてください。
まとめ
このチュートリアルでは、基本的な JUCE アプリのメインウィンドウの動作を設定する方法を説明しました:サイズの調整、リサイズ可能にする、タイトルと外観の設定、タイトルバーに表示するボタンの定義などです。また、実行中のオペレーティングシステムでウィンドウがよりネイティブなウィンドウのように感じられるように、ネイティブタイトルバーに切り替える方法についても説明しました。
注記
- 後で、複数の異なるウィンドウで構成されるより複雑なアプリを構築したい場合があるかもしれません。同じ技術を使用して、それぞれの動作を制御できます。