チュートリアル:ウェーブシェイピングとコンボリューションによるディストーションの追加
ウェーブシェイピングを通じて倍音歪みを作成し、シンセサイザーサウンドにグリットを加えます。インパルスレスポンスに含まれる音響特性を取得するためのコンボリューションの基本を学びます。
レベル: 上級
プラットフォーム: Windows, macOS, Linux
プラグイン形式: VST, AU, Standalone
クラス: dsp::ProcessorChain, dsp::Gain, dsp::Oscillator, dsp::Convolution, dsp::WaveShaper, dsp::Reverb, dsp::ProcessorDuplicator
このプロジェクトにはC++14機能をサポートするコンパイラが必要です。最新バージョンのXcodeとVisual Studioにはこのサポートが含まれています。
はじめに
このチュートリアルはチュートリアル:DSP入門からの続きです。まだ読んでいない場合は、まずそのチュートリアルを読んでください。
このチュートリアルのデモプロジェクトをこちらからダウンロードしてください:PIP | ZIP。プロジェクトを解凍し、最初のヘッダファイルをProjucerで開いてください。
このプロジェクトのPIPバージョンを使用する場合は、Resourcesフォルダを生成されたProjucerプロジェクトにコピーしてください。
この手順でサポートが必要な場合は、チュートリアル:Projucer Part 1: Projucerを始めようを参照してください。
デモプロジェクト
このプロジェクトはプラグインとして構想されていますが、IDEで適切なデプロイメントターゲットを選択することでスタンドアロンアプリケーションとして実行できます。Xcodeでは、以下のスクリーンショットに示すように、メインウィンドウの左上隅でターゲットを変更できます:

デモプロジェクトは、プラグインの上半分に画面上のMIDIキーボード、下半分にオシロスコープを通じた信号の視覚的表現を提供します。現在、キーを押すと、プラグインはいくつかのリバーブが追加された基本的なオシレーターサウンドを出力します。
AudioEngineクラスでリバーブプロセッサをコメントアウトすることで、チュートリアルの各ステップでの変化を明確に聴くためにリバーブを削除してください。
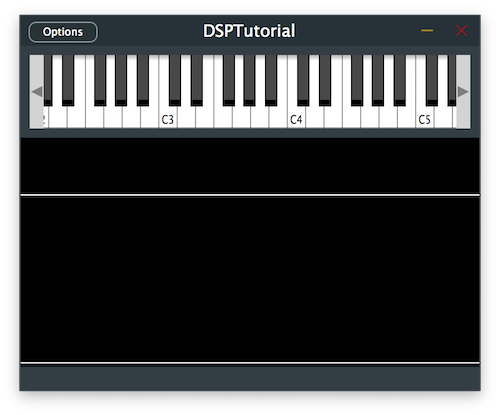
MIDIコントローラーをお持ちの場合は、このチュートリアル全体で画面上のキーボードの代わりに接続することもできます。
イントロダクション
このチュートリアルでは、異なる方法で信号処理を可能にする2つの新しいDSPコンセプトを紹介します:ウェーブシェイピングとコンボリューション。
まず、このDSP用語を定義しましょう。
ウェーブシェイピングとは?
ウェーブシェイピングは、元の信号に適用される伝達関数によって特定の信号を別のものに形成するプロセスです。例えば、シンプルなサイン波は、数学関数を適用することで異なる波形に形成できます。
ウェーブシェイパーは、特定の伝達関数を適用するときに元の信号に倍音成分を追加することで、ディストーションを効果的に作成するために使用できます。ご存知かもしれませんが、矩形波と三角波は本質的に奇数倍音が追加されたサイン波であり、ノコギリ波は奇数と偶数の倍音が組み合わされたサイン波です。
この事実を知っていれば、ディストーションを作成する1つの方法は、サイン波の形状を矩形波に近づけることです。では、伝達関数を使用してそれをどのように達成できるでしょうか?
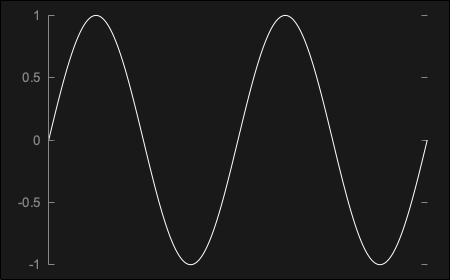
例えば、以下のようにプロットできるシンプルなサイン波sin(x)を考えてみましょう:
サイン波に符号関数伝達関数を適用することで、本質的に入力された数値の符号を出力する関数により、矩形波を完全に表すsgn(sin(x))になります:
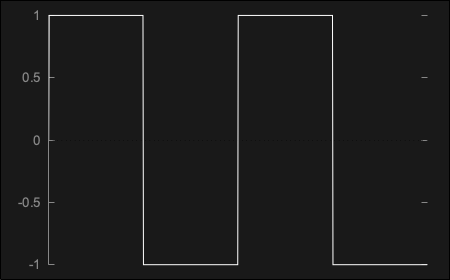
しかし、この完璧な波形は、曲線の硬いエッジにより、ハードクリッピングと呼ばれる過酷なディストーションを作成するため、問題があります。この種の波形はアナログドメインで再現するには「完璧すぎ」、したがってほとんどのアナログシンセサイザーによって作成される矩形波のようには聴こえません。
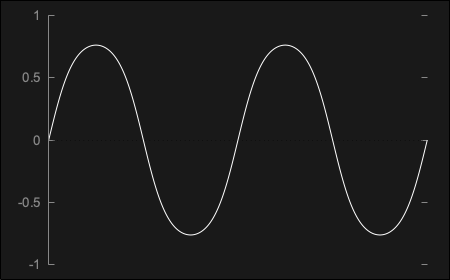
ソフトクリッピングと呼ばれるより穏やかな種類のディストーションを作成するために、双曲線タンジェント伝達関数tanh(sin(x))を使用でき、これはサイン波にほぼ似ていますが、以下に示すようにより丸い曲線を持つ信号を出力します:
次に、矩形に似た形状に到達するために、伝達関数を適用する前に信号をクリッピングまでブーストできますtanh(n*sin(x))。これは本質的にベル形状の上部を切り取り、以下に示すようにソフトエッジの矩形波にします:
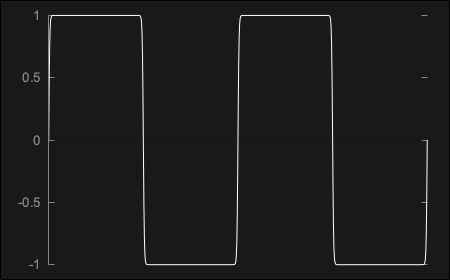
ご覧のとおり、ウェーブシェイピングの可能性は無限であり、どんなタイプの伝達関数でも入力信号に適用できます。
JUCEでは、DSPモジュールに含まれるdsp::WaveShaperクラスでウェーブシェイピングを実行できます。
コンボリューションとは?
コンボリューションは、問題の空間の特性を記述する事前に録音されたインパルスレスポンスを使用して、特定の空間の残響特性をシミュレートすることで構成されます。このプロセスにより、本質的に各データサンプルをインパルスレスポンスサンプルに対して乗算して組み合わせた出力を作成することで、入力信号にあらゆるタイプの音響プロファイルを適用できます。
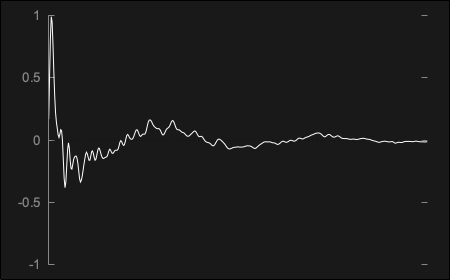
インパルスレスポンスは、プロファイルする空間で短いインパルスを録音することで生成されるオーディオファイルですが、必ずしも実際の物理的空間である必要はありません。例えば、以下に示すように、キャビネットを通じてインパルスを再生し、その効果を録音することで、ギターアンプのプロファイルをキャプチャできます:
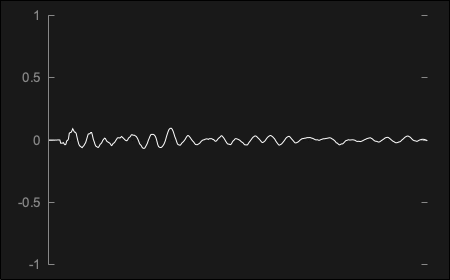
同じことをカセットレコーダーを通じて行い、生成されたインパルスレスポンスは以下のとおりです:
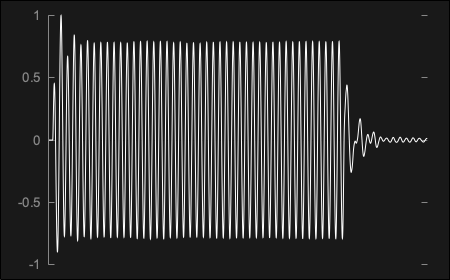
入力信号がインパルスレスポンスでコンボルブされると、元のドライ信号は両方の特性を保持するウェットな残響対応物に変換されます。例えば、上に示したギターアンプのインパルスレスポンスを通じてコンボルブされた100ms 440Hzのサイン波の出力は、以下の結果を生成します:
前に提示したカセットレコーダーのインパルスレスポンスを通じた同じサイン波信号は、この波形を生成することになります:
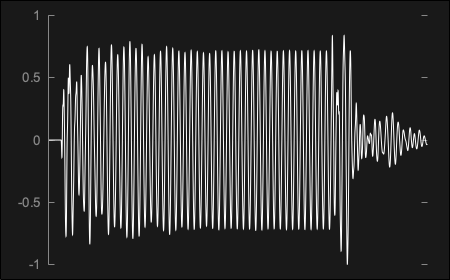
ご覧のとおり、コンボリューションの可能性は無限であり、どんなタイプのインパルスレスポンスでも入力信号に適用できます。
JUCEでは、DSPモジュールに含まれるdsp::Convolutionクラスでコンボリューションを実行できます。
ウェーブシェイパーの統合
Distortionクラスで、juce::dsp::WaveShaperプロセッサをテンプレート引数として持つjuce::dsp::ProcessorChainを追加します[1]。また、後で対応するプロセスをインデックスで明確に参照できるように、プロセッサインデックスを持つenumを定義します[2]。
private:
//==============================================================================
enum {
    waveshaperIndex // [2]
};

juce::dsp::ProcessorChain<juce::dsp::WaveShaper<Type>> processorChain; // [1]
};
reset()関数で、プロセッサチェーン内のウェーブシェイパーのreset関数を呼び出します[3]。
void reset() noexcept
{
    processorChain.reset(); // [3]
}
prepare()関数で、プロセッサチェーン内のウェーブシェイパーのprepare関数を呼び出します[4]。
void prepare (const juce::dsp::ProcessSpec& spec)
{
    processorChain.prepare (spec); // [4]
}
次に、ウェーブシェイパーが入力信号を形成するために使用する伝達関数を定義します。このチュートリアルのイントロダクションセクションで説明したように、まずハードクリッピング関数から始めましょう。
コンストラクタで、プロセスのインデックスを提供してprocessorChain.get<>()メソッドを使用してWaveShaperへの参照を取得します[5]。値を-0.1 .. 0.1の範囲に制限するラムダ関数を使用してウェーブシェイパーを初期化しましょう[6]。
public:
//==============================================================================
Distortion()
{
    auto& waveshaper = processorChain.template get<waveshaperIndex>(); // [5]
    waveshaper.functionToUse = [] (Type x) {
        return juce::jlimit (Type (-0.1), Type (0.1), x); // [6]
    };
}
process()関数で、プロセッサチェーン内のウェーブシェイパーのprocess関数を呼び出すことができます[7]。
template <typename ProcessContext>
void process (const ProcessContext& context) noexcept
{
    processorChain.process (context); // [7]
}
Distortionクラスで上記の変更を実装した後にこのコードを実行すると、オシレーター信号へのウェーブシェイパーの効果が聴けるはずです。
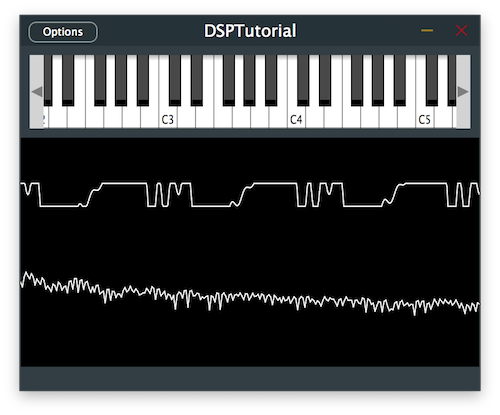
演習:値を-0.5 .. 0.5の間に制限することで、伝達関数で発生するリミッティングの量を変更してみてください。サウンドに違いを感じますか?
伝達関数の変更
ウェーブシェイパーのクリッピングを双曲線タンジェントに変更して、少しソフトにしましょう。
プロセッサチェーンにjuce::dsp::WaveShaperの間に2つのjuce::dsp::Gainプロセッサを追加し[1]、enumにプリゲイン[2]とポストゲイン[3]として対応するインデックスを追加します。これにより、ウェーブシェイパーに入る信号のレベルを調整し、出てくるレベルを制御できるようになり、伝達関数の動作に影響を与えます。
private:
//==============================================================================
enum {
    preGainIndex, // [2]
    waveshaperIndex,
    postGainIndex // [3]
};

juce::dsp::ProcessorChain<juce::dsp::Gain<Type>, juce::dsp::WaveShaper<Type>, juce::dsp::Gain<Type>> processorChain; // [1]
};
コンストラクタで、このチュートリアルのイントロダクションで説明したように、伝達関数を双曲線タンジェントに変更します[4]:
public:
//==============================================================================
Distortion()
{
    auto& waveshaper = processorChain.template get<waveshaperIndex>();
    waveshaper.functionToUse = [] (Type x) {
        return std::tanh (x); // [4]
    };

    auto& preGain = processorChain.template get<preGainIndex>(); // [5]
    preGain.setGainDecibels (30.0f); // [6]

    auto& postGain = processorChain.template get<postGainIndex>(); // [7]
    postGain.setGainDecibels (-20.0f); // [8]
}
ここでは、プリゲインプロセッサへの参照を取得し[5]、ウェーブシェイパーに入る信号を30dBブーストします[6]。次に、ポストゲインプロセッサへの参照を取得し[7]、ウェーブシェイパーから出てくるレベルを20dB下げます[8]。
プログラムを実行すると、異なるディストーションサウンドが得られるはずです。
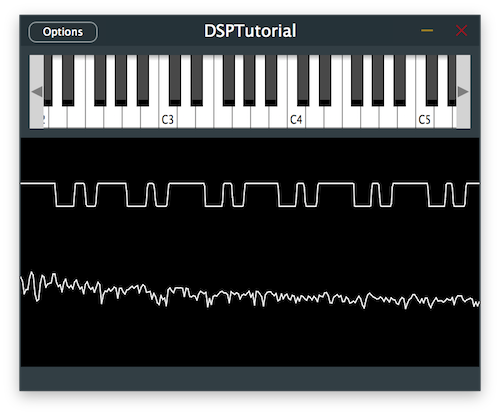
演習:ウェーブシェイパーで使用される伝達関数を符号関数に変更してみてください。サウンドに違いを感じますか?
フィルターの調整
ウェーブシェイパーで低周波コンテンツをディストーションすると、ディストーションされたサウンドが非常に濁りやすくなることに気づいたかもしれません。ウェーブシェイパーで信号を処理する前にハイパスフィルターを導入することで、この問題を軽減できます。
モノフィルターをマルチチャンネルバージョンに簡単に変換するために、juce::dsp::IIR::Filterとjuce::dsp::IIR::Coefficientsクラスをテンプレート引数として持つjuce::dsp::ProcessorDuplicatorを追加します[1]。長いクラス名を簡略化するために、「using」キーワードで短い名前を使用し、enumに対応するインデックスを追加します[2]。
private:
//==============================================================================
enum {
    filterIndex, // [2]
    preGainIndex,
    waveshaperIndex,
    postGainIndex
};

using Filter = juce::dsp::IIR::Filter<Type>;
using FilterCoefs = juce::dsp::IIR::Coefficients<Type>;

juce::dsp::ProcessorChain<juce::dsp::ProcessorDuplicator<Filter, FilterCoefs>,
    juce::dsp::Gain<Type>,
    juce::dsp::WaveShaper<Type>,
    juce::dsp::Gain<Type>>
    processorChain;
};
prepare()関数で、フィルタープロセッサへの参照を取得し[3]、makeFirstOrderHighPass()関数を呼び出してハイパスフィルターのカットオフ周波数を1kHzに指定します[4]:
void prepare (const juce::dsp::ProcessSpec& spec)
{
    auto& filter = processorChain.template get<filterIndex>(); // [3]
    filter.state = FilterCoefs::makeFirstOrderHighPass (spec.sampleRate, 1000.0f); // [4]

    processorChain.prepare (spec);
}
信号の低周波数が減衰し、よりクリアなサウンドになるはずです。
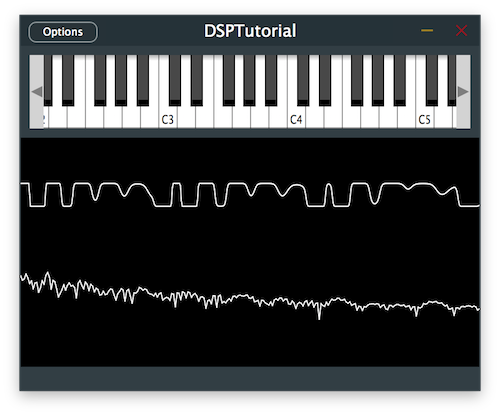
演習:ウェーブシェイピング前に異なるタイプのフィルターを実験し、ディストーションされた信号の倍音成分がどのように変化するか注意してください。
キャビネットシミュレーターの実装
コンボリューションを使用してギターキャビネットをシミュレートすることで、サウンドにさらに特徴を加えましょう。
CabSimulatorクラスで、プロセッサチェーンにjuce::dsp::Convolutionプロセッサを追加し[1]、enumに対応するインデックスを追加します[2]。
private:
//==============================================================================
enum {
    convolutionIndex // [2]
};

juce::dsp::ProcessorChain<juce::dsp::Convolution> processorChain;
};
reset()関数で、プロセッサチェーン内のコンボルバーのreset関数を呼び出します[3]。
void reset() noexcept
{
    processorChain.reset(); // [3]
}
prepare()関数で、プロセッサチェーン内のコンボルバーのprepare関数を呼び出します[4]。
private:
//==============================================================================
enum {
    convolutionIndex // [2]
};

juce::dsp::ProcessorChain<juce::dsp::Convolution> processorChain;
};
次に、コンボルバーが入力信号を残響させるために使用するインパルスレスポンスを指定します。このチュートリアルのイントロダクションセクションで説明したように、プロジェクトのResourcesフォルダに含まれるギターアンプのインパルスレスポンスでコンボリューションプロセッサをロードしましょう。
コンストラクタで、プロセスのインデックスを提供してprocessorChain.get<>()メソッドを使用してConvolutionプロセッサへの参照を取得します[5]。Resourcesフォルダからオーディオファイルをロードしてギターアンプのインパルスレスポンスでコンボルバーを初期化しましょう[6]。
CabSimulator()
{
    auto dir = juce::File::getCurrentWorkingDirectory();

    int numTries = 0;

    while (!dir.getChildFile ("Resources").exists() && numTries++ < 15)
        dir = dir.getParentDirectory();

    auto& convolution = processorChain.template get<convolutionIndex>(); // [5]

    convolution.loadImpulseResponse (dir.getChildFile ("Resources").getChildFile ("guitar_amp.wav"),
        juce::dsp::Convolution::Stereo::yes,
        juce::dsp::Convolution::Trim::no,
        1024); // [6]
}
プロジェクトのResourcesフォルダに「guitar_amp.wav」ファイルが存在することを確認してください。
process()関数で、プロセッサチェーン内のコンボルバーのprocess関数を呼び出すことができます[7]。
template <typename ProcessContext>
void process (const ProcessContext& context) noexcept
{
    processorChain.process (context); // [7]
}
Distortionクラスで、ゲイントリムを削除するか、減衰レベルを0dBに設定します[8]。信号は、信号チェーンでディストーションの後に発生するコンボリューションプロセスを通じて自然に減衰されるためです:
public:
//==============================================================================
Distortion()
{
    auto& waveshaper = processorChain.template get<waveshaperIndex>();
    waveshaper.functionToUse = [] (Type x) {
        return std::tanh (x);
    };

    auto& preGain = processorChain.template get<preGainIndex>();
    preGain.setGainDecibels (30.0f);

    auto& postGain = processorChain.template get<postGainIndex>();
    postGain.setGainDecibels (0.0f); // [8]
}
プログラムを実行して、どのように聴こえるか確認しましょう。
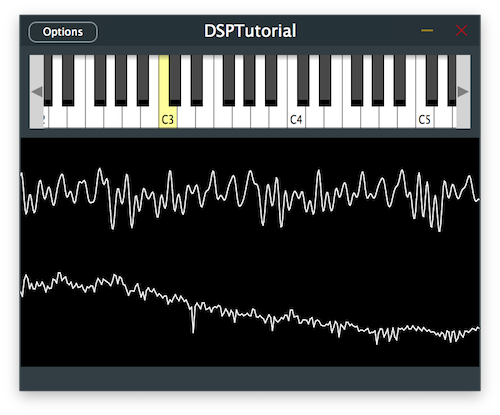
演習:Resourcesフォルダに含まれるカセットレコーダーのインパルスレスポンスをロードし、コンボルブされたサウンドがどれほど劇的に変化するか注意してください。
このコードの修正版のソースコードは、デモプロジェクトのDSPConvolutionTutorial_02.hファイルにあります。
まとめ
このチュートリアルでは、ウェーブシェイピングとコンボリューションを組み込む方法を学びました。特に以下のことを行いました:
- ウェーブシェイピングとコンボリューションの基本を学びました。
- ハードクリッピングウェーブシェイパーを統合してディストーションを作成しました。
- ウェーブシェイパーの伝達曲線を双曲線タンジェントに変更しました。
- コンボリューション技術でキャビネットシミュレーターを実装しました。
このチュートリアルのパート1に戻って、オシレーターとフィルターについて復習しましょう:チュートリアル:DSP入門
このチュートリアルのパート3をチェックして、ディレイラインを追加する方法を学びましょう:チュートリアル:ディレイラインによる弦モデルの作成