Projucerパート1:Projucerを始める
このチュートリアルでは、JUCEのインストール方法と、Projucerを使用して新しいクロスプラットフォームJUCEプロジェクトを作成する方法を説明します。また、JUCEアプリケーションを開発、実行、デバッグするために、プロジェクトをXcodeやVisual StudioなどのIDEにエクスポートする方法も学びます。
レベル初心者
プラットフォーム:Windows, macOS, Linux, iOS, Android
スタート
Download JUCE.JUCEフォルダを解凍し、コンピュータの任意の場所に置きます。ユーザのホームフォルダが便利です。
先ほどインストールしたJUCEフォルダに入ります。そこにあるProjucerを起動します。
新しいプロジェクト・ウィンドウ
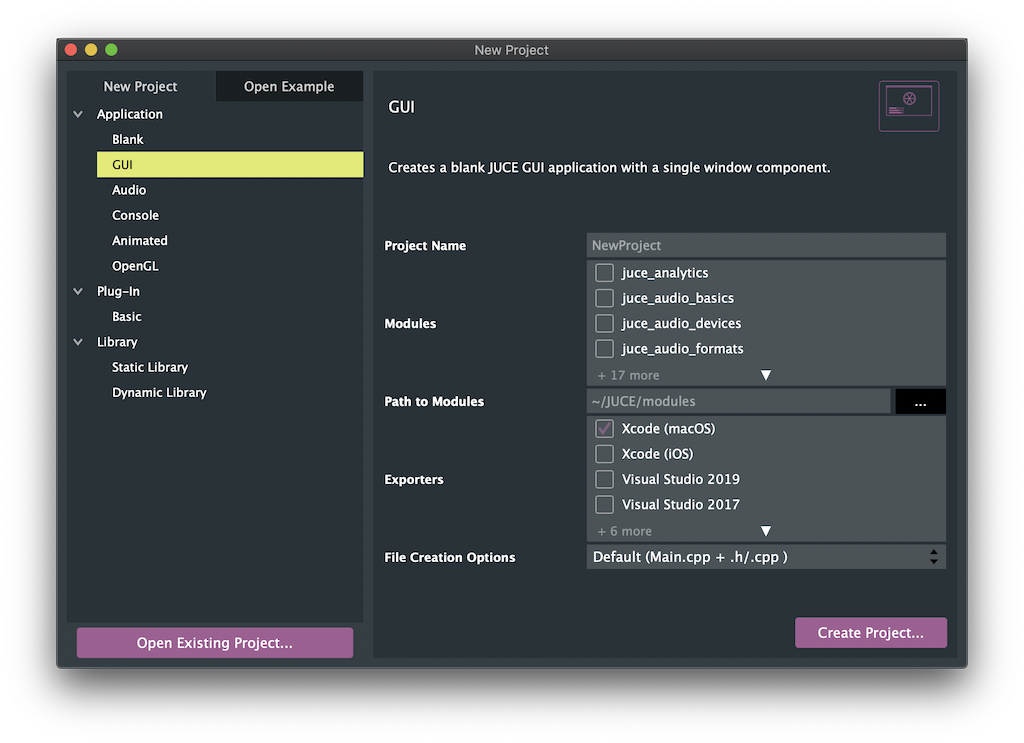
Projucerを初めて起動すると、新しいプロジェクト・ウィンドウが表示されます。(後で新プロジェクトProjucerのメインメニューから):

プロジェクトタイプを選択
ウィンドウの左側で、作成したいプロジェクトのタイプを選択します。
プロジェクト・タイプごとに、Projucerはすべてのプロジェクト・ファイルを生成し、すべてをセットアップする適切な最小限のコードを追加します。このようにして、プロジェクトを作成した後、すぐに実際の機能の開発に取り掛かることができます。
初めてJUCEを使う場合で、何から始めたらよいかわからない場合は、GUIアプリケーションを試してみてください。
以下は、現在サポートされているすべてのプロジェクトタイプの概要です。
| プロジェクトの種類 | 説明 |
|---|---|
| アプリケーション/ブランク | これにより、空白のJUCEアプリケーションが作成されます。 |
| アプリケーション/GUI | これにより、空のアプリケーション・ウィンドウを持つ最小限のJUCEアプリケーションが作成されます。ここから始めて、JUCEが提供する様々なクラスを使って、より多くのGUIコンポーネントなどの機能を追加することができます。 |
| アプリケーション/オーディオ | これは、次のような最小限のJUCEアプリケーションを作成�します。アプリケーション/GUIしかし、オーディオ入出力を簡単に行うために必要なすべてのセットアップコードを自動的に追加します。ゲームやマルチメディア・アプリケーションなど、様々な用途にお使いいただけます。 |
| アプリケーション/コンソール | JUCEは、GUIを全く持たないコマンドラインアプリケーションを開発するのにも非常に便利です。そのようなアプリケーションを作成するには、このプロジェクト・タイプを使ってください。 |
| アプリケーション/アニメーション | これは、アニメーションのグラフィック表示を描画するアプリケーションを作成します。例えば、アニメーション・モバイル・アプリケーションを作成するには、ここから始めることができる。 |
| アプリケーション/OpenGL | これは、次のような空白のJUCEアプリケーションを作成します。アプリケーション/GUIしかし、3DモデルのインポートやGLSLシェーダーを含む描画機能にはOpenGLのサポートが追加されています。 |
| プラグイン/ベーシック | これは基本的なオーディオプラグインを作成します。VST、AudioUnit、AAXプラグインフォーマットをサポートするすべてのコードが自動的に追加されます。セットアップによっては、このプロジェクトタイプを正しく動作させるために、追加の準備手順が必要になる場合があります。参照Tutorial: Create a basic Audio/MIDI plugin, Part 1: Setting upをご覧ください。 |
| ライブラリ/静的, ライブラリ/�動的 | このプロジェクト・タイプは、JUCEの上に構築する再利用可能なソフトウェア・ライブラリを作成するのに便利です。Projucerは、静的リンクと動的リンクの両方のライブラリの作成をサポートしています。 |
また、プロジェクトの出発点として使用できるサンプル・プロジェクトも数多くあります。JUCE/examplesをクリックして閲覧できます。オープン例タブ
選択したプロジェクトタイプによって制限されることはありません。アプリケーション/GUIアニメーションやOpenGLはいつでも後から追加できます。しかし、アプリケーションをライブラリやオーディオプラグインに後から簡単に変換することはできません。
新しいプロジェクトを作成する
適切なプロジェクトタイプを選択した後、ウィンドウの右側にある追加のプロジェクト設定を入力できます:
- プロジェクト名- ここでアプリの名前を決めます。
- モジュール- JUCEフレームワークのコードは以下のように構成されています。モジュール.ここで、どのモジュールをプロジェクトに含めるかを選択し、その下のセクションで
modulesサブフォルダは、先にインストールしたJUCEフォルダの中にあります。 - 輸出業者- ここで、アプリのビルドとデバッグに使用するネイティブIDEを選択します。また、アプリがサポートするデスクトップとモバイルのプラットフォームも定義します。Projucerでは、後からプラットフォームやIDEを追できますす。
Projucerには現在、以下のIDE、ビルド・システム、プラットフォーム用のエクスポータがあります:
| 対象OS | 対応ビルドシステム |
|---|---|
| オーエスエックス | エックスコード |
| ウィンドウズ | ビジュアルスタジオ、Code::Blocks |
| リナックス | Makefile, Code::Blocks |
| iOS | エックスコード |
| アンドロイド | アンドロイドスタジオ |
- File制作オプション- プロジェクトの種類によっては、このフィールドに自動生成するコードの選択肢があります。JUCEに慣れていない場合、必要なも��のをすべて自動生成し、すぐに使い始めるには、通常デフォルトの選択が最適です。
- すべての設定を確認したら**プロジェクトを作成...**ボタンをクリックすると、指定した場所にプロジェクトが生成されます。
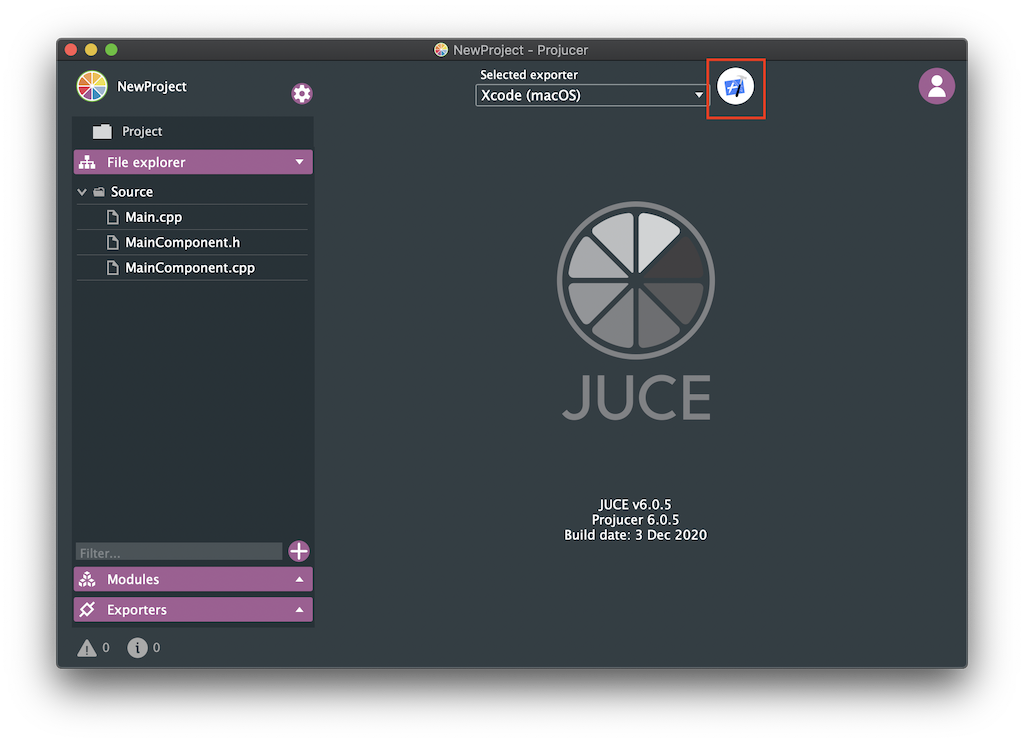
プロジェクトをエクスポートし、ネイティブIDEで開きます。
プロジェクトを作成したら、Projucerから直接ネイティブIDEを起動できます。一番上のボタンを使ってください:

IDE(Xcode、Visual Studioなど)を開いたので、JUCEアプリをコンパイルして実行し、コーディングを始めることができます!
使用する前に、適切なネイティブIDE/ビルド・システムをコンピューターにインストールする必要があります。プラットフォームによっては、追加の依存関係をインストールする必要がある場合もあります。たとえば、Android向けに開発するにはAndroid SDKをインストールする必要があります。
すべてのエクスポートターゲット(ネイティブIDEプロジェクト)は、Projucerプロジェクトを作成するときに生成されます。また、Projucerで保存するたびに更新されます。いつでも新しいエクスポート・ターゲットを作成して、プロジェクトにさらに多くのIDEやプラットフォームのサポートを追加できます。Projucerプロジェクトを管理するためのこの他の機能については、以下を参照してください。Tutorial: Projucer Part 2: Manage your Projucer projects.
既存のプロジェクトを開く
既存のProjucerプロジェクトを開くには、次のいずれかをダブルクリックします。.jucerファイルをクリックするか、プロジェクトフォルダ内の既存のプロジェクトを開くをウィザードから選択します。(に移動することもできます。**オープン...**Projucerのメインメニューから)。
pipファイルを開く
あなたは次のような場面に出くわすかもしれない。Projucerインスタント・プロジェクト(pip)ファイルです。これらは基本的にヘッダファイルで、通常の.hこの拡張機能は、Projucerにメタデータを提供し、1つのファイルから正しいモジュールとエクスポータを持つプロジェクトを自動的に作成します。
pipファイルを開くには、同様に**オープン...**ダイアログを開くか、Projucerのインタフェースウィンドウにドラッグ&ドロップする。
概要
このチュートリアルを読めば、次のことができるようになるはずだ:
- JUCEをインストールする。
- Projucerを使って新しいプロジェクトを作成する。
- このプロジェクトをOSXのXcodeやWindowsのVisual StudioなどのネイティブIDEにエクスポートします。
- ターゲットとするプラットフォームのネイティブIDEでアプリをコンパイル、実行、デバッグする。
- 既存のプロジェクトとpipファイルをProjucerで開きます。